
Let's create a simple interface to allow our users to change the features of the AR objects they are seeing. Let's get started:
- First, right-click on the Hierarchy window and select UI|Canvas. The Canvas element is the main element on the Unity interface and contains all the other elements:

- By default, the Canvas is located in the (0,0) point, facing back, overlaying the whole 3D scene, and with the current screen size. Double-click on its name in the Hierarchy window so that the scene focuses on it.
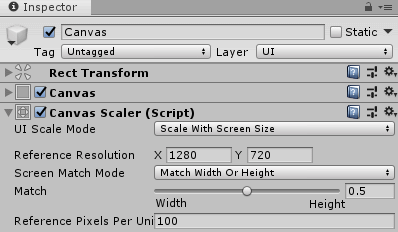
- In the Inspector window, include the following values for Canvas Scaler:
- UI Scale Mode: Scale With Screen Size. With this parameter, we are telling the canvas to adapt itself to the different screen sizes (useful when compiling for different mobile devices).
- For Reference Resolution, we will use 1280 x 720.
- Screen Match Mode allows us to adapt the UI elements to the width and/or height of the screen. A value of 0.5 tells it to adapt to both:
To manipulate the UI elements (move, scale, and so on), select their specific tool in the toolbar:
![]()
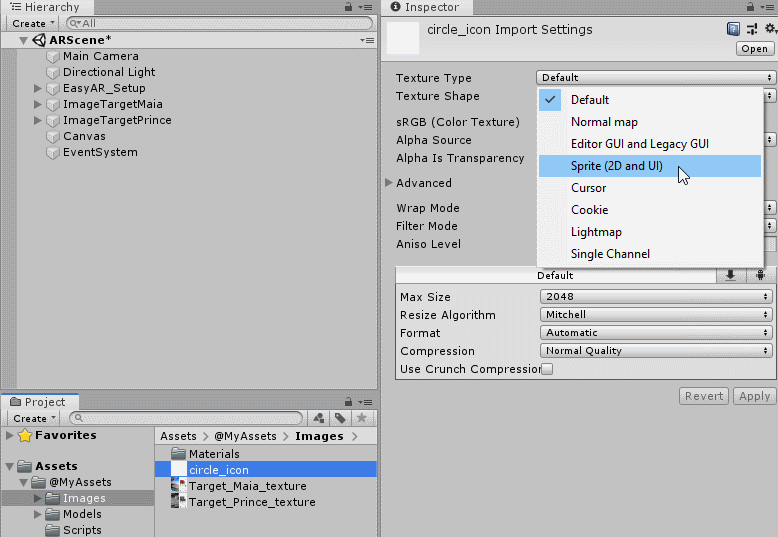
- We are going to use an icon for our color button. For that, import the circle_icon.png image into Assets/@MyAssets/Images. Select it in the Project window. Then, in the Inspector window, modify its Texture Type so that it's Sprite (2D and UI) in order to use it in the UI. Then press Apply to save this change:
- Now, right-click on Canvas in the Hierarchy window and select UI/Button:

- We don't need the text component that comes with the Button, so right-click on it and Delete it:

- Change the button's name to Color_button and assign the icon we previously imported into its Image component to Source Image. Click on the Preserve Aspect checkbox to make sure it's always round:

- Now, let's place the button in the top-right corner of the screen. For the Rect Transform component, click on the square and select the top-right option to move the button's anchors:

- Then, change the PosX, PosY, Width, and Height values to adjust the button's position and scale, as follows:

- Now, with the button selected, under the Button component on the Inspector window, go to the On Click () method and press the + symbol to create a new action:

- Drag the EasyAR_Setup element from the Hierarchy window to the None (Object) box and, from the drop-down menu on the right, select MainController|ChangeColor. With this, we are telling the UI that whenever the Color_button is pressed, the ChangeColor() method from the MainController class that's attached to the EasyAR_Setup GameObject will be executed:

- Play the scene to test it. You will see that when you click on Color_button, the texture of the chairs changes. However, there is still a small detail: the button is not intuitive because it doesn't change its own color. To solve this, we are going to add a few lines to our code in Visual Studio.
- Go back to Visual Studio and in the MainController script import the UnityEngine UI library at the beginning of the file:
using UnityEngine.UI;
- Add the following variables before the Start() method:
public Image color_button;
private Color32 red = new Color32(159, 40, 40, 255);
private Color32 blue = new Color32(40, 74, 159, 255);
We'll use the first one to assign the button in Unity editor (that's why it's public) and the two colors as reference.
- Add the following line inside the Start() method, after the loop segment, to initialize the button to red:
color_button.color = red;
- Add the following lines inside the ChangeColor() method:
if (color_button.color == red)
 color_button.color = blue;
else
 color_button.color = red;
Here, we are telling the button to evaluate the current color and, if it's red, to change it to blue and vice versa. This way, the button will change its color at the same time as the textures of the seats do.
- Finally, in the Unity editor, drag the Color_button GameObject to the Color_button variable on the EasyAR_Setup GameObject to assign it:

-
Save and test the scene in the editor to see how the button changes color initially and whenever it's pressed.
- Now, Build And Run the app in your mobile device and enjoy seeing how the seats come to life in AR:

You can move the camera around the seats, get close to them, or move the targets to see them in detail. You can press the color button to switch their texture color. Now that the app is complete, you can even delete the Quad planes from the scene since they are no longer needed. With this, your project is ready.