
Initially developed by Qualcomm, and currently run by PTC, Vuforia is one of the oldest and most well-known AR SDKs. It's one of the most stable and best-performing pieces of software on the market and, along with ARKit and ARCore, one of the favorite choices for AR developers.
Vuforia offers a wide variety of features, including 2D images and 3D objects tracking, markerless AR where there is no need for a reference image to launch AR content (the one we will be using in this chapter) and barcode-like markers called Vumarks. It provides multiple examples and extra features, such as virtual buttons, runtime image target creation, and background video texture manipulation.
Like other AR software, Vuforia requires a license for it to be deployed on mobile devices. Vuforia offers a free development key generator, which will have to be switched to a deployment key when the app is in the production stage. You can consult its pricing options on their web page: https://developer.vuforia.com/pricing.
The Vuforia SDK can be downloaded for Android and iOS, and can also be used in the Unity 3D platform. Since the Unity 2017.2 version, it comes directly integrated into the Unity editor, just like any other main asset, and it has to be installed and activated inside it. Now, we'll incorporate Vuforia into a new project and set it up so that we can build it on an Android device. Let's get started:
-
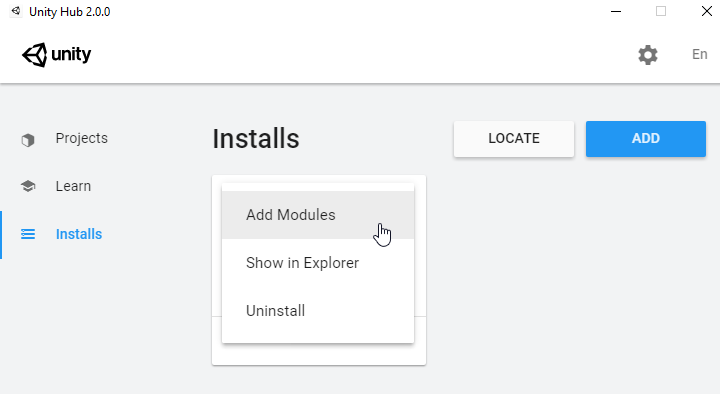
When you first installed Unity on your computer (see Chapter 2, Introduction to Unity for AR Development), you should have selected the option of adding the Vuforia module. If you didn't install it or you are in doubt, open the Unity Hub, go to the Installs tab, and check the installed modules at the bottom of your Unity version:

-
If Vuforia is not there, click on the top-right button and click on Add Modules. Select Vuforia and install it:
-
Now, open the Unity Hub. On the Projects tab, click on NEW:

- Fill in the Project Name and Location fields and click on CREATE:

- Click Ctrl + N or go to File|New Scene. Now, press Ctrl + S or go to File|Save. Name the file OnTheGo and save it in the Scenes folder:

- You can also delete the SampleScene that comes with the project from the Project window:

- AR requires a special camera that retrieves the physical camera feed and processes it so that we can integrate the virtual elements into the real image stream. Vuforia provides an asset called AR Camera that does this for us. Delete the existing Unity Main Camera, right-click on the Hierarchy window, and select Vuforia Engine|AR Camera:

- Since it's the first time we're using Vuforia in the project, a message will appear asking us to import Vuforia's assets. Click Import:
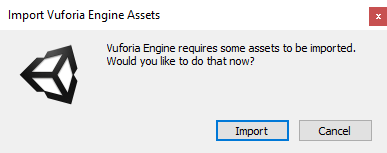
A new folder called Vuforia will appear in the Project window, inside the Assets folder.
- Place the Directional Light inside the AR Camera so that the light moves along with the camera.
- Now, we have to enable Vuforia in the Player Settings so that we can use it in the scene:

- Press Ctrl + Shift + B or go to File|Build Settings... to open the Build Settings window.
- Before anything else, click on Add Open Scenes to include our scene in the building scenes list.
- Then, switch platforms by clicking on Android and pressing Switch Platform in the bottom-right corner. With this, we will have configured our project so that it can be built on an Android device:

- Now, click on Player Settings... to open a new window.
- Fill in the Company Name and Product Name (the name the app will have when we install it on a device).
- In the last tab, XR Settings, enable Vuforia Augmented Reality Supported to allow the use of Vuforia in this project:

- A new message will appear indicating that XR is not supported by the Vulkan graphics API. To fix this, open the Other Settings tab and remove Vulkan from Graphics APIs:

- Below this, fill in the Identification section's Package Name and minimum API Level:

- This step is not always required but it might be the case that the Vuforia version that's been installed with your Unity version is not the latest one. If so, when selecting the ARCamera, a message will appear on the Vuforia Behaviour component indicating that a new version is available:

- Click on the link to download the executable and follow the steps to install it:

- When updating Vuforia, make sure you install it in your Unity root folder, usually in C:/Program Files/Unity/Hub/Editor/{unity_version_name}, and close your currently running Unity session if asked. If a message appears asking you to update your project, click Update. Vuforia will now be up to date in your project:

Now that we know how to integrate Vuforia into a new project, we will start using its Ground Plane feature to create an app that detects flat surfaces and places 3D content on them.