
Now that we have our label to display messages to the user, let's use the session methods we already have in our ViewController class and create new ones to display useful information, as shown in the following steps:
- In the ViewController.swift file, within the didFailWithError session, add a new message:
func session(_ session: ARSession, didFailWithError error: Error) {
    infoLabel.text = "Session failed : (error.localizedDescription)."
}
This message will appear when there is an error in the ARSession.
- In the sessionWasInterrupted method, add the following message:
func sessionWasInterrupted(_ session: ARSession) {
    infoLabel.text = "Session was interrupted."
}
This will be executed when the session is interrupted; for example, when the app is minimized.
- In the sessioInterruptionEnded method, add the following message and code:
func sessionInterruptionEnded(_ session: ARSession) {
    infoLabel.text = "Session interruption ended."
    let configuration = ARWorldTrackingConfiguration()
    configuration.planeDetection = .horizontal
    sceneView.session.run(configuration, options: [.resetTracking, .removeExistingAnchors])
}
When the session interruption finishes, we have to reset the tracking. For that, we will create the configuration parameter again and run the session by removing the previously existing anchors.
- Now, let's create a new method that will detect whenever the tracking state has changed:
func session(_ session: ARSession, cameraDidChangeTrackingState camera: ARCamera) {
    let message: String

    switch camera.trackingState {
    case .normal where session.currentFrame!.anchors.isEmpty:
        message = "Move the device around to detect horizontal surfaces."
    case .notAvailable:
        message = "Tracking unavailable."
    case .limited(.excessiveMotion):
         message = "Tracking limited - Move the device more slowly."
    case .limited(.insufficientFeatures):
        message = "Tracking limited - Point the device at an area with visible surface detail, or improve lighting conditions."
    case .limited(.initializing):
        message = "Initializing AR session."
    default:
        message = ""
    }
    infoLabel.text = message
}
Your Xcode window will look like the following screenshot:
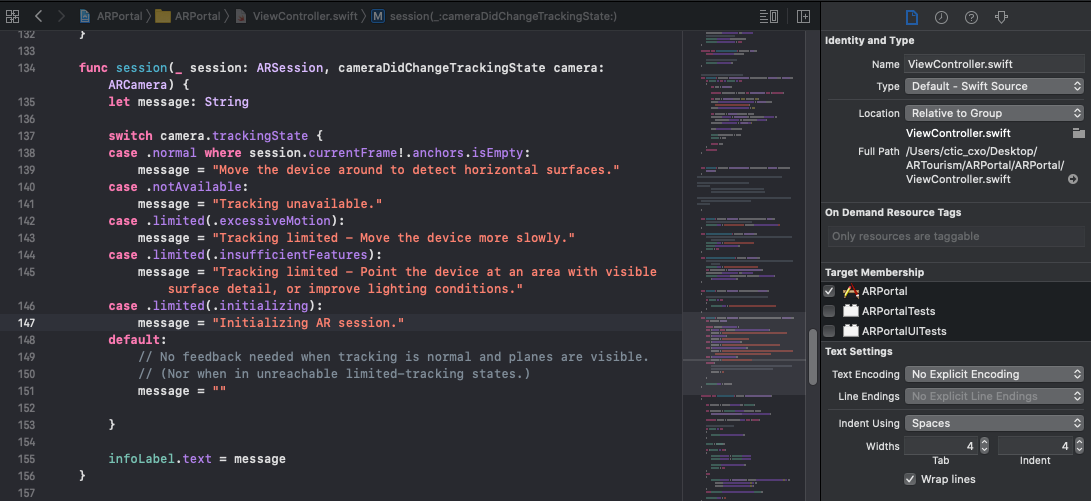
This method checks the tracking state and displays messages when the session is initializing or there are problems. We also display a message when the tracking state is normal, but we haven't found a plane anchor yet, so the user keeps looking around.
- Now, we have to notify the user when an anchor has been added so that they don't have to look around anymore. For that, we are going to use ARSessionDelegateProtocol. The first thing we will do is add the delegate to the class, as shown in the following code:
class ViewController: UIViewController, ARSCNViewDelegate, ARSessionDelegate {
The class declaration will look as follows:

- In the viewWillAppear method, just after the sceneView.session.run(configuration) line, add the following code:
sceneView.session.delegate = self
With this line, we assign the delegate to the class. The viewWillAppear method will now look as follows:

- Now, create the new method to show the message when an anchor has been added:
func session(_ session: ARSession, didAdd anchors: [ARAnchor])
{
    infoLabel.text= "New anchor added."
}
- Run the app to see how the label changes according to the state of the camera, as follows:

After the AR has been initialized, the label changes to detecting the horizontal surfaces message, as shown in the following screenshot:

Now that we have our app's base, let's create an AR portal where we will display a door to a virtual 3D painting. Once we physically go through that door, we will find ourselves immersed in that virtual painting.