
The main trick of an AR portal is based on two things: the transparency and the rendering order. We are going to create a wall with an opening (we will call it the door) in the middle, through which we will see the 3D painting. Open the Portal.swift file and follow these steps:
- Create a new method called createWall with the following code:
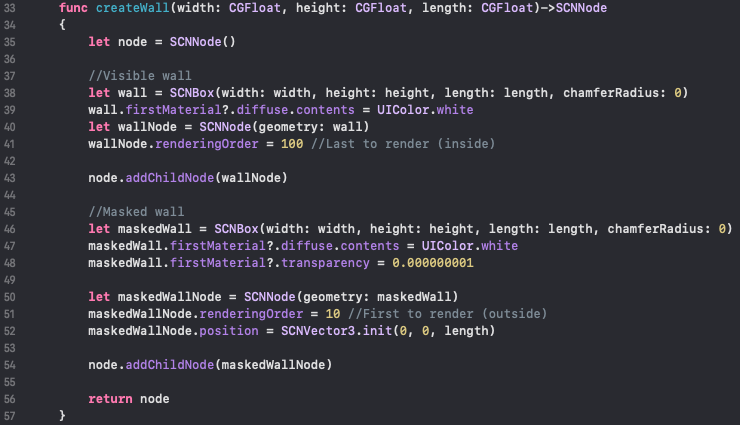
func createWall(width: CGFloat, height: CGFloat, length: CGFloat)->SCNNode {
    let node = SCNNode()

    let wall = SCNBox(width: width, height: height, length: length, chamferRadius: 0)
    wall.firstMaterial?.diffuse.contents = UIColor.white
    let wallNode = SCNNode(geometry: wall)

    node.addChildNode(wallNode)

    return node
}
Here, we created a parent node. Then, we created a box with the given size and set its material to white. We created a node with the box geometry that we attached to the parent node and returned it. This will be our base to create the portal walls:

- Let's create another method called createPortal:
func createPortal() {
}
- Inside it, let's define the variables for the sizes of the walls. Add the following code:
let wallWidth: CGFloat = 2
let doorWidth: CGFloat = 0.8
let topWidth = 2 * wallWidth + doorWidth
let height: CGFloat = 2
let length: CGFloat = 0.05
We will have four walls, that is, on the left, right, top, and bottom of our portal door. The first three have to be big enough to hide the model from being displayed behind the portal. Their length will be the only thing that's displayed (thereby simulating a door to another dimension). The bottom wall will close that opening.
- Now, create the main node and the four walls using the previous method createWall:
let portal = SCNNode()

let leftWall = createWall(width: wallWidth, height: height, length: length)
leftWall.position = SCNVector3(x: Float(-(wallWidth + doorWidth)/2), y: Float(height/2), z: 0)

let rightWall = createWall(width: wallWidth, height: height, length: length)
rightWall.position = SCNVector3(x: Float((wallWidth + doorWidth)/2), y: Float(height/2), z: 0)

let topWall = createWall(width: topWidth, height: height, length: length)
topWall.position = SCNVector3(x: 0, y: Float(height*3/2), z: 0)

let bottomWall = createWall(width: topWidth, height: length, length: length)
bottomWall.position = SCNVector3(x: 0, y: Float(-length/2), z: 0)
- Add the walls to the portal node and then the portal itself to the class' node, as shown in the following code:
portal.addChildNode(leftWall)
portal.addChildNode(rightWall)
portal.addChildNode(topWall)
portal.addChildNode(bottomWall)

self.addChildNode(portal)
Our 3D portal is ready. Your code should appear as follows:

- Now, let's call this method from init. After adding the 3D model, add the following code:
createPortal()
- If we run the app, when we tap on the floor, we will see a white wall, and through its gap, the 3D model. When we cross it, we will find ourselves in the 3D painting, as shown in the following screenshot:

We can also see the walls so that we can go back to the real world:

- However, from the outside, we don't want to see a white wall; the portal should just be an opening in the air (the gap on the wall). To get that effect, let's add another box to the createWall method before the return node call. Add the following code:
let maskedWall = SCNBox(width: width, height: height, length: length, chamferRadius: 0)
maskedWall.firstMaterial?.diffuse.contents = UIColor.white
maskedWall.firstMaterial?.transparency = 0.000000001

let maskedWallNode = SCNNode(geometry: maskedWall)
maskedWallNode.position = SCNVector3.init(0, 0, length)

node.addChildNode(maskedWallNode)
This new wall, located before the other one, has a transparency of near 0 (if set to 0, it is painted black) so that we can see the background. But this alone won't work.
- Add a rendering order of 100 to wallNode and a rendering order of 10 to maskedWallNode, but leave the final code for the createWall method like this:
func createWall(width: CGFloat, height: CGFloat, length:
CGFloat)->SCNNode {
    ...
    wallNode.renderingOrder = 100
    node.addChildNode(wallNode)
    ...
    maskedWallNode.renderingOrder = 10
    node.addChildNode(maskedWallNode)
    return node
}
The createWall method should now look as follows:
-
To finish this, add a rendering order of 200 to modelNode, which we created in the add3DModel method:
func add3DModel() {
    ...
    modelNode.renderingOrder = 200
    self.addChildNode(modelNode)
}
The lower the rendering order, the faster the object will be rendered in the scene. This means that we will see maskedWallNode first, then wallNode, and finally modelNode. This way, whenever the masked wall is in view, the 3D elements behind its surface won't be rendered, leaving us with a transparent surface that will show the camera feed directly. The only part of the 3D painting that will be rendered will be the one that's not covered by the walls, that is, our portal door. Once we go through the portal, we will see the 3D painting in full, and when we look back, we will see our white wall.
- Run the app to see how the portal appears by touching the screen. In the following screenshot, we can see how the masked wall shows us the camera feed hiding the rest of the elements. Here, we can only see the opening from the wall (since we have placed it behind the masked wall in the z axis) and the painting through the opening:

Once inside the painting, if we look back, we will still see the white walls and the opening to go back to the real world, like before.
Now that the scene is ready, let's improve it by adding some texture to the walls.