An important thing to take into account for this project is that the target device is not a phone or tablet, but AR glasses. When working with glasses, the scene view is duplicated (for each eye) and is smaller than that of a tablet or phone. Thus, the UI and the size of its elements have to be adapted accordingly.
As a summary, for this guide, we are going to need the following elements:
- Main message: Some text that occupies most of the screen to provide the main instructions (point at the side of the car, go to the back, and so on).
- Bottom message: Some indication text placed at the bottom of the screen to give secondary instructions combined with AR elements (touch the red elements to see instructions, open the trunk, replace a piece, and so on).
- PDF button: A button for the extra information in PDF format.
- Home button: To return to the initial screen.
Let's create all of them step by step:
- Start by creating a Canvas object in the Hierarchy window:

Adding a Canvas to the scene
When creating the Canvas object (parent to any other UI element), an Event System object, which is in charge of the user events that connect with the UI, is automatically created. If you try to create any UI component (for example, text, button, and so on) before creating the Canvas, Unity will create a Canvas element (with its EventSystem object) and make the new component a child of it.
- In the Inspector window, change the Canvas component's Render Mode from Screen Space - Overlay to World Space and select the ARCamera as Event Camera. This way, the Canvas is placed in the 3D world instead of fixed and can be moved/scaled. In the Rect Transform component, enter the values of the image so that the Canvas is in front of the camera:

Values of the Canvas gameobject
- Let's create the main message. Right-click on the Canvas element in the Hierarchy window and select UI|Text. Name it Main_message:

Creating new text inside the Canvas element
- In the Hierarchy window, change the values on the Rect Transform component to match the following screenshot. Remove the default text, change the Alignment so it's centered in the screen, check the Best Fit checkbox so that the text fills the container, set the Max Size to 80 to ensure it's big enough, and change the Color to white:

Values of the Rect Transform and Text components in the Main_message
- We are now going to create a secondary message panel. As it's going to be very similar to the previous one, we can directly right-click on the previous and select Duplicate:

Duplicating the message
- Change its name to Bottom_message and change its Rect Transform values so its place is at the bottom of the screen:

New message's values
- To create the buttons, right-click on the Canvas element and select UI|Button:

Creating a button element on the Canvas
- Remove the text from it and change the button name to Home_button.
- On the Rect Transform, select anchoring it to the bottom left and copy the values from the image to place it at the bottom left of the screen with an appropriate size for the glasses.
- On the Image component, select the icon_home image as the Source Image, and on the Button component, change the Pressed Color. This way, when the button is clicked, it will change from white to blue:

Home_button's values on the Inspector
- Duplicate the button to create a copy of it and call it File_button. Change its Rect Transform so that you can locate it at the top-right corner of the screen and change its Source Image to icon_file, as follows:

The values of the File_button
- Now, create the last button from scratch, call it OK_button, and place it at the bottom-right corner of the screen. Change its Normal Color to light green:

Values of the Ok_button element
- Select the Text child on the button and change the Rect Transform and Text component parameters so that they match what's shown in the following screenshot:

Values of the Text element inside the Ok_button
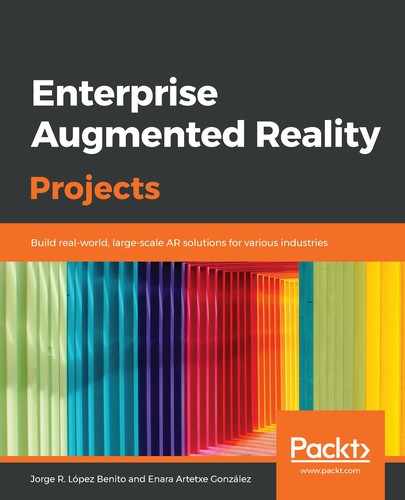
- Your Scene and Game views should now look like this:

Scene and Game views with the created UI
Note that if you press the play button in the Toolbar, you will see that when the real camera feed is launched, the UI disappears. Don't worry about it at this point as we will be adjusting it later in this section.
Now that the UI elements are ready, we are going to add the virtual elements, which will appear in AR, and the logic attached to them.