
Sometimes, attackers use custom encoding/encryption schemes, which makes it difficult to identify the crypto (and the key), and it also makes reverse engineering harder. One of the custom encoding methods is to use a combination of encoding and encryption to obfuscate the data; an example of such a malware is Etumbot (https://www.arbornetworks.com/blog/asert/illuminating-the-etumbot-apt-backdoor/). The Etumbot malware sample, when executed, obtains the RC4 key from the C2 server; it then uses the obtained RC4 key to encrypt the system information (such as hostname, username, and IP address), and the encrypted content is further encoded using custom Base64 and exfiltrated to the C2. The C2 communication containing the obfuscated content is shown later. For reverse engineering details of this sample, refer to the Author's presentation and the video demo (https://cysinfo.com/12th-meetup-reversing-decrypting-malware-communications/):

To deobfuscate the content, it needs to be decoded using custom Base64 first and then decrypted using RC4; these steps are performed using the following python commands. The output displays the decrypted system information:
>>> import base64
>>> from Crypto.Cipher import ARC4
>>> rc4_key = "e65wb24n5"
>>> cipher_text = "kRp6OKW9r90_2_KvkKcQ_j5oA1D2aIxt6xPeFiJYlEHvM8QMql38CtWfWuYlgiXMDFlsoFoH"
>>> content = cipher_text.replace('_','/').replace('-','=')
>>> b64_decode = base64.b64decode(content)
>>> rc4 = ARC4.new(rc4_key)
>>> plain_text = rc4.decrypt(b64_decode)
>>> print plain_text
MYHOSTNAME|Administrator|192.168.1.100|No Proxy|04182|
Instead of using a combination of standard encoding/encryption algorithms, some malware authors implement a completely new encoding/encryption schemes. An example of such a malware is the one used by the APT1 group. This malware decrypts a string to a URL; to do this, malware calls a user-defined function (renamed as Decrypt_Func in the later-mentioned screenshot), which implements the custom encryption algorithm. The Decrypt_Func accepts three arguments; the 1st argument is the buffer containing encrypted content, the 2nd argument is a buffer where the decrypted content will be stored, and the 3rd argument is the length of the buffer. In the following screenshot, the execution is paused before executing Decrypt_Func, and it shows the 1st argument (buffer containing encrypted content):

Depending on your objective, you can either analyze the Decrypt_Func to understand the workings of the algorithm and then write a decryptor as covered in the author's presentation (https://cysinfo.com/8th-meetup-understanding-apt1-malware-techniques-using-malware-analysis-reverse-engineering/), or you can allow the malware to decrypt the content for you. To let the malware decrypt the content, just step over the Decrypt_Func (which will finish executing the decryption function) and then inspect the 2nd argument (buffer where the decrypted content is stored). The following screenshot shows the decrypted buffer (2nd argument) containing the malicious URL:

The previously mentioned technique of allowing the malware to decode the data is useful if the decryption function is called few times. If the decryption function is called multiple times in a program, it would be more efficient to automate the decoding process using debugger scripting (covered in Chapter 6, Debugging Malicious Binary) rather than doing it manually. To demonstrate this, consider the code snippet from a 64-bit malware sample (in the following screenshot). Note how the malware calls a function (renamed as dec_function) multiple times; if you look at the code, you will note that an encrypted string is passed to this function as the 1st argument (in rcx register), and after executing the function, the return value in eax contains the address of the buffer where the decrypted content is stored:

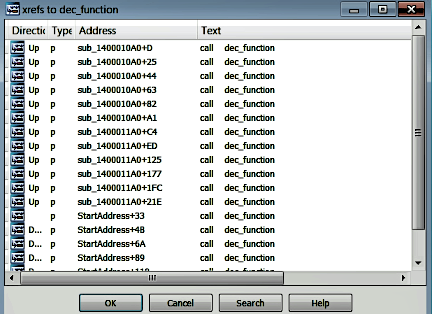
The following screenshot displays the cross-references to the dec_function; as you can see, this function is called multiple times in the program:
Each time dec_function is called, it decrypts a string. To decrypt all the strings passed to this function, we can write an IDAPython script (such as the one shown here):
import idautils
import idaapi
import idc

for name in idautils.Names():
    if name[1] == "dec_function":
        ea= idc.get_name_ea_simple("dec_function")
        for ref in idautils.CodeRefsTo(ea, 1):
            idc.add_bpt(ref)
idc.start_process('', '', '')
while True:
    event_code = idc.wait_for_next_event(idc.WFNE_SUSP, -1)
    if event_code < 1 or event_code == idc.PROCESS_EXITED:
        break
    rcx_value = idc.get_reg_value("RCX")
    encoded_string = idc.get_strlit_contents(rcx_value)
    idc.step_over()
    evt_code = idc.wait_for_next_event(idc.WFNE_SUSP, -1)
    if evt_code == idc.BREAKPOINT:
        rax_value = idc.get_reg_value("RAX")
    decoded_string = idc.get_strlit_contents(rax_value)
    print "{0} {1:>25}".format(encoded_string, decoded_string)
    idc.resume_process()
Since we have renamed the decryption function to dec_function, it is accessible from the names window in IDA. The previous script iterates through the names window to identify the dec_function and performs the following steps:
- If the dec_function is present, it determines the address of dec_function.
- It uses the address of dec_function to determine the cross-references (Xrefs to) to dec_function, which gives all the addresses where dec_function is called.
- It sets the breakpoint on all the addresses where dec_function is called.
- It starts the debugger automatically, and when the breakpoint is hit at dec_function, it reads the encrypted string from the address pointed to by the rcx register. A point to remember is, for the IDA debugger to start automatically, be sure to select the debugger (such as Local Windows debugger), either from the Toolbar area or by choosing Debugger | Select debugger.
- It then steps over the function to execute the decryption function (dec_function) and reads the return value (rax), which contains the address of the decrypted string. It then prints the decrypted string.
- It repeats the previous steps, to decrypt each string passed to dec_function.
After running the previous script, the encrypted strings and their corresponding decrypted strings are displayed in the output window as shown here. From the output, you can see that the malware decrypts the file names, registry name, and API function names during runtime to avoid suspicion. In other words, these are the strings the attacker wants to hide from static analysis:
