
29.5. Creating a New Virtual Host
If you want to host multiple websites on your system, then you will need to create an Apache virtual host for each one. Before you can add a site, its address must first be registered in the DNS, either on a DNS server on your system or on another host. If the site's files are to be owned by a different UNIX user than the one who owns the document root directory, then he must be created first as well.
The entire process for adding a virtual server is:
1. | |
2. | Decide if your new site is going to be IP-based, or name-based. A name-based site will work fine with all except for old browsers and so is, by far, the best choice these days. An IP-based site will work with any browser, but needs its own separate IP address to be added to your system. Because IP addresses are often scarce, this only makes sense if you need to set up a virtual FTP or POP3 server for the domain as well. |
3. | If your site is going to be IP-based, use the Network Configuration module (covered in Chapter 16) to add a new virtual IP address to the external network interface on your system. Make sure that it will be activated at boot time and is active now. If your system has only a single static internet IP address assigned by your ISP, then any extra virtual IP addresses that you add to it will not work. In that case, you will have to use a name-based virtual server instead, or request that your ISP assign you multiple addresses. |
4. | If the example.com domain already exists on a DNS server, add a record for www.example.com with the external IP address of your system (for a name-based site) or the address chosen in the previous step (for an IP-based site). If the domain does not yet exist, you will need to add it to a DNS server and register it with a DNS registrar like Network Solutions. Either way, Chapter 30 explains how to add records and domains in detail. |
5. | If the site will belong to a different person, add a UNIX user account for him in the Users and Groups module covered in Chapter 4. It is a much better idea for the files for each site to be owned by separate users than a single one if they are going to be managed by different people. When you create the user account, make sure it has a valid home directory such as /home/example. Then create a subdirectory called www under the home and make sure that it is owned by the new user. This can be done automatically for new users by creating a www sub-directory under /etc/skel, or wherever default files for new users are stored on your system. |
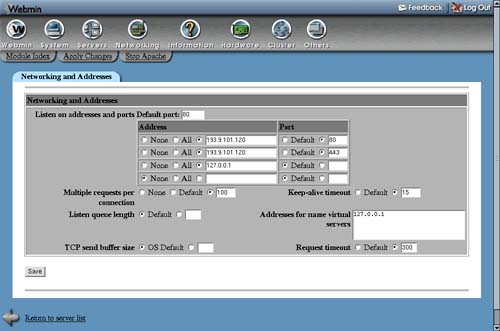
6. | If the site is going to use the standard HTTP port 80 (which is almost always what you want), then you can skip to Step 8. Otherwise, click on the Networking and Addresses icon on the Apache Webserver module's main page to bring up the form shown in Figure 29.3. Figure 29.3. The global networking and addresses page.
|
7. | |
8. | |
9. | If you are setting up an IP-based virtual server, you should enter the virtual IP address in the Specific address field that was added in Step 3. If setting up a name-based virtual server, enter the external IP address of your system into the field instead. If your Apache server has been configured to accept name-based connections on any IP address, you can select the Any address option for this field instead. See the following explanation for more details. If your new virtual server is going to use a port other than 80 and will be the only server on that port, you can select the Any address option as well so it handles all requests that come in on the port. |
10. | If you are setting up an IP-based virtual server, deselect the Add name virtual server address checkbox. For name-based servers, it should be left enabled. |
11. | If the new virtual host is going to use a nonstandard port, select the last option for the Port field and enter the number into the field next to it. |
12. | |
13. | |
14. | Unless you have a separate file on your system that contains all virtual hosts, leave the Add virtual server to file field set to Standard httpd.conf file. Otherwise, you can choose Selected file and enter the path into the field next to it. Make sure that the chosen file is actually used by Apache (such as by an Include directive in httpd.conf) or the virtual server will be useless and will not appear in Webmin. If you always use the same separate file for storing virtual hosts, the File to add virtual servers to field explained in Section 29.22 “Configuring the Apache Webserver Module” may be useful. When this configuration field is set, an option for creating the virtual host in the chosen file is added to the Add virtual server to file field. |
15. | To have Webmin copy all of the directives from another virtual server to the one that you are creating, select it from the Copy directives from menu. This can be useful if all of your virtual hosts have a similar configuration. |
16. | When you are done filling in the form, click the Create button. The new virtual server will be added to the Apache configuration file and to the list of servers on the main page. |
17. | Click on the icon for the new virtual server, which will take you to its options page, shown in Figure 29.4. Figure 29.4. The virtual server options page.
|
18. | |
19. | Click the Create button to add a new section to the configuration file for the directory. This is necessary for granting clients the rights to browse files contained in the directory, because the default Apache directory configuration will deny access. |
20. | Click on the new icon for the directory that has been added to the virtual server options page. This will take you to the directory options page shown in Figure 29.5. Figure 29.5. The directory options page.
|
21. | Click on the Document Options icon and change the Directory options field to Selected below on the form that appears. Under the Set for directory column, change the entry for Generate directory indexes to Yes. Then click the Save button at the bottom of the page. |
22. | To make all your changes active, click the Apply Changes button at the top of any page. |
23. | You or the user who owns the virtual server can now start adding files to the document root directory. You can test it out by opening the URL (such as www.example.com/) in your web browser to make sure that everything is working properly. |


When Apache receives an HTTP request, it must first work out which virtual server the request is for. It will first look for a name-based virtual server whose hostname matches the host requested by the client, and whose address and port are the same as the ones to which the client connected. If none is found, the first defined virtual server for the address and port will be used instead, or if there are none then the request will be handled by the default server.
Name-based virtual servers can only be used on addresses listed in the Addresses for name virtual servers field on the global Networking and Addresses page. If you follow the instructions above, an address will be added to this list automatically when you create a new virtual server. If all the virtual servers on your system are going to be name-based, you can open this page, select the Include all addresses option, and click Save so that Apache will handle such requests on any IP address. This also makes sense if your system has a dynamically assigned IP address and you want to serve multiple virtual hosts.
Once a virtual server has been created, you can edit its settings or delete it by following these steps:
1. | On the module's main page, click on the virtual server's icon. This will take you to the server options page shown in Figure 29.4. |
2. | Scroll down to the Virtual Server Details form at the bottom of the page. |
3. | Change the Address, Port and other fields to whatever you want and click the Save button. These fields have the same meanings as on the virtual server creation form. If the address is changed on a name-based virtual server, however, you may need to change it on the global Networking and Addresses page as well. Or if you want to get rid of the virtual server and all the configuration directives that it contains, click the Delete Virtual Server button instead. |
4. | Back on the module's main page, click on the Apply Changes link to make the new settings active. |
You cannot change the settings for the default server, nor can you delete it.