
17.5. Securing Your NIS Server
By default, an NIS server allows any client to connect to it and query tables, as long as the client knows the domain name. If your system is connected to the Internet, an attacker could guess the NIS domain and request a list of all NIS users. Even though their passwords are stored in encrypted format, it is still possible for obvious or dictionary word passwords to be discovered by a brute-force attack on the password encryption.
For this reason, it is wise to limit the addresses of clients that connect to the server to only those UNIX systems that are really clients. To set this up, the steps to follow are:
1. | On the main page of the module, click on the Server Security icon, which will take you to the form shown in Figure 17.3. Figure 17.3. The server security form.
|
2. | The rows in the Allowed clients table control which clients are allowed to connect. You can modify any of the existing entries, or use the empty row at the bottom to add a new one. To add more than one row, you will have to add them one at a time, saving and opening the form for each one. To grant access to a single host, under the Netmask column select Single host, and enter its IP address under Network/host address. To grant access to an entire IP network, select Netmask and enter a netmask (such as 255.255.255.0) into the field next to it, and the network address under the Network/host address column. To grant access to all clients, just select the Any host option under the Netmask column. |
3. | When done, click the Save and Apply button. The new restrictions will take effect immediately, and you will be returned to the module's main page. |
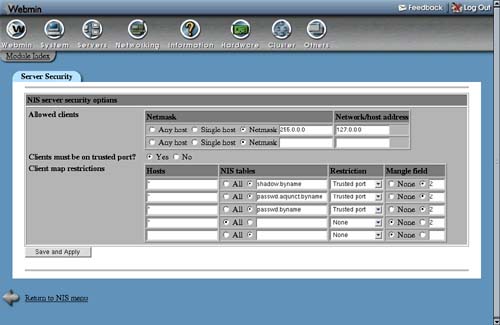
It is a good idea to let only clients on your own network connect, and deny all others. An even more secure alternative would be to allow only those systems that you know are NIS clients, assuming they have fixed IP addresses and do not change often.
Even if you restrict access to only trusted client systems, users who can log in to those systems via SSH or telnet may still be able to get a list of all NIS users and their encrypted passwords. To prevent this, it is possible to configure the server to allow only clients using trusted ports to access certain tables or fields within tables. Because on UNIX systems only the root user can create TCP or UDP sockets with port numbers below 1024, these low ports are considered trusted and safe from use by regular users.
It is also possible to prevent certain clients from accessing some NIS tables, but still allow them access to others. For example, you might want to give all client systems access to the Host addresses table, but only a trusted few the rights to the UNIX users table.
To restrict access to tables on your server, the steps to follow are:
1. | On the main page of the module, click on the Server Security icon to get to the form shown in Figure 17.3. |
2. | The Client map restrictions table controls which NIS tables can be accessed by certain client systems, and who on those systems can access them. Each row specifies a rule that applies to some or all clients, and can either allow access, block it entirely or filter the a queried table. The fields and their meanings are: Hosts An IP address or partial IP address (like 192.168.1.) that this restriction applies to. Entering * will make the restriction apply to all clients. NIS tables Select the All option to have the restriction apply to all tables, or enter a single table name. Internally, the NIS server appends something like .byname or .byuid to table names to indicate what they are indexed by. The table name that you enter must use this internal name, such as passwd.byuid or hosts.byaddr. Restriction This field controls what the server does if a client request matches. Select None to allow the request, Deny access to block it altogether, or Trusted port to block if the client is using an untrusted port. Mangle field If using the Trusted port restriction, you can use this option to hide only a single field of the requested table from the client. Selecting None will block access to the table altogether, but entering a field number will cause its contents to be replaced with an x. The only practical use of this option is hiding passwords in the passwd.byname, passwd.byuid or shadow.byname tables, which are in field 2. New restrictions can be added using the empty row at the bottom of the table. To add more than one restriction, you will need to save and re-open the form multiple times. When a client requests a table, the NIS server will find the first row in the table that matches and use the restriction defined. For this reason, you must make sure that any new row you add is before the one that grants access to all clients and tables, which usually exists by default. |
3. |
The most useful use of the Client map restrictions table is to add a row for all clients on the passwd.byname table, with the restriction set to Trusted port and the Mangle field option set to 2. Then add another row for the passwd.byuid table, with all other options the same. These will prevent non-root users from seeing encrypted passwords, while still allowing in programs running as root, such as the telnet or SSH server.
If you are using the separate shadow table to store passwords and expiry information, the restriction should be on the shadow.byname table instead. On many Linux distributions, a restriction like this exists by default.