44.2. The Squid Proxy Server Module
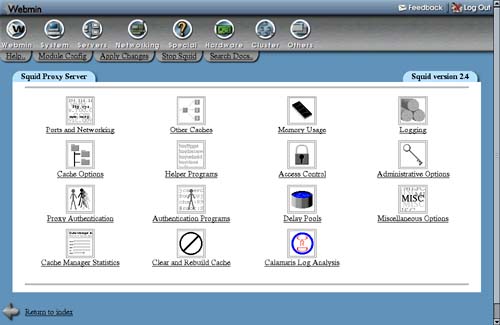
If you want to set or up configure Squid from within Webmin, you will need to use the Squid Proxy Server module, found under the Servers category. When its icon is selected, the page shown in Figure 44.1 will appear, assuming that Squid is installed and configured correctly. As you can see, the main page consists only of a table of icons, each of which can be clicked on to bring up a form for editing settings in some category.
Figure 44.1. The Squid module main page.

If you have not configured or started Squid on your system before, the cache directory has probably not been set up yet. The module will detect this and display a message like Your Squid cache directory /var/spool/squid has not been initialized above the table of icons. To initialize the cache, follow these steps:
1. | If you are unhappy with the displayed cache directory, now is the time to change it. Follow the instructions in Section 44.4 “Adding Cache Directories” to define your own directories before continuing. |
2. | In the as Unix user field, enter the name of the user who will own the cache files and as whom the daemon process will run. Typically, this will be a special squid user created for this specific purpose (and the field will default to squid if such a user exists), but any user will do. I recommend, however, using the Users and Groups module (covered in Chapter 4) to create a user called squid whose home directory is the cache directory, if needed. |
3. | Hit the Initialize Cache button. The Squid configuration will be updated to use your chosen username, and the command squid –z will be run to set up the cache directories. All output that it produces will be displayed so that you can see how the initialization is progressing. |
4. | When the process is complete, return to the module's main page and the error message should have disappeared. |
If Squid is not installed at all on your system (or installed in a different location from the one Webmin expects), an error message like The Squid config file /etc/squid.conf does not exist will appear on the main page instead of the table of icons. If you do have it installed, read Section 44.17 “Configuring the Squid Proxy Server Module” for instructions on how to change the paths the module uses. If it is not installed, you should use the Software Packages module (covered in Chapter 12) to install the squid package from your Linux distribution CD or the source website.
If no such package exists for your operating system, you will need to download, compile, and install the latest version of Squid from www.squid-cache.org. As long as you have a compiler installed on your system, this is a relatively simple process with no dependencies.
Once the server is installed, if you want to make use of Squid in the long term, you should arrange to have it started at boot time using the Bootup and Shutdown module (covered in Chapter 9). All Linux packages include a bootup action script for Squid, although it may be disabled by default, thus requiring you to enable it in that module. Otherwise, you will need to create an action that runs a command like /usr/local/squid/bin/squid –sY, assuming that you have Squid installed in /usr/local/squid.
Once Squid has been installed and initialized, you can start using this module. When Squid is running, every page has two links at the top: Apply Changes, which forces the current configuration to be reread, and Stop Squid, which shuts down the proxy server. If the server is not running, those links are replaced with Start Squid, instead, which (as the name suggests) attempts to start it. If it is not yet running, you will probably want to start it at this time.
Because each version of Squid has introduced new configuration directives, this module's user interface will appear differently depending on the version of Squid that it detects on your system. All of the instructions in this chapter are written for Squid 2.4, as it is currently the most widely deployed version. If you are running an older or newer release, different fields may appear on the forms or may have more or fewer options. For example, each new version has introduced different ACL types and authentication has been handled in three different ways through the history of the program. The basic concepts, however, have always been the same.
When you are using this module, make sure your browser is configured not to use the Squid proxy to access your Webmin server. Otherwise, you run the risk of cutting off your own access to the module if you make a configuration mistake or shut down the server process. All browsers that can use a proxy have a field for listing hosts to which to directly connect, into which you can enter the hostname of your Webmin server.
