
2.5. The Webmin User Interface
Assuming the installation process and login were successful, your browser should show the Webmin main menu with the Webmin category selected, as shown in Figure 2.2. You can switch to other categories by clicking on the icons along the top of the page, such as System, Servers, or Others. Every module is a member of one category, and a table of icons for each module in the selected category will appear in the body of the page. To enter a module, just click on its icon.
Figure 2.2. Modules in the Webmin category.

To log out of Webmin, just click on the Logout link that appears in the top-right corner of every page. To send feedback to the author (that's me), click on the Feedback link that is next to the Logout button. To visit www.webmin.com/, click on the Webmin logo in the top-left corner of any page.
If you are using a different theme, the user interface will appear different to the screen, as shown in Figure 2.2. Some versions of Webmin that come with Linux distributions use a different theme by default, such as Mandrake and Caldera. The main menu, however, will still show categories and modules, maybe using different sized icons in a different on-screen layout. All the screen shots in this book were captured using the default theme, so you may want to switch to it now (see Chapter 52 for instructions on how to change the current theme).
All Webmin modules have a common layout and user interface, in order to make navigation easier. When you click on a module icon from the main menu, the main page of the module will appear. For example, Figure 2.3 shows the main page of the Disk Quotas module.

At the top are the category icons that appear on every Webmin page, so that you can easily switch to another module. Below are links for Help, Module Config, and Search Docs. Not every module will display all of these links, but where they appear they have common purposes:
Help This link opens a pop-up window containing an overview of the module and the options available on the main page.
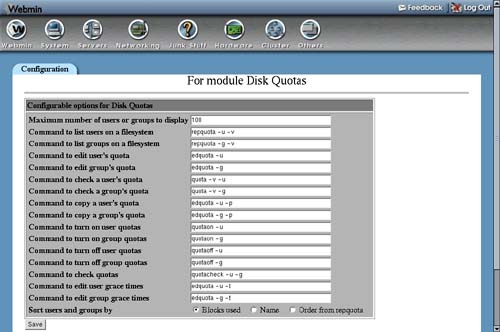
Module Config This link displays a form containing configurable options for the current module. See Figure 2.4 for an example of the options available in the Disk Quotas module. Each module has its own set of options, but all use a similar interface for editing them. In most cases, you will not need to change any of these configuration options for normal use of a module.
Search Docs This link displays a list of UNIX man pages, package documentation, HOWTO files, and websites related to the server or program that the module is configuring. This can be useful for finding out additional information about the underlying configuration files and commands that Webmin is using.
Other pages below the first page in each module also have a common layout. Figure 2.5 shows a sample page from the Disk Quotas module. Below the list of category icons is a link labeled Module Index, which will always return you to the module's main page. This can be found on almost every page of every module. Next to it is another Help link that pops up a window displaying information on the current page. Not all pages have online help, so this link will not always appear. Finally, at the bottom of the page is a link, whose label starts with Return to, that will take you back one level in the module's hierarchy of pages.
