
5.3. Mounting an NFS Network Filesystem
Before you can mount a filesystem from another UNIX server, that server must be configured to export the directory that you want to mount using NFS. For details on how to export a directory using Webmin, see Chapter 6.
Assuming the directory that you want to mount has been exported properly, you can follow the following steps to mount it on your system:
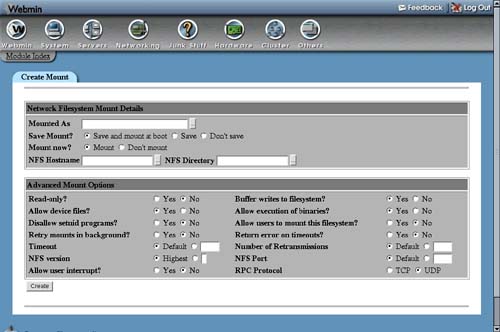
1. | On the main page of the Disk and Network Filesystems module, select Network Filesystem from the dropdown box of filesystem types, and click the Add mount button. A form will appear, as shown in Figure 5.2. Figure 5.2. Mounting a network filesystem.
|
2. | In the Mounted As field, enter the directory on which you want the filesystem to be mounted. The directory should be either nonexistent or empty, as any files that it currently contains will be hidden once the filesystem is mounted. |
3. | If you want the filesystem to be mounted at boot time, select Save and mount at boot for the Save Mount option. If you want it to be permanently recorded but not mounted at boot, select Save. Select Don't save if this is to be only a temporary mount. |
4. | For the Mount now? option, select Mount if you want the filesystem to be mounted immediately, or Don't mount if you just want it to be recorded for future mounting at boot time. It makes no sense to set the Save and mount option to Don't save and the Mount now? option to Don't mount, as nothing will be done! |
5. | |
6. | |
7. | Change any of the options in the bottom section of the form that you want to enable. Some of the most useful are as follows: Read-only? If set to Yes, files on this filesystem cannot be modified, renamed, or deleted. Retry mounts in background? When an NFS filesystem is mounted at boot time, your system will normally try to contact the fileserver forever and ever if it is down or unreachable, which can prevent the boot process from completing properly. Setting this option to Yes will prevent this problem by having the mount retried in the background if it takes too long. Return error on timeouts? The normal behavior of the NFS filesystem in the face of a fileserver failure is to keep trying to read or write the requested information until the server comes back up again and the operation succeeds. This means that if the fileserver goes down for a long period of time, any attempt to access files mounted from the server will get stuck. Setting this option to Yes changes this behavior so that your system will eventually give up on operations that take too long. |
8. | To mount and/or record the filesystem, click the Create button at the bottom of the page. If all goes well, you will be returned to the filesystems list, otherwise an error will be displayed explaining what went wrong. |
Once the NFS filesystem has been successfully mounted, all users and programs on your system will be able to access files on the fileserver under the mount point directory. If users can log in to both your system and the remote fileserver, any files that they own on one machine should be owned on the other because the NFS protocol supports UNIX file permissions and file ownership information. This depends, however, on every user having the same user ID on both servers. If this is not the case, you may end up in a situation in which user jcameron owns a file on the fileserver, but the file appears to be owned by user fred when it is mounted and accessed on your system.
The best solution to this problem is to make sure that user IDs are in sync across all servers that share files using NFS. The best ways to do that are using NIS (as explained in Chapter 17), or Webmin's own Cluster Users and Groups module (as explained in Chapter 49).