
39.2. Editing Report Options
Before you can generate a report from a log file, you must set certain options, such as the output directory, the UNIX user to run the report as, and report layout settings. Assuming the log has been automatically identified by the module and is displayed on the main page, you can use the following steps to set these options:
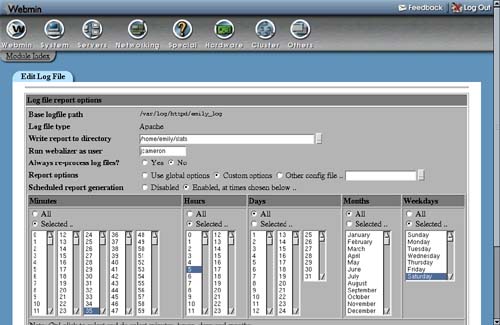
1. | On the module's main page, click on the name of the web server log file for which you want to generate a report. A page listing the current settings for that file will be displayed, as shown in Figure 39.2. Figure 39.2. The log file options page.
|
2. | The All log files in report field shows exactly which files will be used in any report created by Webmin and Webalizer. Because many systems are configured to move, truncate, compress, and eventually delete the Apache and Squid log files on a regular basis (often using a program like logrotate), the module will include all files in the same directory that start with the same name as the primary log file. For example, if you are reporting on /var/log/httpd/access_log, the files access_log.0.gz, access_log.1.gz, and so on in the /var/log/httpd will be displayed in this field as well. |
3. | In the Write report to directory field, enter the directory in which the HTML pages for the report should be created. This must already exist and should generally be under the website's document root—for example, /home/example.com/stats. It must be owned or writeable by the user specified in the next field. Make sure that the directory is not used for anything else, as Webalizer will create an index.html file and other HTML pages that may overwrite anything that it already contains. |
4. | Enter the name of the UNIX user that the generated report files should be owned by into the Run webalizer as user field. This should be the user who owns the website's HTML files, so that he can edit or move them if necessary. You can also just enter root if the reports are only for your own use. Because of the way the module runs Webalizer, the user you specify does not have to have read access to the log file. He must, however, be able to write to the report directory! |
5. | Leave the Always re-process log files? field set to No so that Webalizer can make use of cached information from previous report runs. Setting it to Yes will cause all caches and previous statistics to be thrown away before each run, so that the entire log file is reprocessed. This means that any data that is no longer in the log files will not be included in the report. Selecting Yes is most useful if you want to bypass Webalizer's caching of old statistics, which may be incorrect if the log file has completely changed since the last run. |
6. | In the Report options field, select Custom options to have the module copy the global Webalizer configuration file for this log, so you can later define options that apply only to this report. If you have only one website on your system or don't care about customizing reports for different virtual servers, you can select the Use global options radio button instead. If so, Steps 9 through 19 can be ignored. The final option for this field, Other config file, allows you to specify an existing Webalizer configuration file to be used when generating the report. This can be useful if you have used the program before on this log file and have already customized settings for it. |
7. | Leave Scheduled report generation set to Disabled for now. Section 39.4 “Reporting on Schedule” explains how to enable it. |
8. | Click the Save button at the bottom of the page. As long as there were no errors in your input, you will be returned to the module's main page. |
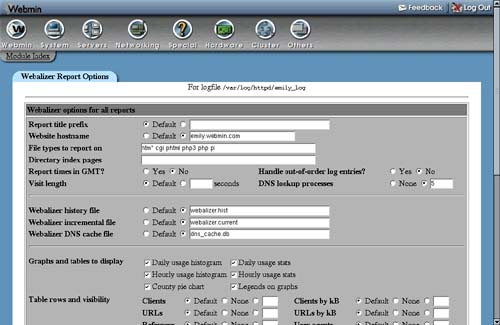
9. | If Custom options was chosen in Step 6, click on the log filename again and then on the Edit Options button at the bottom of the page. This will bring up the Options form shown in Figure 39.3. Figure 39.3. The report options page.
|
10. | |
11. | |
12. | |
13. | Webalizer generally converts times in log files into your system's local time zone. To force the use of GMT instead, change the Report times in GMT? field to Yes. Unless people in different time zones are viewing the report, you should leave it set to No. |
14. | If the log file might contain records that are dated after the records that they appear before, set the Handle out-of-order log entries? field to Yes. This will slow down report generation slightly, but if No is chosen and the log does contain out of order records, Webalizer will not process it completely. Some web servers like Netscape's are guilty of generating log files like this. |
15. | |
16. | In the Graphs and tables to display section, deselect those that you don't want included in the report. |
17. | In the Table rows and visibility section, you can change the size of each table that appears or remove it altogether by selecting None. |
18. | To turn on the creation of extra pages in the report listing all clients that access your site, URLs accessed, and so on, select the appropriate checkboxes in the Generate pages listing all section. Otherwise, only tables showing the top 20 will be include in the report. |
19. |
Although the preceding instructions are written with Apache log files in mind, they apply to Squid logs as well. The only difference is that Squid has no document root directory, so you will have to create a new directory for the report. This could be under the root directory of your web server so that the report can be viewed by anyone. If so, the name of the UNIX user who owns the web server's HTML files should be entered in the Run webalizer as user field.