
18.2. Configuring a PPP Server
Before you can set a system up to allow clients to connect with PPP, it must either have a modem attached to a serial port, or be connected via a null-modem cable to another machine. Internal modems that emulate a serial port can be used as well, although they are not recommended as they do not have easily visible LEDs to indicate if the modem is connected, transmitting, and so on. USB modems should work, as long as they are recognized by the kernel—however, they will probably use a special device file. Modems that require special drivers to operate (commonly known as Winmodems) cannot be used at all, unless there is a driver for the modem available for Linux.
Naturally, any modem must be connected to a phone line. Because your system will be configured to answer the phone after a few rings, the phone line should not be used for anything else—otherwise, voice callers will have their calls answered by the modem, which is not very friendly.
Once all the hardware is ready, the steps to set up your system as a PPP server are:
1. | |
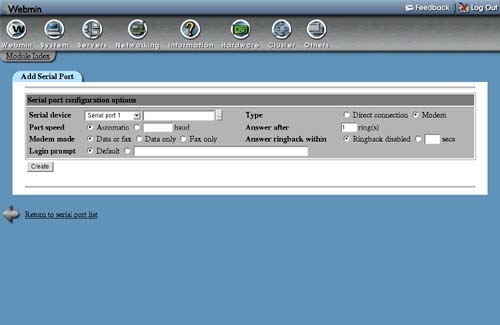
2. | Click on the Add a new serial port link, which will bring up the port configuration form shown in Figure 18.1. Figure 18.1. The serial port configuration form.
|
3. | Set the Serial device to the port on which your modem or null-modem cable is connected. Serial port 1 corresponds to the device file /dev/ttyS0, and so on. For modems on serial devices not starting with /dev/ttyS (such as USB modems), select the Other device option and enter the full device file path into the text field next to the menu. |
4. | |
5. | |
6. | In the Answer after field, enter the number of rings that you want mgetty to wait for before answering the phone. If the phone line your modem is on will be also used for receiving voice calls, you could set this to something large like 20 to give yourself plenty of time to answer the phone before the modem does. Naturally, this option has no meaning for null-modem connections. |
7. | Click the Create button. A new entry will be added to the /etc/inittab file, and you will be returned to the serial ports list. |
8. | Click Apply Configuration to activate mgetty on the new port. Phone calls to the line your modem is on should now be answered after the configured number of rings. If you care only about text-only clients, then nothing more needs to be done—they will be able to dial up, authenticate at the login prompt and execute shell commands. |
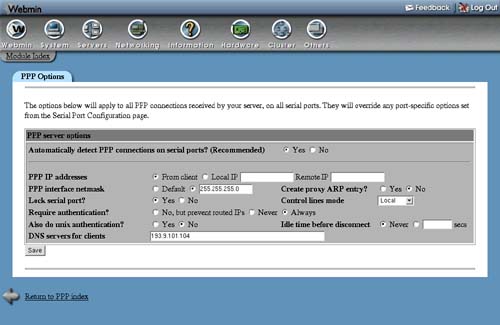
9. | To set up PPP, click on the PPP Options icon back on the main page. This will take you to the form shown in Figure 18.2, where you can set options that will apply to all PPP connections. Figure 18.2. The PPP configuration form.
|
10. | Unless you want clients to log in using text mode and start the pppd command manually, it is best to set the Automatically detect PPP connections on serial ports? option to Yes. With this enabled, mgetty will detect that the client wants to start a PPP session when the server is waiting for a log-in prompt, and run pppd automatically. |
11. | In the PPP IP Address fields, enter the IP address that you want the server's end of the connection to use (the Local IP) and the address for the client's end of the connection (the Remote IP). Normally these addresses will not be on your local LAN, but on a different subnet. Other systems on the network should be configured to route traffic for the client's address to your system, so that they can communicate. If no addresses are specified, then the PPP server will use whatever addresses are supplied by the client. This might make sense when connecting two machines via null-modem, but will not work with most dial-up clients. It is possible to assign the client an IP address that is within the range of the local LAN, by turning on the Create proxy ARP entry? option. If this is enabled, enter an unused LAN IP address into the Remote IP field and your system's current Ethernet IP into the Local IP field. |
12. | |
13. | Unless you are setting up a null-modem connection, clients should be forced to authenticate to prevent potential attackers from connecting. To turn on authentication, set the Require authentication? field to Yes. To turn it off totally for null-modem use, set the field to No. To set usernames and passwords for clients to authenticate against, see Section 18.3 “Managing PPP Accounts”. |
14. | |
15. | |
16. | Finally, click the Save button. Clients should now be able to dial in, establish a PPP session and access your system and network. |
If your system is going to have multiple simultaneous PPP clients connected, then you will need to set different options for each serial port. In particular, each client must have a different remote IP address, although the local address can be re-used.
To set up different PPP options for each serial port, the steps to follow are:
1. | |
2. | Go back to the main page, click on Serial Port Configuration and then on the Edit link under Port PPP Config for the serial port that you want to set options for. This will take you to the per-port options page, which is very similar to the global PPP options form shown in Figure 18.2. |
3. | Enter remote and local IP addresses to which you want PPP clients connecting on this port to be assigned, and change any other options that have not been set on the global PPP options page. |
4. | When done, click the Save button. Clients connecting on the configured port will use the new options from now on. |
The easiest way to stop your system from acting as a PPP server is simply to remove the serial port configuration entry for your modem. If you have multiple modems attached, the steps below can be used to disable one without any effect on the others:
1. | On the main page, click on Serial Port Configuration and then on the device name of the port with the attached modem. |
2. | On the port options page, click the Delete button in the lower-right corner. The appropriate entry will be removed from the /etc/inittab file, and you will be returned to the list of enabled ports. |
3. |