 Setting Quotas for a User or Group
by Jamie Cameron
Managing Linux® Systems with Webmin™ System Administration and Module Development
Setting Quotas for a User or Group
by Jamie Cameron
Managing Linux® Systems with Webmin™ System Administration and Module Development
- Copyright
- Bruce Perens' Open Source Series
- Introduction to Webmin
- Installing Webmin
- Securing Your Webmin Server
- Users and Groups
- Introduction to UNIX Users and Groups
- The Users and Groups Module
- Creating a New User
- Editing an Existing User
- Deleting a User
- Creating a New Group
- Editing an Existing Group
- Deleting a Group
- Viewing Recent and Current Logins
- Reading Users' Email
- Creating Users from Batch Files
- Configuring the Users and Groups Module
- Before and After Commands
- Module Access Control
- Other Operating Systems
- Summary
- Disk and Network Filesystems
- Introduction to Filesystems
- The Disk and Network Filesystems Module
- Mounting an NFS Network Filesystem
- Mounting an SMBFS Windows Networking Filesystem
- Mounting a Local ext2 or ext3 Hard Disk Filesystem
- Mounting a Local Windows Hard Disk Filesystem
- Adding Virtual Memory
- Automounter Filesystems
- Editing or Removing an Existing Filesystem
- Listing Users of a Filesystem
- Module Access Control
- Configuring the Disk and Network Filesystems Module
- A Comparison of Filesystem Types
- Other Operating Systems
- Summary
- NFS File Sharing
- Disk Quotas
- Introduction to Disk Quotas
- The Disk Quotas Module
- Enabling Quotas for a Filesystem
- Disabling Quotas for a Filesystem
- Setting Quotas for a User or Group
- Copying Quotas to Multiple Users
- Setting Grace Times
- Setting Default Quotas for New Users
- Other Operating Systems
- Configuring the Disk Quotas Module
- Module Access Control
- Summary
- Partitions, RAID, and LVM
- Introduction to Hard Disk Partitions
- The Partitions on Local Disks Module
- Adding and Formatting a New Partition
- Creating a New Filesystem
- Partition Labels
- Deleting or Changing a Partition
- Module Access Control
- Other Operating Systems
- Introduction to RAID
- The Linux RAID Module
- Introduction to LVM
- The Logical Volume Management Module
- Creating a New Volume Group
- Adding and Removing a Physical Volume
- Creating and Deleting a Logical Volume
- Resizing a Logical Volume
- Creating a Snapshot
- Summary
- Bootup and Shutdown
- Introduction to the Linux Boot Process
- The Bootup and Shutdown Module
- Configuring an Action to Start at Bootup
- Starting and Stopping Actions
- Adding a New Action
- Rebooting or Shutting Down Your System
- Configuring the Bootup and Shutdown Module
- Other Operating Systems
- The SysV Init Configuration Module
- Summary
- Scheduled Commands
- Introduction to Cron Jobs
- The Scheduled Cron Jobs Module
- Creating a New Cron Job
- Editing a Cron Job
- Controlling Users' Access to Cron
- Module Access Control Options
- Configuring the Scheduled Cron Jobs Module
- Other Operating Systems
- The Scheduled Commands Module
- Creating a New Scheduled Command
- Summary
- Process Management
- Software Packages
- System Logs
- Filesystem Backups
- Internet Services
- Introduction to Internet Services
- The Internet Services and Protocols Module
- Enabling an Internet Service
- Creating Your Own Internet Service
- Creating and Editing RPC Programs
- Configuring the Internet Services and Protocols Module
- Other Operating Systems
- The Extended Internet Services Module
- Enabling or Editing an Extended Internet Service
- Creating an Extended Internet Service
- Editing Default Options
- Summary
- Network Configuration
- Network Information Service
- PPP Server Configuration
- Firewall Configuration
- Introduction to Firewalling with IPtables
- The Linux Firewall Module
- Allowing and Denying Network Traffic
- Changing a Chain's Default Action
- Editing Firewall Rules
- Creating Your Own Chain
- Setting Up Network Address Translation
- Setting Up a Transparent Proxy
- Setting Up Port Forwarding
- Firewall Rule Conditions
- Configuring the Linux Firewall Module
- Summary
- Setting the Date and Time
- Boot Loader Configuration
- Introduction to Boot Loaders
- The Linux Bootup Configuration Module
- Booting a New Kernel with LILO
- Booting Another Operating System with LILO
- Editing Global LILO Options
- The GRUB Boot Loader Module
- Booting a New Linux Kernel or BSD with GRUB
- Booting Another Operating System with GRUB
- Editing Global GRUB Options
- Installing GRUB
- Configuring the GRUB Boot Loader Module
- Summary
- Printer Administration
- Voicemail Server Configuration
- Remote Shell Login
- Running Custom Commands
- Webmin's File Manager
- The File Manager Module
- Navigating Directories and Viewing Files
- Manipulating Files
- Creating and Editing Files
- Editing File Permissions
- Creating Links and Directories
- Finding Files
- Editing EXT File Attributes
- Editing XFS File Attributes
- Editing File ACLs
- Sharing Directories
- Module Access Control
- Summary
- Perl Modules
- Status Monitoring with Webmin
- Apache Web Server Configuration
- Introduction to Apache
- The Apache Webserver Module
- Starting and Stopping Apache
- Editing Pages on Your Web Server
- Creating a New Virtual Host
- Setting Per-Directory Options
- Creating Aliases and Redirects
- Running CGI Programs
- Setting Up Server-Side Includes
- Configuring Logging
- Setting Up Custom Error Messages
- Adding and Editing MIME Types
- Password Protecting a Directory
- Restricting Access by Client Address
- Encodings, Character Sets, and Languages
- Editing .htaccess Files
- Setting Up User Web Directories
- Configuring Apache as a Proxy Server
- Setting Up SSL
- Viewing and Editing Directives
- Module Access Control
- Configuring the Apache Webserver Module
- Summary
- DNS Server Configuration
- Introduction to the Domain Name System
- The BIND DNS Server Module
- Creating a New Master Zone
- Adding and Editing Records
- Record Types
- Editing a Master Zone
- Creating a New Slave Zone
- Editing a Slave Zone
- Creating and Editing a Forward Zone
- Creating a Root Zone
- Editing Zone Defaults
- Configuring Forwarding and Transfers
- Editing Access Control Lists
- Setting Up Partial Reverse Delegation
- Using BIND Views
- Module Access Control
- Configuring the BIND DNS Server Module
- The BIND 4 DNS Server Module
- Summary
- CVS Server Configuration
- DHCP Server Configuration
- Introduction to the Dynamic Host Configuration Protocol
- The ISC DHCP Server
- The DHCP Server Module
- Adding and Editing Subnets
- Viewing and Deleting Leases
- Editing Global Client Options
- Adding and Editing Fixed Hosts
- Adding and Editing Shared Networks
- Adding and Editing Groups
- Module Access Control
- Configuring the DHCP Server Module
- Summary
- Downloading Email with Fetchmail
- Managing Majordomo Mailing Lists
- Introduction to Mailing Lists and Majordomo
- The Majordomo List Manager Module
- Using Other Mail Servers
- Creating a Mailing List
- Managing List Members
- Editing List Information, Headers, and Footers
- Editing Subscription Options
- Editing Forwarded Email Options
- Editing List Access Control
- Moderating and Maintaining a Mailing List
- Deleting a Mailing List
- Creating a Digest List
- Editing Digest Options
- Editing Global Majordomo Options
- Module Access Control
- Configuring the Majordomo List Manager Module
- Summary
- The MySQL Database
- Introduction to MySQL
- The MySQL Database Server Module
- Creating a New Database
- Creating a New Table
- Adding and Editing Fields
- Field Types
- Viewing and Editing Table Contents
- Deleting Tables and Databases
- Executing SQL Commands
- Backing Up and Restoring a Database
- Managing MySQL Users
- Managing Database, Host, Table, and Field Permissions
- Module Access Control
- Configuring the MySQL Database Server Module
- Summary
- The PostgreSQL Database
- Introduction to PostgreSQL
- The PostgreSQL Database Server Module
- Creating a New Database
- Creating a New Table
- Adding and Editing Fields
- Deleting a Field
- Field Types
- Viewing and Editing Table Contents
- Deleting Tables and Databases
- Executing SQL Commands
- Backing Up and Restoring a Database
- Managing PostgreSQL Users
- Managing PostgreSQL Groups
- Restricting Client Access
- Editing Object Privileges
- Module Access Control
- Configuring the PostgreSQL Database Server Module
- Summary
- Configuring Sendmail
- Introduction to Internet Email
- The Sendmail Configuration Module
- Editing Local Domains and Domain Masquerading
- Managing Email Aliases
- Configuring Relaying
- Managing Virtual Address Mappings
- Configuring Domain Routing
- Editing Global Sendmail Options
- Viewing the Mail Queue
- Reading Users' Email
- Adding Sendmail Features with M4
- Creating Autoreply Aliases
- Creating Filter Aliases
- Sendmail Module Access Control
- Configuring the Sendmail Configuration Module
- Summary
- Configuring Qmail
- Introduction to Qmail
- The Qmail Configuration Module
- Editing Local Domains
- Managing Email Aliases
- Configuring Relaying
- Managing Virtual Mappings
- Configuring Domain Routing
- Editing Global Qmail Options
- Editing Mail User Assignments
- Viewing the Mail Queue
- Reading Users' Email
- Configuring the Qmail Configuration Module
- Summary
- Analyzing Log Files
- The ProFTPD Server
- Introduction to FTP and ProFTPD
- The ProFTPD Server Module
- Running ProFTPD from inetd or xinetd
- Using the ProFTPD Server Module
- Creating Virtual Servers
- Setting Up Anonymous FTP
- Restricting Users to Their Home Directories
- Limiting Who Can Log In
- Setting Directory Listing Options
- Message and Readme Files
- Setting Per-Directory Options
- Restricting Access to FTP Commands
- Configuring Logging
- Limiting Concurrent Logins
- Restricting Clients by IP Address
- Limiting Uploads
- Manually Editing Directives
- Configuring the ProFTPD Server Module
- Summary
- The WU-FTPD Server
- Introduction to WU-FTPD
- The WU-FTPD Server Module
- Limiting Who Can Log In
- Setting Up Anonymous FTP
- Managing User Classes
- Denying Access to Files
- Setting Up Guest Users
- Editing Directory Aliases
- Message and Readme Files
- Configuring Logging
- Limiting Concurrent Logins
- Restricting Clients by IP Address
- Restricting Access to FTP Commands
- Configuring the WU-FTPD Server Module
- Summary
- SSH Server Configuration
- Windows File Sharing with Samba
- Introduction to SMB and Samba
- The Samba Windows File Sharing Module
- Managing Samba Users
- Adding a New File Share
- Adding a New Printer Share
- Viewing and Disconnecting Clients
- Editing Share Security Options
- Editing File Permission Settings
- Editing File Naming Options
- Editing Other File Share Options
- Editing Printer Share Options
- Editing Share Defaults
- Configuring Networking
- Configuring Authentication
- Configuring Printers
- Accessing SWAT from Webmin
- Module Access Control
- Configuring the Samba Windows File Sharing Module
- Summary
- Configuring the Squid Proxy Server
- Introduction to Proxying and Squid
- The Squid Proxy Server Module
- Changing the Proxy Ports and Addresses
- Adding Cache Directories
- Editing Caching and Proxy Options
- Introduction to Access Control Lists
- Creating and Editing ACLs
- Creating and Editing Proxy Restrictions
- Setting Up Proxy Authentication
- Configuring Logging
- Connecting to Other Proxies
- Clearing the Cache
- Setting Up a Transparent Proxy
- Viewing Cache Manager Statistics
- Analyzing the Squid Logs
- Module Access Control
- Configuring the Squid Proxy Server Module
- Summary
- Filtering Email with Procmail
- Creating SSL Tunnels
- Usermin Configuration
- Introduction to Usermin
- The Usermin Configuration Module
- Starting and Stopping Usermin
- Restricting Access to Usermin
- Changing the Port and Address
- Configuring the Usermin User Interface
- Installing Usermin Modules
- Changing the Default Language
- Upgrading Usermin
- Configuring Authentication
- Editing Categories and Moving Modules
- Changing and Installing Themes
- Turning on SSL
- Configuring Usermin Modules
- Restricting Access to Modules
- Limiting Who Can Log In
- About the Usermin Modules
- Configuring the Usermin Configuration Module
- Summary
- Cluster Software Management
- Cluster User Management
- The Cluster Users and Groups Module
- Registering a Server
- Creating a New User
- Editing an Existing User
- Deleting a User
- Creating a New Group
- Editing an Existing Group
- Deleting a Group
- Refreshing User and Group Lists
- Synchronizing Users and Groups
- Listing and Removing a Server
- Configuring the Cluster Users and Groups Module
- Summary
- Cluster Webmin Configuration
- The Cluster Webmin Configuration Module
- Registering a Server
- Creating a New Webmin User
- Editing or Deleting a Webmin User
- Creating a New Webmin Group
- Editing or Deleting a Webmin Group
- Editing the User or Group ACL for a Module
- Installing a Module or Theme
- Viewing and Deleting a Module or Theme
- Refreshing User and Module Lists
- Listing and Removing a Server
- Configuring the Cluster Webmin Configuration Module
- Summary
- Webmin Configuration
- The Webmin Configuration Module
- Restricting Access to Webmin
- Changing the Port and Address
- Setting Up Logging
- Using Proxy Servers
- Configuring the Webmin User Interface
- Installing and Deleting Webmin Modules
- Cloning a Webmin Module
- Changing Your Operating System
- Editing the Program Path and Environment Variables
- Changing Webmin's Language
- Editing Main Menu Settings
- Upgrading Webmin
- Installing Updates to Webmin
- Configuring Authentication
- Editing Categories and Moving Modules
- Changing and Installing Themes
- Referrer Checking
- Allowing Unauthenticated Access to Modules
- Turning on SSL
- Setting Up a Certificate Authority
- Summary
- Webmin Access Control
- Introduction to Webmin Users, Groups, and Permissions
- The Webmin Users Module
- Creating a New Webmin User
- Editing a Webmin User
- Editing Module Access Control
- Creating and Editing Webmin Groups
- Requesting a Client SSL Key
- Viewing and Disconnecting Login Sessions
- Module Access Control
- Configuring the Webmin Users Module
- Summary
- Webmin Servers
- Logging in Webmin
- Webmin Module Development
- Advanced Module Development
- Inside the Scheduled Cron Jobs Module
- Creating Webmin Themes
- Inside the MSC Theme
- The Webmin API
- Index
7.5. Setting Quotas for a User or Group
The quotas for a user or group can be set or changed at any time on a filesystem that currently has quotas enabled of the correct type. By default, any user or group whose quotas have not yet been set will have no limits at all and thus be able to use up all the disk space on the filesystem.
To set quotas for a user, follow these steps:
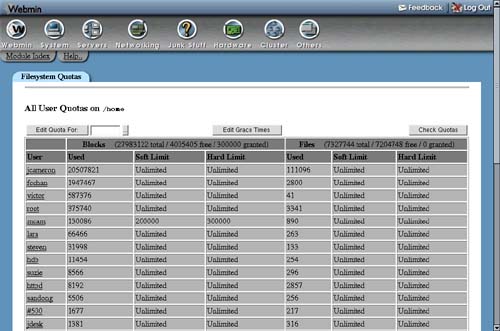
1. | From the list of filesystems on the main page of the module, click on the mount point of one on which you want to edit quotas. This will take you to a page listing the quotas for all users on the filesystem, as shown in Figure 7.2. Figure 7.2. The list of users and their quotas.
|
2. | Click on the name of the user you want to edit under the User column, or enter the username into the Edit Quota For field and press the button. Both will take you to a form containing the user's current quota settings and blocks and files used, as shown in Figure 7.3. Figure 7.3. The user quota form.
|
3. | |
4. | |
5. | Click the Update button. The new quota settings will take effect immediately. |

The procedure for setting group quotas is almost identical. If a filesystem has both user and group quotas enabled, the main page of the module will have two links for each filesystem—one for users, and one for groups.
-
No Comment
..................Content has been hidden....................
You can't read the all page of ebook, please click here login for view all page.