
15.9. Enabling or Editing an Extended Internet Service
If you want to allow users to fetch mail from your system using the POP3 protocol or login via telnet it is necessary to turn on the appropriate service in this module, assuming it is listed on the main page. If not, you will need to first install the appropriate package from your distribution website or CD, which should add an entry for the service. If not, see Section 15.10 “Creating an Extended Internet Service”.
Existing services can also be changed in other ways—for example, to restrict the allowed client IP addresses or number of concurrent connections. To edit a service, the steps to follow are:
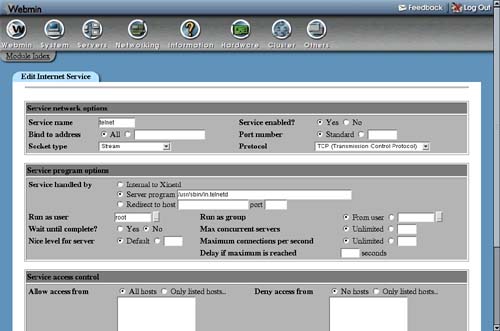
1. | On the main page of the Extended Internet Services module, click on the name of the service that you want to edit. This will take you to the form shown in Figure 15.5. Figure 15.5. Editing an extended Internet service.
|
2. | The Service name, Socket type and Protocol options should all be left unchanged. The Port field should be changed only if you know what you are doing. |
3. | To turn on the service, set the Service enabled? field to Yes. Or if it is already enabled and you want to turn it off, select No. |
4. | If you want the service to be accessible only via a single IP address on your server, enter it into the Bind to address field. This can be useful if you have multiple virtual IP interfaces on your system and want different servers to listen on different addresses. |
5. | Most of the fields under Server program options can be left unchanged, unless you want to limit the amount of load the service puts on your system. If so, you can set the Max concurrent servers field to the maximum number of server processes that should be allowed to run at any one time. The Maximum connections per second and Delay if maximum is reached fields can be set to limit the rate at which clients are allowed to connect and the amount of time that the service is disabled if that rate is exceeded. |
6. | To control which addresses clients are allowed to connect from, use the fields in the Service access control section. If Allow access from is set to Only listed hosts, only the IP addresses (like 192.168.1.55), hosts (like server.foo.com) and networks (like 192.168.1.0/24) entered will be allowed. If Deny access from is set to Only listed hosts, the hosts, IP addresses, and networks entered will be prevented from connecting. If a client matches an entry in both lists, the most specific entry will be used to determine whether access is allowed or denied. For example, if 192.168.1.10 was allowed and 192.168.1.0/24 was denied then a client with IP address 192.168.1.10 would be able to connect. |
7. | If you want to limit the times at which the service can be used, fill in the Allow access at times field. It must be in the format HH:MM-HH:MM, such as 9:00-17:00 to allow access during normal working hours. |
8. | Click the Save button when you are done making changes. As long as you haven't made any mistakes, the browser will return to the module's main page. |
9. | Click the Apply Changes button to make your modifications active. |
If you want to delete a service totally, you can click the Delete button on the editing form instead. However, it is usually better to simply disable it so that it can be easily turned back on later.