
28.2. Adding a New Monitor
To have Webmin check on the status of a new server or service, you must add an additional monitor in this module. Before you can do this, you must decide on the monitor's type, which is determined by the type of service that you want it to check. See Section 28.3 “Monitor Types” for a list of all those that are available, their purposes, and optional parameters.
Once you have chosen a type, you can add the monitor by following these steps:
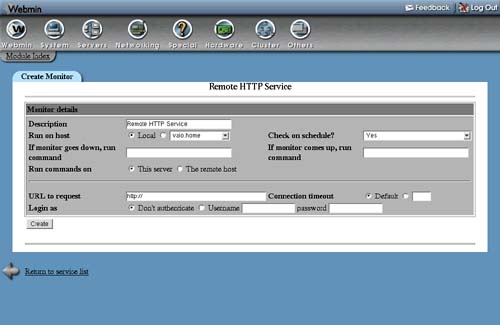
1. | Select the type from the menu next to the Add monitor of type button on the module's main page. When you click the button, the browser will display a form for adding a new monitor, as shown in Figure 28.2. Figure 28.2. Adding a new HTTP monitor.
|
2. | Fill in the Description field with a short description of this monitor, such as Office web server. This will appear on the main page and in any status emails. |
3. | To have the monitor executed on another Webmin server, select it from the Run on host menu. If you have no servers defined in the Webmin Servers module (covered in Chapter 53), no menu will appear. |
4. | If you have scheduled monitoring enabled and want this service to be regularly checked by it, make sure the Check on schedule? field is set to Yes. If it is set to No, scheduled checking will be turned off for this particular monitor. The other options starting with Yes allow you to control when email is sent if the monitor goes up or down. They correspond to the options for the Send email when field, explained in Section 28.4 “Setting Up Scheduled Monitoring”. |
5. | To have a command executed when a scheduled check determines that the monitor has gone down, enter it into the If monitor goes down, run command field. This could be used to attempt to restart the monitored server, or to notify a system administrator by some method other than email. |
6. | You can also fill in the In monitor comes up, run command field with shell commands to execute when a scheduled check determines that the service has come back up again. |
7. | |
8. | If the monitor is being run locally and is checking a server configured in another Webmin module for which multiple clones exist, the Module to monitor field will appear on the form. This menu can be used to choose from which of the clones the monitor should get its configuration. So, for example, if you had two versions of Apache installed on your system and two Apache Webserver modules set up to configure them, you would be able to choose which one should be checked when creating an Apache Webserver monitor. See Chapter 51 for more information on how module clones work. |
9. | Depending on the type of monitor being created, there may be several additional options that you can set on this form. See Section 28.3 “Monitor Types” for the details. |
10. | When done, click the Create button to have the monitor created and added to the main page. Its status should be immediately displayed. |
Existing monitors can be edited by clicking on their description on the main page. When editing, all the same fields as described above are available, in addition to a Current status field that indicates whether the service is up or down. For some monitor types, additional information is displayed when it is up, such as the time that the server being checked was started.
After you have finished editing a monitor, click the Save button at the bottom of the page to record your changes. To get rid of a monitor, use the Delete button instead. Either way, the changes will be applied immediately.