
52.3. Creating a New Webmin User
If you want to create a new user who can log in to Webmin, possibly with limited privileges, it must be created in this module. To do this, use the following steps:
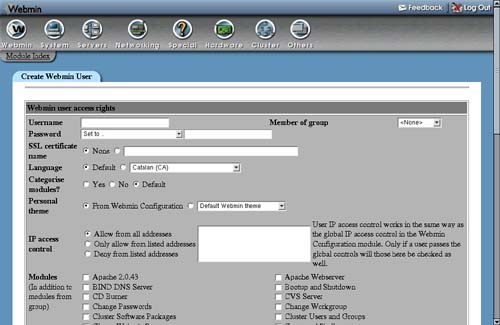
1. | On the module's main page, click on the Create a new Webmin user link above or below the list of existing users. This will bring up the creation form shown in Figure 52.2. Figure 52.2. Creating a new Webmin user.
|
2. | Enter a log in name into the Username field. The name cannot already be in use by any other user or group. |
3. | To make the user part of a group, select it from the Member of group field. Any modules that the group has will be granted to the user in addition to modules that you select on this page, and any access control restrictions that apply to the group in those modules will apply to the user as well. See Section 52.6 “Creating and Editing Webmin Groups” for more information on how to add new groups to the list. |
4. | To give the user a normal password, select Set to from the menu in the Password field and enter it into the adjacent field. If the new user has the same name as a UNIX user, you can select UNIX authentication to have Webmin use PAM, or read the /etc/shadow file to validate the user. To prevent the user from logging in at all, select No password accepted. This might be a good idea when creating a user who will have limited privileges, so that he cannot log in until you have finished restricting his access. |
5. | To have Webmin use a different language for the user than the global default, select one from the Language field menu. |
6. | In most themes, module icons on Webmin's main page are displayed under categories. If this new user is going to be granted access to only a few modules, this is not really necessary and you can change the Categorize modules? field to No. |
7. | To have the Webmin user interface displayed using a different theme for the user, set it in the Personal theme field. |
8. | To limit the addresses from which the new user can log in to Webmin, change the IP access control field to Only allow listed addresses. Then, fill in the text box next to it with hostnames, IP addresses, network/netmask pairs, or wildcard hostnames (like *.foo.com). Note that these restrictions are checked only after any global IP access control sets in the Webmin Configuration module have been passed. |
9. | Select all the modules to which you want the user to have access in the Modules section. |
10. |
To further restrict what the new user can do in each module to which you have granted him access, see Section 52.5 “Editing Module Access Control”.
You can speed up the process of creating a new user who has the same attributes and access permissions as an existing user by using the module's cloning feature. To clone a user, follow these steps:
1. | Click on the username of the existing user that you want to clone on the module's main page. |
2. | Click on the Clone button at the bottom of the editing form. This will take you to the creation form shown in Figure 52.2, but with most fields already filled in with the attributes of the original user. |
3. | Fill in the Username field and set the Password, as they do not get copied from the cloned user. You can also adjust the values in any of the other fields. |
4. | When done, click the Create button. The new user will receive a copy of all module access control settings from the original user, but they will not be updated if the original user is changed in future. |
If you want to create many users with access to the same modules and the same access control settings, it is better to create a group and assign the users to it. That way you can change the settings for all members at once by just editing the group.