
Chapter 6
Mechanical Construction Techniques
More than likely, at one time or another, you’ve used tools to build or fix something. But even with that experience, you may not know the ins and outs of using tools to work with robot-building materials. If you’re a die-hard workshop expert, that’s fine; you can skip this chapter and move on to the next. But keep reading if you lack basic construction and tool use know-how, or if you need a refresher course.
This chapter assumes you’ve read the section on tools in Chapter 5, “Building Robot Bodies—the Basics.” It contains a review of all the core tools you need to construct automatons in your garage. If you haven’t yet read that chapter, do so now, then come back. A few additional specialty tools are covered here.
This chapter also assumes you’re working with wood, plastic, or metal. If you’re using lightweight rapid prototyping materials like foamboard, you’ll also want to check out Chapter 14, “Rapid Prototyping Methods.”

This chapter won’t teach you everything about how to build things. This is a book about robots, after all, not shop class. If you hunger for more, try the Time-Life and Reader’s Digest do-it-yourself books. They are particularly well done, with clear and concise illustrations.
First Things First: Eye and Ear Protection
Always wear eye protection when using any tool, power or hand. This helps prevent harmful debris from flying into your eyes, possibly causing injury.
Don’t forget your ears when using power tools. High-speed tools, especially power saws and air tools, create a high volume of sound. Wear sound-suppressing ear protection—wraparound earmuffs designed for shop use or even basic earplugs that you can get at the local drugstore.
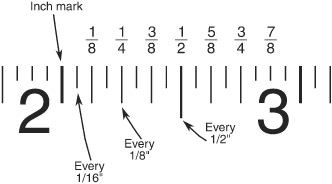
Figure 6-1 Learning to read the graduations of a tape measure is the first step to mastering any construction project. Most tape measures marked off in inches have graduations down to 1/16 or 1/32 of an inch.
FYI
Read more about how to safely enjoy the robot-building hobby in Chapter 4, “Safety First (and Always).”
Plan, Sketch, Measure, Mark
Start with a plan, and take a moment to visualize how your robot will look and the parts that will go into it. Then,
![]() Work up a quick budget. If you’re just starting out, you won’t have many parts and supplies. Research what you need (see Appendix A, “RBB Online Support,” and Appendix B, “Internet Parts Sources”), and make a list of their names, part numbers, and prices.
Work up a quick budget. If you’re just starting out, you won’t have many parts and supplies. Research what you need (see Appendix A, “RBB Online Support,” and Appendix B, “Internet Parts Sources”), and make a list of their names, part numbers, and prices.
![]() Sketch out your plan on paper or by using a computer vector graphics program. I prefer Inkscape (it’s free).
Sketch out your plan on paper or by using a computer vector graphics program. I prefer Inkscape (it’s free).
If you need to cut and drill, mark directly on the materials. For wood, cardboard, and foam-board use a #2 soft lead pencil. For everything else use a black Sharpie or similar marker; a fine tip works best.
Use a measuring tape to ensure accuracy. If you’re using a tape measure marked in inches (see Figure 6-1), the graduations will be every 1/2″, 1/4″, 1/8″, and 1/16″. It’s easy to miscount the subdivisions and get the measurement wrong, so double-check every measurement.
Drilling Holes in Things
Except for rapid prototypes (like those in Chapter 14, “Rapid Prototyping Methods,”), most of your robots will need some holes drilled into them so you can mount things like battery holders, motors, and electronics.
Regardless of the material (wood, plastic, metal), the basic concepts of drilling are the same: you put a bit into the drill (hand or power), mark where you want the hole to be, and drill there. Good drilling involves following some simple procedures, covered here.
PICKING THE RIGHT DRILL BIT
That 29-piece drill bit set you’ve been wanting for your birthday offers a fine selection of the most common drill sizes you’ll need. But in actual practice you’ll probably end up using only a small handful of them regularly and the rest only very occasionally. That’s how it is with me.
I use these five drill bits for the vast majority of the holes I drill for my desktop robots. I keep them in a large block of wood for quick access.

FYI
Refer to Chapter 5, “Building Robot Bodies—the Basics,” for a summary of drill bit types, including special coatings that are used to make the bits last longer.
![]() When drilling into metal or hard plastic (acrylic, polycarbonate), first use the 5/64″ bit to make a pilot hole. Then mount the bit for the hole size you want.
When drilling into metal or hard plastic (acrylic, polycarbonate), first use the 5/64″ bit to make a pilot hole. Then mount the bit for the hole size you want.
![]() Unless you’re making really large holes, when drilling into wood and soft plastic (PVC or ABS) you can go directly to the bit for the hole size you need.
Unless you’re making really large holes, when drilling into wood and soft plastic (PVC or ABS) you can go directly to the bit for the hole size you need.
![]() When drilling holes larger than 1/4″—and especially when working with metal—start with a smaller bit and work your way up. For example, if drilling a 3/8″ hole, begin with a 1/8″ pilot, then switch to 1/4″, and finish with the 3/8″ bit.
When drilling holes larger than 1/4″—and especially when working with metal—start with a smaller bit and work your way up. For example, if drilling a 3/8″ hole, begin with a 1/8″ pilot, then switch to 1/4″, and finish with the 3/8″ bit.
SELECTING THE PROPER SPEED
Different materials require different speeds for drilling. High-speed drilling is fine for wood but leads to dull bits when used with metal and cracks when used with plastic.
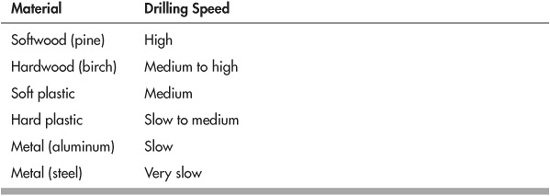
Most drill motors lack a means to directly measure the speed of the tool, so you just have to guess at what’s high, medium, or slow. Go by the sound of the tool. If you’re using a portable variable-speed drill, pull the trigger all the way in for full speed. Then let it out and estimate half (medium) and quarter (slow) speeds by listening to the sound of the motor.
If you’re using a drill press where you adjust the speed by changing the position of a rubber belt, place the belt into the High, Medium, and Low positions accordingly. As changing the belt is a hassle, you may want to just set it to Low, and drill everything that way. It’s better to drill wood using a slow bit than metal using a fast bit.
PROPER USE OF THE DRILL CHUCK
The chuck is the mechanical “jaws” that hold the bit in the drill motor. While some electric drills use an automatic chuck system, most chucks are operated using a chuck key: insert the key into one of the holes in the side of the chuck, and loosen or tighten the jaws. Keep the following in mind when using the drill chuck:
Insert only the smooth shank of the bit into the chuck and none of the flutes. Otherwise, the bit might be damaged.
Be sure the bit is centered in the jaws of the chuck before tightening. If the bit is even slightly off-center, the hole will come out too large and distorted.
Don’t over tighten the chuck. Too tight makes it harder to loosen when you want to remove the bit.
Tighten the chuck using at least two key holes. This evens out the torque applied to the chuck and makes it easier to loosen the chuck when you’re done.
CONTROLLING THE DEPTH OF DRILLING
Most of the holes you drill will be completely through the material, but sometimes you need to drill only partway in, then stop. For example, you might want a limited-depth hole in the jaw of an android robot for setting a pin that’s used as a hinge.
There are various methods to control the depth of the hole in thicker materials. My favorite method is to wrap masking tape around the shaft of the drill bit (see Figure 6-2). Place the edge of the tape at the depth you want for the hole.
Another type of depth-limited hole is the counterbore, where the drill hole is in different diameters. Counterbore holes, like that in Figure 6-3, can be created by first drilling with a small bit, then using a larger bit only partway through the material. The technique is often used with tapered screws, when you want the bottom of the hole to be smaller than the top.
ALIGNING HOLES
Drilling with any handheld tool will naturally produce a certain amount of error. Even the most skilled worker cannot always drill a hole that is at exact right angles to the surface of the material.
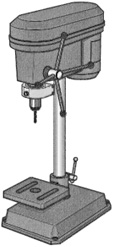
When precisely aligned holes are a must, use a drill press or drill-alignment jig. The latter can be found at better hardware and tool stores that stock specialized carpentry accessories, but, frankly, I’ve never found them all that convenient. The drill press is the much better tool for ensuring alignment. A basic no-frills bench model is under $100. I’m still using the one I bought over 30 years ago!
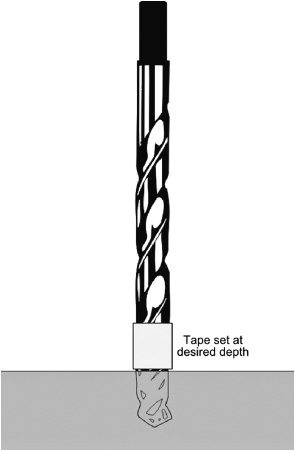
Figure 6-2 A quick and easy way to prepare holes of a specific depth is to wrap a piece of masking tape around the drill bit. Position the bottom of the tape at the depth of the hole you want to make.
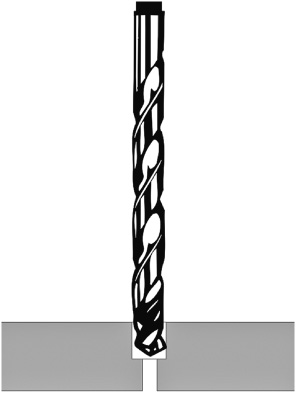
Figure 6-3 A counterbore hole is one that has two sizes. One use is with lag and wood screws, where the top of the screw is not threaded. Make the bottom of the hole smaller to give the threads something to bite.
USING CLAMPS AND VISES
When drilling with power tools, exercise care to hold the part in a clamp or vise. Avoid holding the part just with your hands, especially if it’s small. Why? As you drill, the bit may “dog” into the material, causing it to get caught. If you’re holding the part, it could get violently yanked out of your hands, causing injury.
Hold-down clamps and vises come in various shapes, sizes, and styles. There is no one type that works for every occasion. Spring-loaded clamps (they look like giant tweezers) are useful for very small parts, while C-clamps are handy for larger chunks of material. A vise is required when drilling small parts of any type with a drill press. For very small and lightweight pieces you can use a pair of large lineman’s pliers or a pair of Vise-Grips.
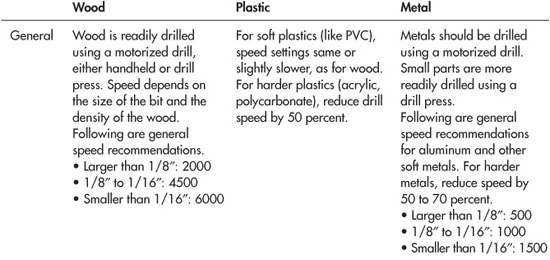
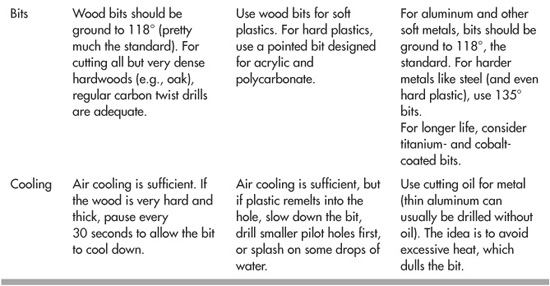
TIPS FOR DRILLING
Here are some handy tips for drilling wood, metal, and plastic. All speeds are in RPM.
Cutting Things to Size
Wood, metal, and plastic can be cut using hand-operated or power tools. For all but the lightest materials, however, you will find that power tools make short work of the job.
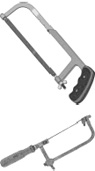
In the realm of hand tools, practical choices are:
For wood, a backsaw; for metal and plastic, a standard hacksaw. The hacksaw uses a replaceable blade, which is required when working with harder materials.
A coping saw allows you cut tight-radius corners in wood, plastic, and softer metals. A coping saw is similar to the hacksaw, except the blades are smaller. Replace the blade when it’s dull.
A razor saw is used with thin woods and plastics. Its shape is like that of a backsaw, but much smaller. You can find razor saws at the hobby store.
![]()
And for power tools, practical choices are:

Jigsaw for wood. You need one with adjustable speed unless you work only with soft wood (not really recommended for robotics anyway).

Circular saws and table saws are useful for cutting long, straight cuts in wood and metal. Be sure to use the proper blade, or else damage to the material and/or blade could result.

A circular miter saw is useful when cutting aluminum channel and bar stock. The alternative is a hacksaw, a miter block, and sweat. When cutting metal be sure to use clamps to hold the material in the miter!
There are plenty of other saw types not mentioned here, like the scroll saw, which can cut very intricate shapes in wood and metal and some plastics. If you have a preference for one type of tool over another, by all means use it.
REMEMBER SAFETY!
Of all the tools in the shop, saws are the most dangerous—yes, even handsaws. I need not remind you to observe all safety precautions. NEVER remove a safety device or guard. Work in a well-lit, unobstructed area. Some additional stern warnings for you:
![]() Use eye and ear protection when the saw is in operation.
Use eye and ear protection when the saw is in operation.
![]() When using a table saw, feed the last 6″ or so of the material through the blade with a flat stick. The woodworking guides show how to do this.
When using a table saw, feed the last 6″ or so of the material through the blade with a flat stick. The woodworking guides show how to do this.
![]() Don’t wear loose clothing. This goes for long-sleeve shirts, ties, baggy pants, everything. The loose material could get caught in the rotating parts of the saw.
Don’t wear loose clothing. This goes for long-sleeve shirts, ties, baggy pants, everything. The loose material could get caught in the rotating parts of the saw.
![]() Keep the blade sharp, and always use the right blade for the job. Don’t try to cut ferrous (contains iron) metal with a blade meant for thin wood paneling. For one thing, the teeth could break off and fly right at you.
Keep the blade sharp, and always use the right blade for the job. Don’t try to cut ferrous (contains iron) metal with a blade meant for thin wood paneling. For one thing, the teeth could break off and fly right at you.
TIPS FOR SAWING
Here are some handy tips for sawing wood, metal, and plastic.
In the preceding table, the term kerf means the width of the cut made by the blade. Many blades use cutting teeth that protrude to either side (often referred to as set). This makes for a wider cut (kerf), but helps keep the blade from binding into the material. When cutting plastic, a wide kerf helps prevent melting.
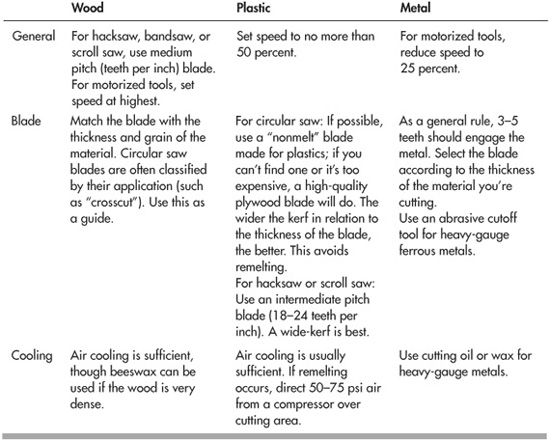
LIMITING CUTTING DEPTH
When using power saws, you can readily limit the depth of the cut by changing the height of the blade within the tool. This is useful when you want to add channels or grooves in the material but not cut all the way through. The following apply to sawing wood or plastic, and when the thickness of the material is at least 1/4″—any thinner and it doesn’t much matter how deep the cutting is.
OTHER WAYS TO CUT MATERIAL
While a saw is the most common means of cutting materials, there are other methods as well. Select the method based on the material you are cutting and the demands of the job.
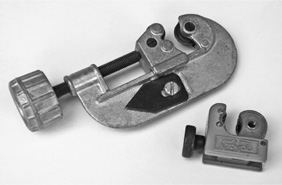
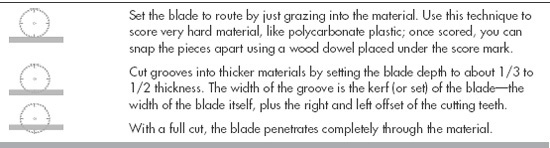
Figure 6-4 A tubing cutter is easier to use than a saw when sawing a tube in half. It’s for so-called thin-wall tube, not thick pipe. Use a small tool (also shown) for tubing under 1/2″; it’s available at many hobby stores.
![]() Very thin (less than 1/8″) hard plastics can be cut by scoring with a sharp utility knife. Place the score over a 1/4″ dowel, and apply even pressure on both sides to snap apart the material.
Very thin (less than 1/8″) hard plastics can be cut by scoring with a sharp utility knife. Place the score over a 1/4″ dowel, and apply even pressure on both sides to snap apart the material.
![]() Thin (to about 20 gauge) metal can be cut with hand or air snips. Pneumatic air snips make the work go much faster. Manual snips are available for straight cuts, left-turning cuts, and right-turning cuts.
Thin (to about 20 gauge) metal can be cut with hand or air snips. Pneumatic air snips make the work go much faster. Manual snips are available for straight cuts, left-turning cuts, and right-turning cuts.
![]() For higher gauges of metal, and for long, straight cuts in thinner gauges, cut using a bench shear (also called a metal brake).
For higher gauges of metal, and for long, straight cuts in thinner gauges, cut using a bench shear (also called a metal brake).
![]() Thin-wall tubing (aluminum, brass, copper) can be cut using a tubing cutter, like those in Figure 6-4. Tubing cutters are easier to use, and they do a better job than using a saw.
Thin-wall tubing (aluminum, brass, copper) can be cut using a tubing cutter, like those in Figure 6-4. Tubing cutters are easier to use, and they do a better job than using a saw.
![]() Foam-based materials that are not laminated (e.g., Styrofoam) can be cut using a hot wire. Hot wire kits are available at most craft stores.
Foam-based materials that are not laminated (e.g., Styrofoam) can be cut using a hot wire. Hot wire kits are available at most craft stores.
Using Portable Power Tools
Your work in the robot shop will go much faster if you use power tools. This applies even if you’re constructing your bot out of wood. The use of power tools is fairly straightforward, and the subject needs little additional instruction beyond what you’ll get in the instruction manual and maybe a good shop tools book. But here are some of the most important issues to be aware of.
TOOL SAFETY
Sparking in some tool motors is fairly common, but excessive sparking may indicate a damaged motor.
When working outside, use an AC outlet equipped with a ground-fault interrupter circuit.
The grounding lug on AC-operated tools should never be defeated.
TOOL MAINTENANCE
Keep the cooling fan of the tool, if it has one, clean and free of obstruction. Do not use the tool if metal bits have become caught in the cooling vents.
Some power tools must be periodically lubricated, as indicated by the manufacturer. This is especially true of reciprocating saws. Gear-driven tools (e.g., heavy-duty power drills, worm-drive circular saws) should be lubricated with the appropriate grease or high-viscosity oil.
GENERAL STUFF
When using an extension cord, be sure it is rated for the current being passed through it. As a general rule, medium-duty tools (8 to 10 amps) can be used with 14-gauge extension cords, no more than 50 feet. (Gauge refers to the thickness of the wires; the smaller the number, the larger the wires.) Check the instruction manual for the tool for guidelines.
Keep the exterior of the tool clean by wiping it off with a dry cloth. Grime can be removed by cleaning with a slightly damp cloth. Never apply water or any other liquid directly to the tool.
Getting Work Done Fast with Air Tools
Electric power tools are by far the most common variety found in any home shop. Yet another kind of power tool is the air (pneumatic) type, which is driven by a blast of high-pressure air. Common air power tools include the drill (standard and reversible models available; see Figure 6-5), air hammers, metal snips (very handy!—I use these all the time), and power wrench. Pneumatic tools offer several advantages:
![]() Air tools tend to be lighter because they lack a bulky motor.
Air tools tend to be lighter because they lack a bulky motor.
![]() The tools are generally less expensive than their electrified cousins, because their motor is a fairly simple air pump. Of course, you need a separate compressor to supply the air.
The tools are generally less expensive than their electrified cousins, because their motor is a fairly simple air pump. Of course, you need a separate compressor to supply the air.
![]() They’re safer to use outdoors, because there’s no electricity to the tool. You can keep the compressor indoors and connect the compressor and tool via a hose.
They’re safer to use outdoors, because there’s no electricity to the tool. You can keep the compressor indoors and connect the compressor and tool via a hose.
![]() Properly cared for, air tools can last a lifetime (your lifetime, that is).
Properly cared for, air tools can last a lifetime (your lifetime, that is).
Know that water destroys air tools. Use pneumatic tool oil to dispel any moisture. Oiling your air tools every day that you use them will greatly prolong their life. To oil an air tool just squirt a dab or two into its air intake the first time you use it that day.
Pneumatic tools require both air pressure and air volume to work. Be sure your compressor can deliver both the pressure and the volume needed by your tools. The specifications that come with each tool will tell you what it needs.
Keep the air hose as short as possible. The longer the hose, the less the pressure to the tool. A length of under 25 feet is ideal. I like using noncoiled hoses, as the “straight” ones tend to provide higher pressures. However, the coiled hoses are more convenient.
Figure 6-5 A pneumatic drill is lighter and smaller than an electric drill, but it needs a constant source of compressed air.