
Chapter 5
Building Robot Bodies—the Basics
So we know robots are a clever combination of mechanics and electronics. The mechanical part constitutes the “body” of the robot—call it a frame, a base, a platform, it’s all the same.
Constructing a robot body comprises three straightforward tasks:
![]() Choose the material (you can mix and match).
Choose the material (you can mix and match).
![]() As needed, cut it to shape, and drill holes for mounting parts.
As needed, cut it to shape, and drill holes for mounting parts.
![]() Put it all together.
Put it all together.
In this chapter you’ll be introduced to the principal materials used in constructing amateur robots, plus the basic tools you need to form the material into the size and shape you want.
Then, the remaining chapters in Part 2 give you explicit and detailed instructions for using these various materials. Chapters include hands-on plans for several robust robot platforms, which you can use as starting points for your robot creations.

Expensive, fancy tools are not required to complete any of the designs in this book. All you need are basic shop tools—you probably already have them in your garage, or you can borrow them from a friend or relative.
Picking the Right Construction Material
Your robots can be constructed out of wood, plastic, metal, even heavy-duty cardboard or foam. But which to choose?
That all depends on the design of the robot: how big and heavy it is and what you intend to use it for. It can be as simple as a piece of wood. Or it can be a fancy amalgam of high-tech plastic covering a body of extruded aluminum and steel support brackets.
Your budget and construction skills, plus the availability of heavier-duty tools, will also influence your choice of materials. It takes a lot less sweat to use a 1/4″ sheet of plywood or 1/8″ plastic than it does to cut or drill aluminum and steel. And it’s easier still to make a robot using foamboard you purchase at the craft store.
![]() Wood. Wood is easy to work with, can be sanded and sawed to any shape, doesn’t conduct electricity (avoids short circuits) unless wet, and is available everywhere.
Wood. Wood is easy to work with, can be sanded and sawed to any shape, doesn’t conduct electricity (avoids short circuits) unless wet, and is available everywhere.
![]() Plastic. Pound for pound, plastic has more strength than many metals, yet is easier to work with. You can cut it, shape it, drill it, even glue it. Some unique plastics might be harder to get unless you live near a well-stocked plastics specialty store; mail order is a great alternative.
Plastic. Pound for pound, plastic has more strength than many metals, yet is easier to work with. You can cut it, shape it, drill it, even glue it. Some unique plastics might be harder to get unless you live near a well-stocked plastics specialty store; mail order is a great alternative.
![]() Metal. And by metal we’re talking mostly aluminum here, though copper and brass sheets and tubes are commonly available in hobby stores. All three are great for building robots.
Metal. And by metal we’re talking mostly aluminum here, though copper and brass sheets and tubes are commonly available in hobby stores. All three are great for building robots.
![]() Lightweight composite materials. Art supply stores stock what’s known as “foamboard,” also called Foam Core, a popular brand. Foamboard is a sandwich of paper or plastic glued to both sides of a layer of densely compressed foam. Heavy-duty cardboard and lightweight plastic board used to make signs are also contenders.
Lightweight composite materials. Art supply stores stock what’s known as “foamboard,” also called Foam Core, a popular brand. Foamboard is a sandwich of paper or plastic glued to both sides of a layer of densely compressed foam. Heavy-duty cardboard and lightweight plastic board used to make signs are also contenders.
Let’s take a closer look at these. Even more details on these construction materials are found in later chapters.
WOOD
If Noah can build an ark out of wood, it’s probably good enough for robots. Wood is reasonably inexpensive and can be worked using ordinary tools.
Avoid soft “plank” woods, like pine and fir; and instead select a hardwood plywood designed for model building. Though more expensive—about $7 to $10 for a 12″ × 12″ square—this material is superior for robot building. These plywoods are less likely to warp, crack, or fleck. They’re available at hobby and craft stores.
FYI
See Chapter 7, “Working with Wood,” for more details on using wood in your robots.
PLASTIC
There are literally thousands of plastics, but don’t let that alarm you. For robotics, there are just a small handful of plastic materials that are both affordable and readily available. These same plastics also tend to be the ones most easily worked using standard shop tools.
![]() Acrylic is used primarily for decorative or functional applications, such as picture frames or salad bowls. It’s usually clear but also comes in solid and translucent colors. You have to be careful of cracking caused by too much weight.
Acrylic is used primarily for decorative or functional applications, such as picture frames or salad bowls. It’s usually clear but also comes in solid and translucent colors. You have to be careful of cracking caused by too much weight.
![]() Polycarbonate is similar in looks to acrylic but is considerably stronger. This plastic is a common substitute for window glass; because of its increased density, it’s much harder to work with and is more expensive.
Polycarbonate is similar in looks to acrylic but is considerably stronger. This plastic is a common substitute for window glass; because of its increased density, it’s much harder to work with and is more expensive.
![]() A special type of PVC that comes in sheets, called expanded PVC, is ideal for making small and medium-size robots. An example robot made with PVC is shown in Figure 5-1. It’s easier to work with than either acrylic or polycarbonate plastic.
A special type of PVC that comes in sheets, called expanded PVC, is ideal for making small and medium-size robots. An example robot made with PVC is shown in Figure 5-1. It’s easier to work with than either acrylic or polycarbonate plastic.
![]() Specialty plastics. And last, there are a couple of plastics that are a bit harder to find (you get them at specialty plastics outlets; check your local Yellow Pages), but they offer certain advantages. These include ABS, acetal resin, and nylon. Their use in robotics is covered in more detail in Chapter 9, “Working with Plastic,” for more details on using plastic materials.
Specialty plastics. And last, there are a couple of plastics that are a bit harder to find (you get them at specialty plastics outlets; check your local Yellow Pages), but they offer certain advantages. These include ABS, acetal resin, and nylon. Their use in robotics is covered in more detail in Chapter 9, “Working with Plastic,” for more details on using plastic materials.
METAL
The archetypal material for robots is metal. It’s among the most expensive materials for robots—in terms of both cost and weight—and is harder to work unless you have the proper tools and skills. That said, metal is a must if your robot will be bashing other robots to death in combat or if it’s made for rugged outdoor use.
For robots, aluminum and steel are the most common metals. Aluminum is a softer metal, so it’s easier to work with. But steel is several times stronger, and it’s easier to weld if you’re planning on building a large robot.
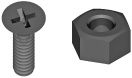
There are three general approaches to metal construction in robots, shown in Figure 5-2:

Figure 5-1 Expanded PVC is an ideal construction material for robotics. It’s inexpensive and lightweight, and it cuts and drills like wood. It comes in a variety of colors and thicknesses to match the needs of your project.
![]() A flat frame provides the base of the robot and lends it support. A box-shaped frame is just what its name implies: a 3D box with six faces. It’s well suited for larger robots or those that require extra support for heavy components.
A flat frame provides the base of the robot and lends it support. A box-shaped frame is just what its name implies: a 3D box with six faces. It’s well suited for larger robots or those that require extra support for heavy components.
![]() A shaped base is a piece of metal cut in the shape of the robot. The metal must be rigid enough to support the weight of the motors, batteries, and other parts without undue bending or flexing. Some very capable robots are basically a piece of sheet metal on wheels, with a laptop PC resting on top.
A shaped base is a piece of metal cut in the shape of the robot. The metal must be rigid enough to support the weight of the motors, batteries, and other parts without undue bending or flexing. Some very capable robots are basically a piece of sheet metal on wheels, with a laptop PC resting on top.
Robots made of wood, plastic, or other materials may nevertheless use metal (typically aluminum) in their construction. Common metal parts include brackets, to hold pieces together, and nuts, screws, and other fasteners.
FYI
See Chapter 11, “Working with Metal,” for more details on using metal materials in your robots.
LIGHTWEIGHT COMPOSITES
Not every robot needs to withstand a winter sandstorm on Mars. A technique known as rapid prototyping uses lightweight materials that are cut with basic hand tools, like knives and hobby saws, and awls or even nails for punching out holes. With rapid prototyping you can make a robot in less time, for less money. It’s a good way to test out a design before you build it using stronger materials.
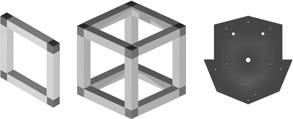
Figure 5-2 The three basic types of robot bases: square frame (it can actually be made of wood, plastic, or metal), a box frame, and a shaped base that provides the structure for the robot’s components.
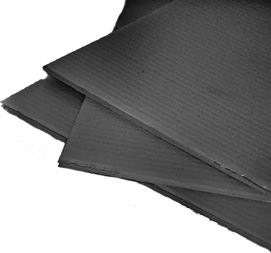
Figure 5-3 Corrugated plastic is like cardboard but made out of plastic. It’s well suited for small and lightweight robots that you want to construct in a hurry. The material can be cut with a knife.
Rapid prototyping is such an important concept in amateur robot building that the subject gets its own chapter (see Chapter 14, “Rapid Prototyping Methods”), but for now, here are some of the typical materials used:
![]() Heavy-duty cardboard is surprisingly strong, yet easy to cut and drill. This stuff is heavier (and thicker) than your average cardboard box, but the concept is the same. It’s made by sandwiching paper over a corrugated middle. Heavy automotive parts are often shipped in heavy-duty cardboard boxes, and you can buy the cardboard new.
Heavy-duty cardboard is surprisingly strong, yet easy to cut and drill. This stuff is heavier (and thicker) than your average cardboard box, but the concept is the same. It’s made by sandwiching paper over a corrugated middle. Heavy automotive parts are often shipped in heavy-duty cardboard boxes, and you can buy the cardboard new.
![]() Laminated composite materials include foamboard, which is a piece of plastic foam inside two sheets of heavy paper. Other kinds of laminated composite sheets may use a combination of wood, paper, plastic, even thin metal.
Laminated composite materials include foamboard, which is a piece of plastic foam inside two sheets of heavy paper. Other kinds of laminated composite sheets may use a combination of wood, paper, plastic, even thin metal.
![]() Corrugated plastic is a favorite among sign makers. They use sheets of it to make lightweight (and very affordable) indoor and outdoor signs. These look like cardboard, as in Figure 5-3, but they’re entirely made of plastic.
Corrugated plastic is a favorite among sign makers. They use sheets of it to make lightweight (and very affordable) indoor and outdoor signs. These look like cardboard, as in Figure 5-3, but they’re entirely made of plastic.
In Review: Selecting the Right Material
Let’s review the four main construction materials for building robots and compare their good and bad sides.
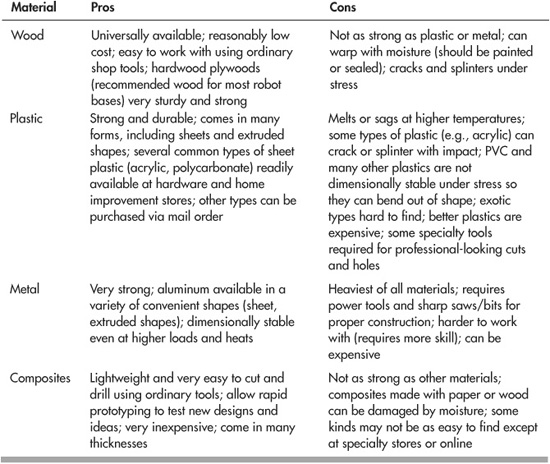
Remember! There is no single “ideal” material for constructing robots. Each project requires a review of:
The robot itself, especially its physical attributes—large, small, heavy, light.
The tasks the robot is expected to do. Robots that do not perform heavy work, such as lifting objects or smashing into other robots, do not require heavy-duty materials.
Your budget. Everyone has a limit on what he or she can spend on robot materials. Tight budgets call for the least expensive materials.
Your construction skills. Robots made from wood, plastic, and composites are easier to build than metal ones.
Your tools. Building robots with metal or thick plastics require heavier-duty tools than when building wood or thick plastic bots.
Robots from “Found” Parts
Before leaving the subject of robot materials, I want to touch on a special construction style known as found parts. You’ll read more about the concept in Chapter 16, “Constructing High-Tech Robots from Toys,” and Chapter 17, “Building Bots from Found Parts,” but here’s a quick overview.
With found parts you adapt some ready-made manufactured product that you find (in a store, in your house, on the side of the road) to serve as the base of your robot. Inexpensive housewares, hardware items, and toys can be used in various creative ways to make robot building faster and more economical. Examples of found parts include old CDs and DVDs and plastic container boxes.
Basic Tools for Constructing Robots
Construction tools are the things you use to fashion the frame and other mechanical parts of your robo-buddy. These include such mundane things as a screwdriver, a saw, and a drill.
Take a long look at the tools in your garage or workshop. You probably already have everything you need to build your robot. But if you’re short a tool or two, relax in knowing that constructing an amateur robot—at least the ones described in this book—doesn’t require anything special.
There are other tools for constructing robot electronics. These tools are detailed in their own chapter; see Chapter 30, “Building Robot Electronics—the Basics.”
TAPE MEASURE

You need a way to measure things as you build your robot. A retractable 6- or 10-foot tape measure is most convenient. Nothing fancy; you can get one for a few dollars at a discount store. Graduations in both inches and metric is helpful, but it’s not critical.
A paper or fabric tape measure—one yard long, available at yardage stores, often for free—can substitute in a pinch but may not be as accurate. They’re handy for measuring in tight places.
SCREWDRIVERS
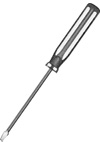
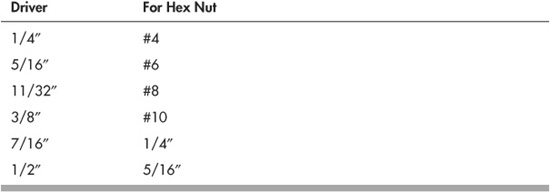
You need a decent set of screwdrivers, with both flat and Phillips (cross) heads, as shown in Figure 5-4. These come in sizes; get #0 (small) and #1 (medium) Phillips, and small- and medium-tip flat-blade drivers. Magnetic tips are handy, but not necessary. Be sure to purchase a good set. Test the grips for comfort. The plastic of the grip should not dig into your palm. Try soft (rubber) coated grips for extra comfort.
HAMMER
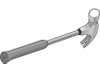
None of the designs in this book call for pounding nails into wood, but you might still use a hammer for tapping parts into alignment or for using a center punch to mark a spot for drilling a hole. A standard-size 16-oz claw hammer is perfect for the job, but a ball-peen hammer also works, as long as it’s not too large. You don’t want a sledgehammer when a gentle knock is all you need.

Figure 5-4 The basic assembly tool for making a robot is the screwdriver. There are two common types, Phillips and flat.
PLIERS
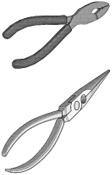
Pliers hold parts while you work with them. A pair each of standard and needle-nose pliers is enough for 94.5 percent of all jobs. Don’t use either as a wrench for tightening nuts; they’ll slip and round off the corner of the nut, making it harder to remove later on. Instead, use a nut driver, detailed below.
For heavy-duty applications, purchase a larger pair of needle-nose pliers. A set of “lineman’s” pliers can be used for the big jobs, and they provide a sharp cutter for clipping nonhardened wire.
HACKSAW
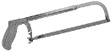
The hacksaw is the mainstay of robot building. Look for a model that allows quick blade changes. Common blade sizes are 10″ and 12″ in length. The smaller blade length is recommended when working with metal. Purchase an assortment of carbide-tipped blades in 18 and 24 teeth per inch (referred to as tpi, or pitch).
By convention, hacksaw blades are inserted so that the teeth face forward. That means the saw cuts when you push the blade away from you. However, there is no strict rule about this. Experiment to see what works best for you.
ELECTRIC DRILL
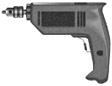
You use a drill to make holes; an electric drill makes the whole hole process easier. Pick an electric motorized drill with a 1/4″ or 3/8″ chuck—the chuck is the part where the drill bit is inserted. Chuck size determines maximum diameter for the shank of the bit. The vast majority of work on small robots will require bits of 1/4″ or smaller.
Spring for an adjustable-speed, reversible drill. The slight added price is well worth it. Adjusting the speed is important when working with different kinds of materials, as some (like metal) need a slower tool.
DRILL BITS
![]()
A drill is what turns a bit; the bit is what actually makes the holes.
So, with that amazingly helpful clarification out of the way, let’s get on with the advice: purchase a drill bit set in so-called jobber length. In the United States and other locations where they still use inches, drill bits are measured in fractional sizes. The typical fractional drill bit set contains 29 bits (give or take), in sizes from 1/16″ to 1/2″, in 64ths-of-an-inch steps. For most robotic creations, you’ll use only a third of these, but it’s nice to have the full set in case you ever need the others.
FYI
Drill bits under 1/4″ are also identified by their numerical size. For example, a #36 bit is the same as 7/64″. See Appendix C, “Mechanical Reference,” for a handy chart comparing number drill bits with their fractional counterparts.
![]() The least expensive drill bits for robot building are made of high-carbon steel.
The least expensive drill bits for robot building are made of high-carbon steel.
![]() Better drill bits are made with high-speed steel, and these keep their sharpness for longer. These are fine for most amateur robotics workshops.
Better drill bits are made with high-speed steel, and these keep their sharpness for longer. These are fine for most amateur robotics workshops.
![]() Tungsten carbide bits stay sharp the longest even when cutting metal. They’re more expensive than the others.
Tungsten carbide bits stay sharp the longest even when cutting metal. They’re more expensive than the others.
![]() Cobalt bits are the Terminator of the bunch. They drill into most anything, including hardened steel.
Cobalt bits are the Terminator of the bunch. They drill into most anything, including hardened steel.
Drill bits have different kinds of coatings, which extend their life. However, when coated, the bit usually can’t be resharpened, as the resharpened edge will no longer have the coating. Black oxide coating is the least expensive of them all, and is useful for wood, soft plastic, and thin aluminum. Various titanium coatings greatly extend the life of your bits, allowing you to use them on thicker aluminum and steel.
Save money! Get a standard fractional drill set in standard high-speed steel, then augment that set with specific sizes of more-expensive longer-lasting bits. The most commonly used bit in my shop is 1/8″, so I get extras of those with a titanium coating.
SCREWDRIVER BITS

When you find you’re doing a lot of screw assembly, invest a few dollars in a set of Phillips and flathead bits for use in drills and motorized driver tools. These fit into the drill chuck like any other bit but are used to tighten and untighten screws. To be useful, your drill needs a variable-speed motor; you’ll surely strip out the screws if you try to use the bits at high speed.
HOBBY KNIFE

Hobby knives include the X-Acto brand, sporting interchangeable blades. They’re ideal for cutting cardboard, foamboard, and thin plastics. A word of caution: The blades in these knives are extremely sharp. Use with care.
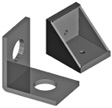
NUT DRIVER

Nut drivers look like screwdrivers, but they’re made to tighten hex-head (six-sided) nuts. They come in metric and imperial (inch) sizes. On the imperial front, common driver sizes are:
Optional Tools
There are a couple more tools that are nice to have but aren’t absolutely critical to build a robot. Add them as your budget allows.
![]() Miter boxes help you make straight and angled cuts into tubing, bars, and other “lengthwise” material. Attach the miter box to your worktable.
Miter boxes help you make straight and angled cuts into tubing, bars, and other “lengthwise” material. Attach the miter box to your worktable.
![]() A vise holds parts while you drill, cut, or otherwise torment them. What size vise to get? One that’s large enough for a 2″ block of wood, metal, or plastic is about right.
A vise holds parts while you drill, cut, or otherwise torment them. What size vise to get? One that’s large enough for a 2″ block of wood, metal, or plastic is about right.
![]() A drill press sits on your workbench or table. It helps you make smoother, more accurate holes. Lower the bit and drill the hole by turning a crank.
A drill press sits on your workbench or table. It helps you make smoother, more accurate holes. Lower the bit and drill the hole by turning a crank.
Hardware Supplies
A robot is about 70 percent hardware and 30 percent electronic and electromechanical components. Most of your trips for robot parts will be to the local hardware store. The following sections describe some common items you’ll want to have around your shop.
SCREWS AND NUTS
Screws and nuts are common fasteners used to keep things together. Screws (called bolts when they’re bigger) and nuts come in various sizes, either in metric or in imperial (inch) units. For this book I stick with imperial sizes, because that’s still what we use in the United States, and it’s what I’m used to.
Anyway, here are the very basics of what you should have to build your robots. You can read more about fasteners in Chapter 13, “Assembly Techniques.”
![]() Use 4-40 size screws and nuts for the typical tabletop robot. The “4” means it’s a #4 fastener; the “40” means there are 40 threads per inch. Screws come in various lengths, with 3/8″, 1/2″, and 3/4″ being the most useful for small robotics. I use 4-40 × 1/2″ screws the most.
Use 4-40 size screws and nuts for the typical tabletop robot. The “4” means it’s a #4 fastener; the “40” means there are 40 threads per inch. Screws come in various lengths, with 3/8″, 1/2″, and 3/4″ being the most useful for small robotics. I use 4-40 × 1/2″ screws the most.
![]() For bigger parts and bigger robots, use 6-32, 8-32, and 10-24 screws and nuts. The most commonly used screw lengths are 1/2″, 3/4″, 1″, and 1-1/2″. These and other sizes are available at any hardware or home improvement store, and you can pick up what you need when you need it.
For bigger parts and bigger robots, use 6-32, 8-32, and 10-24 screws and nuts. The most commonly used screw lengths are 1/2″, 3/4″, 1″, and 1-1/2″. These and other sizes are available at any hardware or home improvement store, and you can pick up what you need when you need it.
![]() For very heavy duty work, you want 1/4″-20 or 5/16″ hardware. (1/4″-20 means the screw is 1/4″ in diameter and has 20 threads per inch; the standard for this size). Get these only when plans call for them.
For very heavy duty work, you want 1/4″-20 or 5/16″ hardware. (1/4″-20 means the screw is 1/4″ in diameter and has 20 threads per inch; the standard for this size). Get these only when plans call for them.
Locking nuts are a special kind of nut you’ll use a lot in robotics. They have a piece of nylon plastic built into them that provides a locking bite when they are threaded onto a screw.
WASHERS

Washers are used with screws and nuts and help to spread out the pressure of the fastener. They’re also used when you want to make sure the nut and screw don’t come apart. The most common is the flat washer, which is typically used to keep the head of the screw (or the nut) from pulling through the material. Tooth and split lock washers apply pressure against a nut to keep it from coming loose.
ANGLE BRACKETS
Also ideal for robot construction is an assortment of small steel or plastic brackets. These are used to join two parts together. They come in different sizes, the smaller sizes being perfect for use on desktop robots—smaller brackets weigh less. I often use 1-1/2″ × 3/8″ flat corner steel brackets when joining two pieces cut at 45° angles to make a frame.
Setting Up Shop
You can build a robot anywhere. But it’s more pleasurable when your workspace is well lighted, tidy, and comfortable.
A garage is an ideal location because it affords you the freedom to cut and drill without worrying about getting the pieces in the carpet. Electronic assembly can be done indoors or out, but I’ve found that when working in a carpeted room, it’s best to spread another carpet or some protective cover over the floor. When the throw rug gets filled up with solder bits and little pieces of debris, I take it outside, beat it over a trash can with a broom handle, and it’s as good as new.
No matter where you set up your robotics lab, be sure all your tools are within easy reach. Keep special tools and supplies in an inexpensive fishing tackle box. The tackle box provides lots of small compartments for screws and other parts. For the best results, your work space should be an area where the robot-in-progress will not be disturbed if you have to leave it for a time. The worktable should also be off limits or inaccessible to young children.
Good lighting is a must. Both mechanical and electronic assembly require detail work, and you will need good lighting to see everything properly. Supplement overhead lights with a 60-watt (minimum) desk lamp. You’ll be crouched over the worktable for extended periods of time, so a comfortable chair or stool is a must.