
Chapter 11
Working with Metal
Before the modern dependency on plastic, metal was the mainstay of the construction material world. Toys were not made of plastic, as they are today, but of tin.
Metal is a good material for building robots because it offers extra strength that other materials cannot. In this chapter you’ll learn how to construct robots out of readily available metal stock, without resorting to welding or custom machining.
All about Metal for Robots
Metal is routinely broken into two broad categories: ferrous and nonferrous.
![]() Ferrous metals are made from iron (Fe, from which “ferrous” is derived, is the symbol for iron on the Periodic table of elements).
Ferrous metals are made from iron (Fe, from which “ferrous” is derived, is the symbol for iron on the Periodic table of elements).
![]() Metals other than iron are nonferrous. This includes copper, tin, and aluminum.
Metals other than iron are nonferrous. This includes copper, tin, and aluminum.
When you buy a piece of metal, you’re seldom buying the stuff in its pure form. Instead, metal is almost always processed with other metals. The resulting material is called an alloy. Different alloys provide different properties for the metal. For example, there are aluminum alloys specifically designed for casting, and others intended for machining parts.
ALUMINUM
Aluminum is the most common metal used in robot construction projects, partly because of cost and partly because it is strong yet lightweight. It’s also one of the easier metals to cut and drill, and it requires only a modest assortment of tools. The aluminum you buy at the hardware store is actually an alloy; raw aluminum (which is manufactured from bauxite ore) has little commercial value as a finished metal. Rather, the alumina metal is alloyed with other metals.

Figure 11-1 Extruded aluminum is available in a variety of handy shapes for building robots. Strips, angles, and channels are among the most useful.
Aluminum alloys are identified by number. A common aluminum alloy is 6061, which boasts good machinability (it’s not difficult to drill or saw), yet is still lightweight and strong. Common forms of aluminum useful for robotics include thin sheets and extruded shapes, such as squares, tubes, angle Ls, and U-channel (Figure 11-1).
STEEL
Iron is used to make steel, which is further classified by the amount of carbon added to it during processing. The kind of steel you can routinely find at the local welder’s shop or home improvement store has low amounts of carbon and is called mild steel.
Stainless steel is a special formulation of steel with small amounts of chromium added in. The chromium develops a microscopic film on the metal that helps it to resist rust and corrosion. Because stainless steel is very difficult to work with, is hard to weld, and is more expensive than most other metals, it’s seldom used in amateur robots (exception: combat robots).
COPPER
Copper is available as just copper metal, but it’s also often alloyed with other metals to make something else. When combined with zinc, copper makes brass; when combined with tin, copper makes bronze. All three are soft metals and are relatively easy to cut and drill.
Copper and its alloys can be readily annealed, which is the process of heating the metal to high (but not melting point) temperatures, then allowing it to cool very slowly. Annealing is used to change such properties as the softness of the metal. Annealing is commonly used to make metal springs and metallic spring strips.
ZINC AND TIN
Zinc and tin are often employed as an alloy ingredient or as a coating. Tin, which resists corrosion and inhibits rust, is also a common material in some crafts and home decorating. Tin is a soft metal, and if the sheet is thin enough, it can be cut with a pair of large scissors. It’s easy to make hold-down straps and other parts using tin sheets designed for “punch” crafts.
Measuring the Thickness of Metal
There are many ways to denote the thickness of metal. The most common are:
![]() Fractional inch/millimeters. Metal primarily sold to consumers may be specified using inches or metric units. Thickness is expressed in fractions, such as 3/64″ or 1/16″. When in metric, the thickness is in millimeters.
Fractional inch/millimeters. Metal primarily sold to consumers may be specified using inches or metric units. Thickness is expressed in fractions, such as 3/64″ or 1/16″. When in metric, the thickness is in millimeters.
![]() Decimal inch. There’s more precision in measuring thickness as a decimal value, down to the thousandths of an inch. A thickness of .032 means the metal is 0.032″ thick—or “thirty-two thousandths.”
Decimal inch. There’s more precision in measuring thickness as a decimal value, down to the thousandths of an inch. A thickness of .032 means the metal is 0.032″ thick—or “thirty-two thousandths.”
![]() Mil. In this case “mil” doesn’t mean millimeters or millionths or military, but a unit of measure equal to one thousandth of an inch. A decimal thickness of 0.032″ is equivalent to 32 mils. By comparison, a plastic trash can liner is usually 2 to 4 mils.
Mil. In this case “mil” doesn’t mean millimeters or millionths or military, but a unit of measure equal to one thousandth of an inch. A decimal thickness of 0.032″ is equivalent to 32 mils. By comparison, a plastic trash can liner is usually 2 to 4 mils.
![]() Gauge. This is a pseudo-standard used to specify the thickness of various materials, especially sheet metal and wire. Gauges of different types of materials aren’t always the same (e.g., between plastic and metal), so you can’t readily compare one to another. Purely as an example, 20-gauge aluminum is 0.032″ thick.
Gauge. This is a pseudo-standard used to specify the thickness of various materials, especially sheet metal and wire. Gauges of different types of materials aren’t always the same (e.g., between plastic and metal), so you can’t readily compare one to another. Purely as an example, 20-gauge aluminum is 0.032″ thick.
Complicating matters: When used with metal sheet, gauge varies depending on the metal. That hunk of 20-gauge aluminum is equivalent to something between 21 and 22 gauge for steel, and 13 gauge for zinc.

You need a machinist’s micrometer (Figure 11-2) to accurately measure the thickness of metal. Digital micrometers can be switched between decimal inch and other units of measure (typically millimeters), but less expensive models just have a mechanical scale, which can take a bit of getting used to.
They’re not hard to operate, but you’ll want to read the instructions that come with the tool for general guidelines on how to read the markings. When using micrometers marked in inches, the measurement will be in thousandths of an inch, .001″. Most metric micrometers are marked in half-a-millimeter steps.
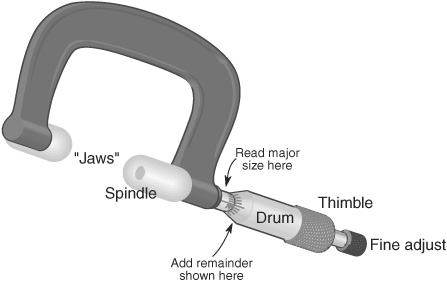
Figure 11-2 Use a micrometer to measure the size or thickness of small parts.
What’s This about Heat Treatments?
When shopping for metal bits and pieces, you may come across references to how the material was heat treated. Heat treating is used to enhance certain physical properties of the metal. As heat treatments can affect the price of the metal, there’s no reason to pay for something you don’t need. So you can be an informed shopper, here are the most common treatments in a nutshell:
![]() Hardening strengthens the metal and literally makes it harder. The process also makes the metal more brittle. Tools are commonly made of hardened steel, and the hardening process makes it very difficult to cut or drill the metal.
Hardening strengthens the metal and literally makes it harder. The process also makes the metal more brittle. Tools are commonly made of hardened steel, and the hardening process makes it very difficult to cut or drill the metal.
![]() Annealing softens the metal and makes it more workable—a metal that is ductile or malleable is easier to work with, usually because it’s been annealed. Copper is routinely annealed, but many other metals, like aluminum, can be annealed, too.
Annealing softens the metal and makes it more workable—a metal that is ductile or malleable is easier to work with, usually because it’s been annealed. Copper is routinely annealed, but many other metals, like aluminum, can be annealed, too.
![]() Tempering removes some of the hardness and brittleness of steel and in doing so makes it even tougher. An example of a tempered aluminum alloy that you may encounter is 6061-T6, which has several times the strength of the same alloy untempered.
Tempering removes some of the hardness and brittleness of steel and in doing so makes it even tougher. An example of a tempered aluminum alloy that you may encounter is 6061-T6, which has several times the strength of the same alloy untempered.
![]() Case hardening is a coating process for soft steels and allows relatively low-carbon steels, such as wrought iron, to be hardened. It’s frequently used with steel to make tools.
Case hardening is a coating process for soft steels and allows relatively low-carbon steels, such as wrought iron, to be hardened. It’s frequently used with steel to make tools.
Hardening and tempering can be accomplished in the home shop, useful for the die-hard combat robot enthusiast. The subject is beyond the scope of this book, but if you’re interested in the concept, check your local library for a good tutorial on home metalworking.
Where to Get Metal for Robots
You’ll find most metals for robot building at these local sources. If they don’t provide the materials you need, try a Web search to locate mail-order suppliers of the metals you want:
Hardware and home improvement stores carry some aluminum and steel sheets, but look for angle brackets, rods, and other shapes. See the section “Metal from Your Home Improvement Store,” below, for more details.
Hobby stores sell aluminum, brass, and copper, in small sheets, rods, tubes, and strips. A common brand sold by stores in North America is K&S Engineering. The metal is sold in small quantities, which makes it more expensive, but more convenient. Read more in “Metal from Craft and Hobby Stores.”
Metal supply shops that cater to welders are usually open to the public and offer all kinds of useful metal. Many sell stock in large pieces, which you can have cut so you can get it home in your car. Tip: Check out the “remnant” bin for odds-and-ends sizes.
Restaurant supply stores, most of which are open to the public, sell many aluminum and steel materials. Look for spun bowls, cookie and baking sheets, unusually shaped utensils, strainers, and other items that you can adapt to your robot creations. Metal is metal.
Recap of Metals for Robotics
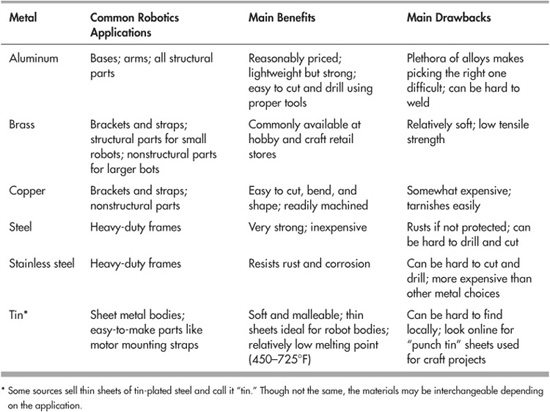
See Table 11-1 for a review of metals that are particularly well suited for the construction of robotics. Each metal is noted with its common use, main benefits, and principle drawbacks.
Table 11-1 Summary of Metals for Robot Building
Metal from Your Home Improvement Store
Your local home improvement or hardware store is the best place to begin your search for metal. Depending on the store, here’s what you may find:
EXTRUDED ALUMINUM
Aluminum comes in all kinds of forms, including sheets, bars, rods, and something called extrusions. It’s the last form that’s really—and I mean really—useful in robot making. I started using it for my bots back in the ’80s, when most folks were still cutting out sheet metal to form robot bodies. Ugh! Extruded aluminum has now become the number one metal for making homebrew robots.
Extruded aluminum is made by pushing molten metal out of a shaped orifice, as those Play-Doh Fun Factory play sets do. As the metal cools it retains the exact shape of the orifice. Extruded aluminum generally comes in various lengths, from 12 inches to 12 feet. My local stores routinely sell it in 4-foot lengths. It’s often used in home improvement jobs to trim the edge of wood or tile and to make channels for shower doors.
There’s lots of variety to choose from, allowing you to pick the extrusion to match your project. Common shapes include equal and unequal L-angles, U-channels, and flat bars.
I’ve found the following extrusions among the most useful in my robot building. Try these for starters, but don’t be afraid to select other shapes and sizes for your projects. For easy comparison, several of the most popular extrusion variations are shown in Figure 11-3.
![]() U-channel—equal and unequal sizes. A popular size is 1/2″ × 1/2″ × 1/16″ U-channel, which is sold as trim edge for 3/8″ plywood.
U-channel—equal and unequal sizes. A popular size is 1/2″ × 1/2″ × 1/16″ U-channel, which is sold as trim edge for 3/8″ plywood.
![]() Angle—equal and unequal. The 1/2″ × 1/2″× 1/16″ (equal) angle stock is especially useful for use in robots up to about 15″ in size.
Angle—equal and unequal. The 1/2″ × 1/2″× 1/16″ (equal) angle stock is especially useful for use in robots up to about 15″ in size.
![]() Bar and rod. Example: 3/4″-wide × 1/16″-thick flat bar.
Bar and rod. Example: 3/4″-wide × 1/16″-thick flat bar.
TIE PLATES
Tie plates are designed to strengthen the joint of two or more pieces of lumber that are nailed together. The plates are made of steel but are galvanized to resist rust. The galvanizing gives the metal a noticeable mottled look.
Check for this stuff in the lumber area of your home improvement store. Much of what they’ll offer is preformed shaped for specific jobs, such as attaching 2-by-4 lumber to a ceiling beam. What you want is the flat plates (or flat plates with a flanged edge; those are useful, too), available in several widths and lengths. Common widths are 3″ to 5″ and lengths from 3″ to 7″. See Figure 11-4 for a size comparison of popular 3″ × 5″, 3″ × 7″, and 3″ × 9″ plates.
You can use the plates as is or cut them to size. The plates have numerous predrilled holes to help you hammer in nails, but the metal is thin enough (usually 20 gauge or so) that you can drill new holes. Just be sure to use sharp drill bits.
In North America the most common brand of tie plate is the Simpson Strong-Tie. Visit the company’s Web site (www.strongtie.com) for sizes and specifications of their various products. In Chapter 12 you’ll learn how to use some of these common and inexpensive tie plates to make a sturdy metal robotic base.

Figure 11-3 Look for extruded aluminum at your neighborhood hardware or home improvement store. It comes in various lengths and may be cut to size using a hacksaw.
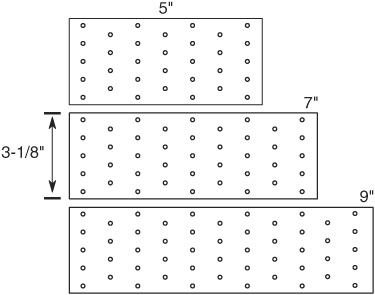
Figure 11-4 Tie plates are made of galvanized steel and are useful as base or construction metal for your robots. They come in different sizes; avoid unnecessary cutting by matching the size to best fit your intended use.
STEEL TUBES AND ANGLES
Most hardware stores carry a limited quantity of extruded round and square tubes, as well as angles and other shapes. These are solid and fairly heavy items made with 14-gauge steel. Use them when you need lots and lots of support. Many are predrilled with holes along the sides, saving you the effort. You still have to cut them, though. For cutting, use a hacksaw with a new fine-toothed blade, as detailed later in this chapter.
EMT PIPE
EMT means electrical metallic tubing, often referred to as metal conduit or thinwall. It’s used to enclose electrical wiring for a building—and sometimes to make robots. You’ll find it in the electrical section of the hardware or home improvement store.
Conduit comes in a variety of sizes, starting with 1/4 and going up. The 1/2 and 3/4 sizes are more common. Electrical conduit pipe can be used to make unusual robot frames. You can bend it with a conduit-bending tool.
The sizes of EMT conduit is not in fractional inches, though it’s often listed that way in catalogs and stores. Depending on the metal used, EMT 1/2 (the 1/2 is called the trade size) is actually 0.622″ on the inside and 0.706″ on the outside. When shopping, bring along a tape measure so you can be sure you’re getting the size you need.
In addition to the EMT pipe itself, other conduit-related materials are useful in robot construction. Topping the list is the conduit hanger and clamp, like that in Figure 11-5. These make good mounts for things like motors. You can almost always find a conduit hanger or clamp that will fit a round-shape motor—give it a bit of a squeeze or stretch if the size isn’t perfect right off the bat.
Metal from Craft and Hobby Stores
Hobby and craft stores are another handy outpost for your metal needs. Sheets of stainless steel, copper, and even bronze are common. Some of the metal products are meant to be used for decorative purposes, so they’re very thin and not as useful as structural parts in a robot. These are more like thick aluminum foil than metal sheets. But other, heavier pieces (22 gauge and above) are suitable for making bases and frames.
Besides sheet metal there are metal strips, bars, and tubes, both round and square. The tubes are sized so that they “telescope”—they fit within one another. You might use these to make ersatz shaft couplers, for example, to match a small shaft to a larger wheel hole. In fact, Chapter 24, “Mounting Motors and Wheels,” discusses this very topic.
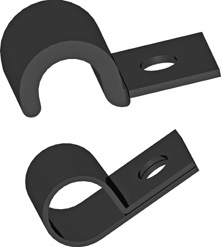
Figure 11-5 EMT pipe clamps make for useful motor mounts on your robots. They come in plastic or metal, in various sizes and styles.
The Metalsmith’s Art
One reason to use metal for your robot is that it’s stronger. It also looks pretty cool—though to be fair, you can get plastic that looks like metal, but that’s beside the point. Another key benefit is the longevity of a metal or frame; it simply lasts longer. Even if your robot falls off the table or gets mauled by the dog, at least its body will remain intact.
But while metal provides a resiliency that wood and plastic cannot match, it’s harder to work, costs more, and weighs more. Choices, choices.
As first discussed in Chapter 6, “Mechanical Construction Techniques,” to cut metal you should use a hacksaw outfitted with a fine-tooth blade—24 or 32 teeth per inch. Coping saws, keyhole saws, and other handsaws are generally engineered for cutting wood, and their blades aren’t fine enough for metal work.
You’ll probably do most of your cutting by hand. When cutting pieces for a frame you’ll want a miter box. You don’t need anything fancy. Be sure to get a miter box that lets you cut at 45° both vertically and horizontally. Firmly attach the miter box to your workbench using hardware or a large clamp.
You’ll always have better-than-average results if you use sharpened, well-made tools. Dull, bargain-basement tools can’t effectively cut through aluminum or steel stock. Instead of the tool doing most of the work, you do. That’s no fun, and robotics is supposed to be fun.
![]()
Cutting, drilling, and finishing metal are hazardous! Be sure to always wear eye and ear protection. Don’t disengage the safety device on any tool. Follow all manufacturer instructions. When using power tools be sure to hold smaller pieces in a vise or clamp while you work with them. DO NOT ever hold the work with your bare hands!
CUTTING A BASE
Use sheet metal to make robot bases. Mild steel and aluminum are the most common for use in bots, and they are relatively inexpensive. For both, select a thickness that will support the size and weight of the robot, but without adding undue weight of its own. Consider the following starting points in your design.
For small robots, under 8″:
![]() Aluminum: 1/32″ to 1/16″ (0.03125″ to 0.0625″)
Aluminum: 1/32″ to 1/16″ (0.03125″ to 0.0625″)
![]() Steel: 22–20 gauge
Steel: 22–20 gauge
For medium robots, 9″ to 14 ″:
![]() Aluminum: 1/16″ to 1/8″ (0.0625″ to 0.125″)
Aluminum: 1/16″ to 1/8″ (0.0625″ to 0.125″)
![]() Steel: 20–18 gauge
Steel: 20–18 gauge
For large robots, 14″ and over:
![]() Aluminum: 1/8″ to 1/4″ (0.125″ to 0.250″)
Aluminum: 1/8″ to 1/4″ (0.125″ to 0.250″)
![]() Steel: 18–16 gauge
Steel: 18–16 gauge
Cutting sheet metal by hand is a chore, but it can be done with a bit of work. These are some specialty hand tools for cutting sheet metal:
Aviation snips are suitable for aluminum under 1/8″ (0.125″) thick, or 18-gauge thickness for steel. When cutting out circular bases, consider using a right-or left-hand tool; it’ll make better cuts. “Right-hand” and “left-hand” in this case refer to the direction of the cut, not whether you are right-or left-handed.
A nibbler tool takes out little bites to cut and shape the metal.
Pneumatic shears make quick work of cutting sheet metal. I don’t know what I’d do without mine! The shears themselves are relatively inexpensive (most under $40), but you need a suitable air compressor to power them. An alternative is all-electric sheet metal shears, but these cost more. With both, the maximum practical thickness is 18-gauge steel.
The basic steps are the same whether you use snips, nibbler, or shears:
1. Use a scribe or construction pencil (anything that writes on metal) to mark the cut you want to make.
2 Hold the metal sheet in one hand—use a work glove if you need to—and the cutting tool in the other, or clamp the metal in a vise.
3. Cut along the marked path. If you need to make sharp turns, you may have to cut (or nibble) away from the scrap portion of the work, then approach the path from another angle.
4. Smooth the edges with a metal file or fine-grit sandpaper, as detailed later in this chapter.
Figure 11-6 shows an example of galvanized 20-gauge tie plate being cut with an air shear. Tie plates are very inexpensive (this one cost under a dollar), and they’re commonly used in home construction.
Cutting Thick Sheet Metal
For thicker stocks, specialized metalworking tools are needed. On large pieces, a metal brake is used to make straight cuts. You probably don’t own one of these, but if you attend school, ask the shop teacher if you can use the school’s for a few minutes.
Very thick steel (1/4″ or more) can be cut with a torch, then ground down as needed with an electric grinder. Obviously, this requires a cutting torch and the experience that goes with using it.
Cutting Thin Sheet Metal
On the other side of the spectrum, the thinner aluminum stocks (1/32″ and under) can be cut to shape using aviation snips (see above) or even a pair of heavy-duty scissors. You can also use a scroll saw, as long as it is a variable-speed model (use the slower speeds) and you’ve equipped it with a metal cutting blade.
CUTTING A FRAME
Robot frames can be constructed using aluminum extrusions, described above in “Metal from Your Home Improvement Store.” These pieces are meant to be used for such things as trim for a shower door in the bathroom, but it won’t mind if it’s used for making a robot.
Figure 11-6 Air shears make quick work out of cutting sheet metal. Use a pencil to mark the line you want to cut, then slowly work the tool around the contours of the line.
![]() U-channel (equal and unequal). U-channel is available with equal and unequal dimensions. Pick the style best suited for your project. It’s available in thicknesses starting at 1/32″.
U-channel (equal and unequal). U-channel is available with equal and unequal dimensions. Pick the style best suited for your project. It’s available in thicknesses starting at 1/32″.
![]() Angle (equal and unequal). Available with equal and unequal sides, frames can be constructed using standard bracket hardware, pop rivets, and machine screw fasteners. Thicknesses start at 1/32″.
Angle (equal and unequal). Available with equal and unequal sides, frames can be constructed using standard bracket hardware, pop rivets, and machine screw fasteners. Thicknesses start at 1/32″.
![]() Flat bar. Available in different widths and thicknesses, use this stock to make your own brackets and support columns. It’s also useful as a reinforcement strap.
Flat bar. Available in different widths and thicknesses, use this stock to make your own brackets and support columns. It’s also useful as a reinforcement strap.
![]() Tubing. Available in square, rectangle, or round shapes. These tend to be the most expensive, and are harder to build frames from.
Tubing. Available in square, rectangle, or round shapes. These tend to be the most expensive, and are harder to build frames from.
Sources for these structural shapes include:
Larger dimensions: Your nearby hardware and home improvement store is likely to have a good selection. Online is another choice if your local store is out of stock.
Smaller dimensions: Hobby and craft stores are your best bet. Some hardware and home improvement stores also carry a limited assortment of the smaller pieces. As noted earlier in the chapter, a popular maker of metal structural components is K&S Engineering. Check their Web site at www.ksmetals.com for a description of their products.
Using a Backsaw and Miter Box
The process of cutting a frame from aluminum (or other) stock is the same as it is when making a frame out of wood. So instead of repeating those steps here, please refer to Chapter 7, “Working with Wood,” for the lowdown details.
A small, lightweight but sturdy frame can be constructed using 1/2″ × 1/2″ × 1/16″ U-channel stock, cut to length with miters. The 1/2″ dimensions are for the outside of the stock; inside it’s 3/8″, so you can connect the pieces using 3/8″-wide L angle brackets (see Figure 11-7), also available at your hardware store.
To assemble, use 4-40 machine screws and nuts. The screws can be 3/8″ or 1/2″ in length. You need only one screw per “leg” of the angle bracket—this makes it easier for you to assemble the frame and saves on weight. In a pinch, you can use 6-32 machine screws and nuts, but these are bigger and heavier.
Creating a Box Frame
Box frames are three-dimensional bodies for your robots. They can be constructed using two (or more) square frames, anchored together with metal or plastic “pillars,” as shown in Figure 11-8.
For good strength but less weight, I like to use 6mm PVC for the pillars. These are cut to about 3″ wide. Then,
1. Drill a pair of holes near both the top and the bottom of the pillar. Space the holes no closer than 1/4″ from the top (and bottom), and no closer than 1/2″ from the sides.
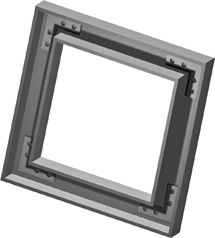
Figure 11-7 Solid metal frames can be constructed out of U-shaped aluminum channel, 3/8″ wide L angle brackets, and metal fasteners. Cut the aluminum channel with a miter box and hacksaw.
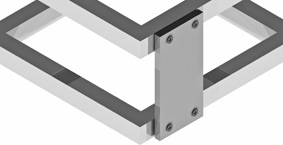
Figure 11-8 By using pillars (also called risers or columns), you can literally stack frames together to make boxlike body shapes for your robots.
2. Drill corresponding holes at the approximate center of each side of the frame. (See “Drilling Metal,” next section.)
3. Assemble, using 4-40 × 1/2″ machine screws and nuts. Use flat washers on the screw-head side.
When building large frames—say, over 14″ square—use two pillars per side; that means eight total. Position each pillar about 1″ to 2″ from the corners of each frame. This gives you room in the middle of the box to work.
DRILLING METAL
Metal requires a slow drilling speed. That means, when using a drill, you should set it to no more than about 25 percent of full speed. Variable-speed power drills are available for under $30 these days, and they’re a good investment. Use only sharp drill bits. If your bits are dull, replace them or have them sharpened. Quite often, buying a new set is cheaper than professional resharpening. It’s up to you.
Punching a Starter Hole
You’ll find that when you cut metal, the bit will skate over the surface until the hole is started. You can eliminate this skating by using a center punch tool prior to drilling. (In a pinch, a nail works, too.) Use a hammer to gently tap a small indentation into the metal with the punch.
Dabbing On Some Oil
When drilling aluminum thicker than 1/16″, or most any thickness of steel, first add a drop of oil over the spot for the hole. If you’re drilling a very thick piece, you may need to stop periodically and add more oil. There’s no rule of thumb, but one drop per 1/16″ or 3/32″ of thickness seems about right. The purpose of the oil is to keep the bit cool, which makes it last longer.
Using a Drill Press
When it comes to working with metal, particularly channel and pipe stock, a drill press is a godsend. It improves accuracy, and you’ll find the work goes much faster.
Always use a proper vise when working with a drill press. Never hold the work with your hands. Especially with metal, the bit can snag as it’s drilling and yank the piece out of your hands. For best results the vise should be physically attached to the base of the drill press. Anchoring the vise may not be critical if it’s heavy, and it will hold the pieces you drill in place just by its sheer weight.
If you can’t place the work in the vise, use a pair of Vise-Grips or other suitable locking pliers. The pliers allow you to adjust the jaw size and “lock down” on the material for a sure hold. Once locked, you can hold the pliers normally, without continually exerting pressure. To unlock, squeeze or pull the release lever.
If using a drill press, your model may require you to change the position of belts in order to alter the speed. Set the speed to the lowest available.
Tapping Holes
When using thicker metal (1/16″ or more), you can tap the holes you drill so they have threads for machine screws. To use a tap you must first drill the appropriate-size hole. You then manually “screw” the tap into the hole; this conforms the hole with the threads needed for the screw.
You don’t need a fancy 10-in-1 tap-and-die set. You can get by with just a couple of tap sizes, along with their corresponding drill bits. I use 4-40 and 6-32 screws almost exclusively in my robot designs, so I really only need the 4-40 and 6-32 taps. If you require holes for other screw sizes, you can purchase taps for these on an as-needed basis.
In order to thread the tap into the hole, you need a T-wrench for the tap (see Figure 11-9). The tap is secured by a chuck, as shown, or a setscrew in the wrench. Follow these basic steps to tap holes for threading with machine screws:
1. Drill the hole with the appropriate-size bit. The hole is always smaller than the tap. For example, to tap a hole for a 4-40 screw, use a 3/32 (or #43) drill bit.
2. Add a drop of oil at the location of the hole, and proceed to drill.
3. After drilling is complete, check the hole for burrs and remove them as detailed in the next section, “Finishing Metal.”
4. Mount the tap into the T-wrench. Add a few drops of cutting oil to the entire length of the tap.
5. Keeping the tap as perpendicular to the surface of the metal as possible, slowly thread the tap into the hole. Apply steady but firm downward pressure on the wrench. You should soon feel the tap “bite” into the metal.
6. Continue threading the tap into the metal until about 1/4″ of the tap is fully through the other side.
7. Clean off any metal debris, add a drop or two more of cutting oil, and carefully back the tap out of the hole. Clean the newly threaded hole when done.
FYI
See Appendix C, “Mechanical Reference,” for a handy chart comparing tap sizes and appropriate drill bits, for both imperial (inch) and metric.
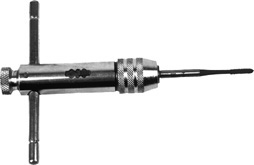
Figure 11-9 A T-wrench and tap are used to thread holes for mechanical fasteners. Be sure to drill the hole to the proper size for the tap you are using.
BENDING METAL
Most metals can be bent to another shape. Sheet metal is typically transformed into curves and angles using a tool called a metal brake. Hollow pipe, such as metal conduit for electrical wiring, is bent using (get this!) a pipe bender.
Not all kinds of metals are as easily bent, at least not without specialty tools. The thickness of the metal and its overall size, shape, and tempering qualities greatly affect how easy (or hard) it is to bend. Strips of softer metal like copper and brass bend easily. The thinnest pieces can be bent by hand; otherwise, you can use a bench vise and rubber mallet to bang it into shape.
Mild steel up to about 1/16″ thick that has not been heat treated (tempered) to make it harder can be bent using a shop vise and brute force. But you get better results with a metal brake.
Tube bending, especially thin-wall aluminum or brass, requires either skill or a special tool to keep the tube from collapsing. The idea is to prevent a sharp kink at the bend. Benders are available for different sizes of tube. Smaller tubing available at hobby stores can be worked using a tightly wound spring. With practice, you can also bend lightweight tubing by first filling it with sand.
Bending causes stress in the metal, which can weaken it. Some aluminum alloys are engineered to be bent, but most of the stuff you find at hardware and home improvement stores has been hardened. Bending it to more than 20° or 30° can seriously degrade the structure of the metal. You especially don’t want to bend it in a 90° angle, then back out straight, as the metal will likely just snap apart.
Metals that have been annealed using a heat treatment are easier to bend. The annealing makes the metal softer and more ductile. If you need to bend aluminum (up to about 1/8″ thick), find an alloy that has been pretreated using an annealing process. Or you can anneal the piece yourself if you have a gas welding torch. I’m not going to get into the steps here (check metalworking books at your local library), but in general you heat up the metal to about 700°F, then allow it to cool slowly back to room temperature. Once cooled, the spot that was annealed is now softer, and it can be more readily bent to shape.
FINISHING METAL
Cutting and drilling often leave rough edges, called flashing and burrs, in the metal. These edges should be finished using a metal file or very fine sandpaper. Otherwise, the pieces may not fit together properly, and the rough edges can scratch skin and snag on carpet. Aluminum flash comes off quickly and easily; you need to work a little harder when removing the flash from steel or zinc stock.
If there is a lot of material to remove, use a small grinding wheel attached to a drill motor or hobby tool, such as the Dremel. Use the standard Dremel mandrel. It’s composed of two pieces: a shaft and a screw. Then purchase an aluminum oxide grinding wheel in the shape you need. Example: Dremel item 541 is a set of two 7/8″-diameter flat wheels made to be mounted with the mandrel.
Using Metal Files
A metal file is the same as any other file, excepts its teeth—the part that removes the material—are finer. You should always use a metal file for metal; never use a wood file, because the teeth on a wood file are far too coarse. Unless you plan on doing lots and lots of metalworking, you can purchase an inexpensive set with a variety of files in it or get just what you need. I’d start with just one or both of the following:
![]() For aluminum, get a single-cut mill, half-flat, half-round file; that is, on one side the file is flat, and on the other it’s rounded. You don’t need a handle on the file unless you want one.
For aluminum, get a single-cut mill, half-flat, half-round file; that is, on one side the file is flat, and on the other it’s rounded. You don’t need a handle on the file unless you want one.
![]() For steel, get the same, except make it double-cut.
For steel, get the same, except make it double-cut.
The number of teeth per inch defines the smoothness of the finished work. For general-purpose deflashing and deburring, opt for files with 30 to 40 teeth per inch. This equates roughly to “bastard” and “second cut” files, if the tools you’re looking at are marked that way instead.
For small pieces, you might want to invest in a set of needle files, so-called because they’re small like knitting needles. The set has different sizes and shapes.
Most files have teeth that face forward, away from the handle. So they do their work as you push it into the material, not as you draw it back. Use this fact to make your work easier. Don’t try to use the file like you’re cutting a loaf of bread with a knife. Make even strokes, and bear down only on the forward stroke.
Using Sandpaper
Use sandpaper if you want the smoothest edge possible. This is not just for looks, but for function, too: the surfaces need to be like glass on pieces that slide against one another.
You need aluminum oxide or silicon carbide sandpapers for working with metal. For general deburring and cleaning, use a fine or medium aluminum oxide paper; for finishing/polishing, use a fine emery cloth (doesn’t use a paper backing), and dip it in water as you work. The higher the grit, the finer the finish.

For a final smooth finish, buff the metal using 00 or 000 steel wool. You can get this at a hardware or home improvement store. Look in the paint section. Which brings us to …
Painting Metal
Bases and frames of mild steel should be painted, to prevent rust. No painting or other treatment is needed if the aluminum is already anodized—it’ll have a silvered, black, or colored satin appearance. For bare aluminum, the metal can be left as is, but you may prefer to paint it. There are several alternatives for painting aluminum and steel:
![]() Brush painting is simple, but brush marks are hard to avoid in metal. And the paint tends to be applied too thickly.
Brush painting is simple, but brush marks are hard to avoid in metal. And the paint tends to be applied too thickly.
![]() Spray painting with a paint designed for metal yields better results, but only if you apply the paint in several light coats. Apply a primer coat first. Enamel paints work the best. Paints for automobile engines are especially durable. Let dry completely before handling.
Spray painting with a paint designed for metal yields better results, but only if you apply the paint in several light coats. Apply a primer coat first. Enamel paints work the best. Paints for automobile engines are especially durable. Let dry completely before handling.
![]() Powder coating is a process that applies a layer of paint to the metal using an electrostatic charge. The pigment penetrates the surface layer of the metal for a more durable finish. Powder coating can be performed at home if you have the right gear, but this is usually something for specialty paint shops.
Powder coating is a process that applies a layer of paint to the metal using an electrostatic charge. The pigment penetrates the surface layer of the metal for a more durable finish. Powder coating can be performed at home if you have the right gear, but this is usually something for specialty paint shops.
In all cases, before painting it is extremely important that the metal be completely clean and free of grease, oils (including skin oil), and dirt. Use denatured alcohol to clean the metal, including all the nooks and crannies.