
Chapter 16
Constructing High-Tech Robots from Toys
Ready-made toys can be used as the basis for surprisingly complex homebrew hobby robots. Snap or screw-together kits, such as the venerable Erector or Meccano set, let you use premachined parts for your own creations. Not to mention that the toy industry is robot crazy, and you can buy a basic motorized or unmotorized robot for parts, building on it and adding sophistication and features.
Some kits, like LEGO and K’NEX, are even designed to create futuristic motorized robots and vehicles. You can use the parts in the kits as is or cannibalize them. Because the parts already come in the shape you need, the construction of your own robots is greatly simplified.
Let’s take a closer look at using toys in your robot designs in this chapter and examine several simple, cost-effective designs using readily available toy construction kits.
Erector Sets
(Note: Everything in this section also applies to the Meccano brand and similar beams-and-girders construction sets sold by others.)
Several Erector sets come with wheels, construction beams, and other assorted parts that you can use to construct a robot base. Motors are typically not included in these kits, but you can readily supply your own.

I’ve found the general-purpose sets to be the best bets. Among the useful components of the kits are prepunched metal girders, plastic and metal plates, tires, wheels, shafts, and plastic mounting panels. You can use any as you see fit, assembling your robots with the hardware supplied with the kit or with your own 4-40 or 6-32 machine screws and nuts.
The prepunched metal girders included in the typical Erector set make excellent motor mounts. They are lightweight enough that they can be bent, using a vise, into a U-shaped motor holder. Bend the girder at the ends to create tabs for the machine screws, or use the angle stock provided in an Erector construction set.

Figure 16-1 Robot bases powered by two motors and wheels on either side may be constructed using a pair of inexpensive salvaged motorized toys. For each toy, remove one of the wheels from the motor mechanism.
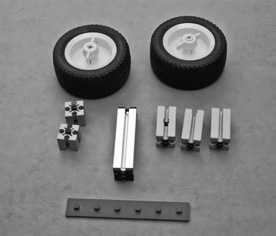
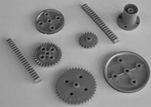
Figure 16-2 Sampling of parts from a general-purpose Fischertechnik kit.
Most Erector vehicles use four wheels, but that wheel arrangement makes it difficult to steer the robot. Instead, use a two-wheel design like those depicted in Chapter 20, “Moving Your Robot.” Mount a battery holder on the top of the platform for power.
One method of motorizing a nonmotored Erector set is to rob the motor drives from two inexpensive powered toy vehicles. These use a single motor to power two wheels; the wheels are on either side of the motor. To convert these motor drives for use on a robot platform, remove one wheel from each side of the motor, as shown in Figure 16-1.
![]() For the right motor, pull off the left wheel.
For the right motor, pull off the left wheel.
![]() For the left motor, pull off the right wheel.
For the left motor, pull off the right wheel.
You now have two independent motor drives. Use girders or other parts from the Erector set to mount the motors to the base.
Fischertechnik
The Fischertechnik kits, made in Germany and imported into North America by a few educational companies, are the Rolls-Royces of construction toys. Actually, “toy” isn’t the proper term because the Fischertechnik kits are not just designed for use by small children. In fact, many of the kits are meant for high school and college industrial engineering students, and they offer a snap-together approach to making working electromagnetic, hydraulic, pneumatic, static, and robotic mechanisms.
All the Fischertechnik parts (see Figure 16-2) are interchangeable and attach to a common plastic baseplate. You can extend the lengths of the baseplate to just about any size you want, and the baseplate can serve as the foundation for your robot. You can use the motors supplied with the kits or use your own motors with the parts provided.
K’NEX
K’NEX uses unusual half-round plastic spokes and connector rods to build everything from bridges to Ferris wheels to robots. You can build a robot with just K’NEX parts or use the parts in a larger, mixed-component robot. For example, the base of a walking robot may be made from a thin sheet of aluminum, but the legs might be constructed from various K’NEX pieces.
A number of K’NEX kits are available, from simple starter sets to rather massive special-purpose collections (many of which are designed to build robots, dinosaurs, or robot-dinosaurs). Several of the kits come with small gear motors so you can motorize your creation. The motors are also available separately.
Other Construction Sets to Try
Toy stores are full of plastic put-together kits and ready-made robot toys that seem to beg you to use them in your robot designs. Here are some toys you may want to consider for your next project.
INVENTA
United Kingdom–based Valiant Technologies offers the Inventa system, a reasonably priced construction system aimed at the educational market. Inventa is a good source for gears, tracks, wheels, axles, and many other mechanical parts. The beams used for construction are semiflexible and can be cut to size. Angles and brackets allow the beams to be connected in a variety of ways. Inventa isn’t the kind of thing you’ll find at the neighborhood Toys “R” Us. It’s available via mail order and through the Internet; see the Inventa Web site at www.valiant-technology.com.
ZOOB
Zoob is a truly unique form of construction toy. A Zoob piece consists of a stem with a ball or socket on either end. You can create a wide variety of construction projects by linking the balls and sockets together. The balls are dimpled so they connect securely within their sockets. One practical application of Zoob is to create armatures for human-or animal-like robots. The Zoob pieces work in a way similar to bone joints.
ZOMETOOL
For kids, parents, experimenters, and educators, Zometool sets are composed of ball-shaped connectors (called nodes) and a variety of interconnecting rods they refer to as struts. The sets can be used to create different physical models of things like DNA, molecules, plane and solid geometric shapes, and much more. For robotics you can use the parts as construction girders and brackets.
The struts solidly latch into sockets within the nodes, but it’s probably not secure enough for a robot that careens across the floor. As needed, use glue (a dab of hot glue works) to help secure the pieces together for a temporary fit; for a more permanent bond use ABS solvent cement (see Chapter 13, “Assembly Techniques,” for more information about using various types of adhesives.)
GONE BUT NOT FORGOTTEN
As of this writing, these most excellent construction toy sets are not in production—though that could change if some company buys the rights and production molds, and re-releases the product. In any case, you may be able find bits and pieces at garage sales, resale shops, and online traders (try Craigslist and eBay):
![]() Milton Bradley Robotix
Milton Bradley Robotix
![]() Capsela
Capsela
![]() Construx
Construx
Construction with Snap-Together Components
I’m far from the purist. I don’t mind reusing things like LEGO bricks (see Figure 16-3), MEGA Bloks, and K’NEX (see above) in my robots. “Parts is parts,” as they say. Unless you’re going after an unusual design, there is no cutting or drilling involved—just pick the piece you want to use, and snap it into place.
MAKING JOINTS (MORE OR LESS) PERMANENT
Snap-together components are by their nature temporary. They are made to be taken apart and reused. This may be your aim with your latest robot creation. Also bear in mind that temporary constructions can come apart when you don’t want them to, especially if the robot is mishandled, takes a fall from the workbench, or bangs into objects or other robots.
Though snap-together parts are most often used in robotic constructions with or without adhesives, it is also perfectly acceptable to use other binding techniques with them, including double-sided foam tape and nylon tie-wraps. By no means are you limited in any way in how you lash the goodies together. As the variations are endless, I’ll just leave the discussion at that, and let your creativity come up with interesting alternatives.
If you decide gluing the parts together is the method, pick the glue to match the kind of plastic used for molding the pieces.
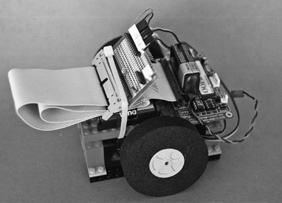
Figure 16-3 A small desktop robot made with surplus LEGO bricks and beams. The LEGO pieces are glued together.

![]() For a strong but less permanent bond, use only very small amounts of solvent cement or epoxy.
For a strong but less permanent bond, use only very small amounts of solvent cement or epoxy.
![]() You can also make nonpermanent bonds by using very small amounts of cyanoacrylate (CA) adhesive. Super Glue is a common brand of CA adhesive. Apply to one side only. Remove the parts by giving them a good twist.
You can also make nonpermanent bonds by using very small amounts of cyanoacrylate (CA) adhesive. Super Glue is a common brand of CA adhesive. Apply to one side only. Remove the parts by giving them a good twist.
![]() High-temperature hot-melt glue provides a good middle ground between temporary and permanent constructions. Use sparingly if you wish to disassemble the parts later. The glue can usually be peeled off.
High-temperature hot-melt glue provides a good middle ground between temporary and permanent constructions. Use sparingly if you wish to disassemble the parts later. The glue can usually be peeled off.
![]() Flexible adhesives, such as Shoe Goo or any silicone-based RTV adhesive also make for strong yet temporary bonds.
Flexible adhesives, such as Shoe Goo or any silicone-based RTV adhesive also make for strong yet temporary bonds.
Depending on the design of the construction toy, you can also use mechanical fasteners to hold things together. Drill holes in your LEGO, MEGA Bloks, or K’NEX parts, for instance, and secure them with miniature 2-56 or 4-40 machine screws and nuts. The plastic is easy to drill through, and the fasteners can be readily removed if you need to take things apart.
USING SNAP-TOGETHER PARTS TO MAKE MODULES
You’re not limited to using snap-together construction parts just for the body or structure of your robot. You can use extra or discarded LEGOs and similar construction pieces for making customized accessories. The snap-on nature of these parts allows you to easily reuse these accessories for different prototype projects.
For example, you might glue the flat bottom of a standard R/C servo motor to some LEGO blocks. (It’s okay to use glue here because you’re able to reuse the motor as much as you’d like. Simply pull it off the LEGO plate when you’re done.) Use the servo motor to quickly and effortlessly attach a sensor turret to your base. Just add a bracket and ultrasonic or infrared sensor on top of the servo, snap the servo into place on the base, and you’re done.
The same concept works for other components as well, such as compasses, accelerometers, microcontrollers, speakers, and lights. The idea is to mount the part to one or more accommodating LEGO pieces, ensuring that everything is aligned. This allows you to press one LEGO part into the next.
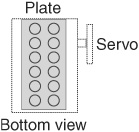
The idea doesn’t stop with LEGO beams, plates, and other parts. You can also use plastic or metal construction set pieces from an Erector set. One benefit here is that if you make accessories using these parts, they are easily transferred to full robots once you have successfully prototyped the design. For instance, you can permanently mount a short LEGO Technic beam to a bracket for a servo motor (see Figure 16-4), and use it as a mounting bracket for a cardboard-based prototype.
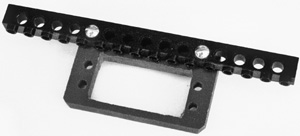
Figure 16-4 You can combine LEGO pieces with homemade plastic parts for such things as making mounts for radio control servo motors.
Specialty Toys for Robot Hacking
Some toys and kits are just made for hardware hacking (retrofitting, remodeling) into robots. Some are already robots, but you may design them to be controlled manually instead of interfacing to control electronics. Here are just a couple of ways you can use inexpensive toys to make homebrew robots.
TAMIYA
Tamiya is a manufacturer of a wide range of radio-controlled models. They also sell a good selection of gearboxes in kit form that you can use for your robot creations. One of the most useful for starter bots is the Twin Motor Gearbox (item number 70097), which consists of two small motors and independent drive trains. You can connect the long output shafts to wheels, legs, or tracks. This gearbox is used for the My First Robot lessons; refer to Appendix A, “RBB Online Support.”
One big disadvantage of the Twin Motor Gearbox is that the DC motors it uses are quite inefficient. Under heavy load or stall (powered but stopped) conditions, the motors can draw over 2 amps each. That’s a lot for this size motor. (Amps and other terms are covered in more detail in Chapter 22, “Using DC Motors.”
The Twin Motor Gearbox is acceptable when controlled by switch or relay, but when using transistor control you should replace the DC motors it uses with more efficient versions. Pololu and several other online retailers offer these replacements; cost is under $3 per motor.
Other Tamiya kits include single motors with selectable gear ratios, basic walking and rolling robots, wheels, and more.
OWIKIT AND MOVITS
The OWIKIT and MOVITS robots are precision-made miniature robots in kit form. A variety of models are available, including manual (switch) and microprocessor-based versions. The robots can be used as is, or they can be modified for use with your own electronic systems. For example, the OWIKIT Robot Arm Trainer (model OWI-007) is normally operated by pressing switches on a wired control pad. With just a bit of work, you can connect the wires from the arm to a computer interface (with relays, for example) and operate the arm via software control.
Most of the OWIKIT/MOVITS robots come with preassembled circuit boards; you are expected to assemble the mechanical parts. Some of the robots use extremely small parts and require a keen eye and steady hand. The kits are available in three skill levels: beginner, intermediate, and advanced. If you’re just starting out, try a beginner-level kit.
Once (properly) constructed, the OWIKIT and MOVITS robots last a long, long time. I have several models—no longer available—I built in the mid-1980s, and, with just the occasional nut tightening here and a dab of grease there, they have continued to operate flawlessly.
Making Robots from Converted Toy Vehicles
Toy cars, trucks, tractors, and tanks can make ideal robot platforms. With some motorized vehicles, you can directly convert them to robot service by hacking into their motor connections. Quick and simple! With others, you may need to do a bit of disassembly and rebuilding, especially those toys that have only one drive motor—it’s best when they have two.
And let’s not forget that you can rob parts from nonmotorized toy vehicles. I’ve gotten some of the best stuff off of cheapo “dollar store” toys! Push-around toys with rubber tank treads are an especially nice find. Rob the treads and put ’em on your own robot base.
MOTORIZED VEHICLES
Let’s start with inexpensive radio-controlled cars. These have a single drive motor and a separate steering servo or mechanism; the setup doesn’t lend itself well to robot conversion. In many cases, the steering mechanism is not separately controlled; you “steer” the car by making it go in reverse. The car drives forward in a straight line but turns in long arcs when reversed. These are impractical for use as a robot base and you should spend your attention elsewhere (they’re okay for stripping off parts).
On the other hand, most radio-and wire-controlled tractor (farm, military tank, construction) vehicles are perfectly suited for conversion into a robot. Remove the extra tractor stuff to leave the basic chassis, drive motors, and tracks.
You can keep the remote control system as is or remove the remote receiver (or wires, if it’s a wired remote) and replace it with new control circuitry. In the case of a wired remote, you can substitute relays or an electronic circuit for the switches in the remote. Of course, each toy is a little different, so you’ll need to adapt this wiring diagram to suit the construction of the vehicle you are using.
FYI
The most common electronic circuit used as a substitute for switches is the transistorized H-bridge, discussed more fully in Chapter 22, “Using DC Motors.” When replacing manual switches with an H-bridge, be sure the motors don’t draw more current than the H-bridge can handle, or damage to the electronics could occur.
Chapter 21 details the method of testing the amount of current consumed by a motor. You’ll need a digital multimeter to complete the test.
Another option is to use two small motorized vehicles (mini “4-wheel-drive” trucks are perfect), remove the wheels on opposite sides, and mount them on a robot platform. Your robot uses the remaining wheels for traction. Each of the vehicles is driven by a single motor, but since you have two vehicles (see Figure 16-5), you still gain independent control of both wheel sides.
The drives in the picture were taken from a pair of Tamiya Monster Beetle Jr. toys (catalog # 17001); the same 4WD drive is used in a number of Tamiya toy products that differ only in the car body used on top—examples include the Juggernaut Jr. (catalog # 17014), and the Toyota Hi-Lux Monster Racer (catalog # 17009). The removed wheels are replaced with 1/8″ Dura collars; this prevents the axles from coming loose in the chassis. The collars are locked in place with a miniature set screw. The set screw comes with the collars.
Whatever vehicles you use, be sure they are the same exact type. Variations in design (motor, wheel, and so on) will cause your robot to “crab” to one side as it attempts to travel a straight line. The reason: The motor in one vehicle will undoubtedly run a little slower or faster than the other, and the difference in speed will cause your robot to veer off course.
USING PARTS FROM VEHICLES
It’s called repurposing. Toys can be a terrific source of parts that would otherwise cost a lot more if purchased as honest-to-goodness “robot accessories.” This is especially true of wheels and tank treads.
Because of the economies of volume production, a $10 toy may contain four wheels that would otherwise sell for $5 each—a savings of 50 percent. The same is true of rubber, plastic, and even metal tank treads, which are hard to find in any case. A pair of rugged rubber treads specifically for robotics could retail for between $30 and $50, yet a toy tank with the same treads might sell for $19.95.
Figure 16-6 shows a motorized remote control tank outfitted with rubber treads, drive sprocket, and “idler wheels” that keep the tread in place. It’s operated by two motors, one for each tread—there’s even a third motor on this toy, used to swivel the cannon turret back and forth.
The majority of these toys are imported from China, where stock comes and goes, so you never know what will be available, or for how long. That can be frustrating, but if you’re on your toes, you can snatch a bargain when you least expect it.
I bought four of these tanks for experimenting, and within six months the source for them was dry, the item replaced with some other toy vehicle (that unfortunately wasn’t as good—that’s the way it goes). The moral: Always be on the lookout for motorized toys that could make for good robot platforms.
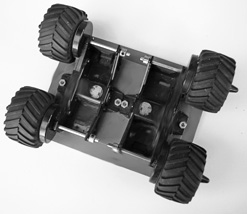
Figure 16-5 This 4WD robot base was constructed from two motorized toy models. The models used a single motor to power four wheels. For each motor the wheels on opposite sides were removed; a metal collar (fastened in place with a set screw) prevents the axle from coming out.
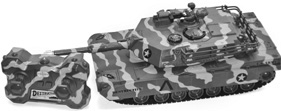
Figure 16-6 A store-bought tank toy contains motors, rubber tracks, drive sprockets, and idler wheels—all can be repurposed for a desktop tracked robot.
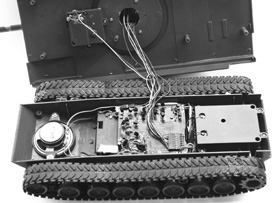
Figure 16-7 Inside the tank depicted in Figure 16-6, showing the modular construction. Not all tank toys are like this model, but when you find one like this, it’s a pleasure to tear apart.
Toy vehicles such as this one are ideal starter bases for your robots. Remove the remote control electronics and attach your own to the motors already in the tank. The innards are shown in Figure 16-7; you can see the motor in its case, a speaker for sound effects, and the circuit board that contains the remote control and motor drive electronics. This board is readily removed and replaced with your own microcontroller and motor drive.
REUSING ALL THE PARTS
When removing treads be sure to also collect the drive sprocket and any idler wheels used to keep the tread in place. You’ll want to reuse these with your robot, too. Figures 16-8 and 6-9 show a flexible robot base using treads and related parts from a $20 tank toy. The pictures show you the kind of mechanics you might find in a motorized toy.
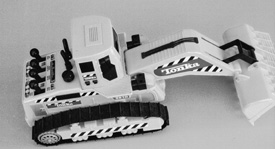
Figure 16-8 Tank toy as it came out of the box.
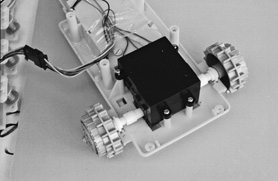
Figure 16-9 Tank toy showing the motor drive unit, with drive sprockets for the rubber tracks.
FYI
See Chapter 22, “Using DC Motors,” for various ways to operate the motors from hacked toys. Options include switches for manual control, relays, and motor bridge circuits. The latter two allow you to operate the vehicle from a microcontroller or other electronics.