
Chapter 14
Rapid Prototyping Methods
Not every robot needs heavy-duty construction. Sometimes, all you’re after is a general idea that your design is workable. Rather than use traditional construction with wood, plastic, or metal, you build a “rough-cut” prototype of the robot and use it for testing purposes.
This concept is known as rapid prototyping, and it borrows from a wealth of other technologies to provide you with a fast-track method of building your bots. Construction takes less time, and it’s less expensive. While rapid prototyping is most useful for testing the merit of a design, it can also be used to build finished robots that don’t require sturdy long-life construction.
In this chapter you’ll learn about mechanical hardware prototyping using materials that are lightweight, cheap, and easy to cut and drill. Keep in mind, the resulting bot may not win any beauty contests, and it may not last long—fast prototypes can be rather delicate. But you won’t have spent much on constructing it, and at the end you’ll know for sure your idea has merit.
Selecting Lightweight Robot Materials
At the core of rapid prototyping is lightweight yet reasonably strong materials for the body of the robot. To reduce the time required to produce the prototype, you want to select a material that is easy to cut and drill, perhaps even with hand tools. So we’re looking for stuff that can be cut with a knife, a razor saw, or even a pair of scissors. Candidate materials include heavy-duty cardboard, corrugated plastic, laminated paper and foamboard, and others.
Collectively, these are often referred to as “substrates,” because they’re used as an under-layment for things like indoor and outdoor signs, walls for temporary booths at trade shows, and posters for hanging up on your wall.
Substrates often (but not always) have multiple layers of complementary materials—each layer contributes to adding strength to the substrate. An example is shown in Figure 14-1. The “sandwich” construction places a top and bottom layer (say, of thin paper or plastic) with a very lightweight core, such as Styrofoam. Individually each layer is quite flimsy, but when combined the material is surprisingly strong and sturdy.

Figure 14-1 Substrates are constructed of sandwiching layers of materials together, each layer reinforcing the other. For very lightweight substrates, a foam core is layered top and bottom with a thick paper or plastic sheet.
CARDBOARD—HEAVY-DUTY, THAT IS
Cardboard is the most basic of all rapid prototyping substrates. While you could build a robot base out of the cardboard of an ordinary shipping box, it’s a little too thin for the job (though in a pinch you could always layer the cardboard to make it double-thickness).
Heavy-duty cardboard is available in thicknesses from 1/8″ to over 1/2″. You can find it in larger sheets or simply cut up a used heavy-duty shipping box. Laminate several pieces of cardboard to make it thicker and stiffer. “Criss-cross” the corrugation of the inner layers of the cardboard for greater strength. Use a good paper glue or contact cement for a solid bond. Cut with a sharp knife (be careful of your fingers!) or with any small fine-toothed saw.
An even heavier-duty cardboard uses a stiff honeycomb-like inner layer. It’s much more expensive than ordinary cardboard, but when used properly it can hold over 50 pounds. You can often find this type in packing materials for shipping very heavy objects, such as automobile engines. For this, you want a hand or power saw; it’s too thick to be safely cut with a knife.
CORRUGATED PLASTIC
Corrugated plastic is a common staple in the sign-making biz. It’s used for temporary outdoor signage, restaurant menu boards, that sort of thing. The plastic is composed of several layers, all bonded together during manufacture. To give the material its strength, the inner core is corrugated, like cardboard. Corrugated plastic comes in a variety of thicknesses, with 1/4″ being common. You can cut it with a knife or even a heavy-duty scissors. A quick mock-up or prototype can be roughed out in minutes, and with simple tools.
Corrugated plastic gets its rigidity from its “fanfold” design. It’s meant to be used as a backing for temporary outdoor signs, so it’s not particularly hardy. If you need a stiffer substrate, you can use several layers of the plastic, sandwiching the layers at 90°. This orientation increases the rigidity of the material.
FOAMBOARD
Foamboard (aka Foam Core, a brand name) is likewise a good candidate for quick prototypes. This material is available at most craft and art supply stores and is constructed out of a foam laminated on both sides with stiff paper. Most foamboard sheets are about 1/4″ thick, but other thicknesses are available, too, from 2mm to half an inch. You can find foamboard in colors at any art or craft supply store. Colored boards are more expensive, but you really only need white.
Cut with a knife or small hobby saw. Make holes with a hand drill. Because the board is laminated with paper, you can use any of a number of paper glues to try out different designs.
CONSTRUCTION FOAM
I’m using the term “construction foam” for the material used in buildings for subflooring, insulation, and sound deadening. This material is commonly referred to as “blue foam,” and represents a rather diverse family of molded and expanded polystyrene plastic.

Though called “blue foam,” its color may be either blue or pink. The foam is available in different densities, with many of the pink variety foams having the lowest density. You may find the heavier blue foam easier to work with because it’s not as floppy.
Blue foam is from 1″ to 3″ thick, though specialty versions, such as floor sound-deadening foam, are available in thinner sheets. This latter material can be found at flooring stores.
Rather than as a base all on its own, blue foam is most useful as a substrate or “rigidizer” for your robot. It weighs very little for its size and bulk, yet offers remarkable rigidity. It’s best used when physically cemented to another substrate, such as corrugated plastic or cardboard. The two materials together provide a strong yet lightweight building platform for your robot.
PICTURE FRAME MAT BOARD
Pictures are often framed using a heavy paper mat. Mat board is available at any art supply and picture frame store, and, depending on composition, is less than a dollar per square foot. A common size is 16″ × 20″, but it’s also available in larger sheets (not practical for mail order), and precut into smaller pieces, such as 5″ × 7″ or 8″ × 10″. You can cut mat board with a utility knife or with a specialty mat cutter. You can also get it custom cut for you at a picture frame store; you can select squares, circles, and ovals.
Ask the sales assistants at the picture frame shop if they have any mat discards. When mat board is cut to make a picture frame, only the outside parts are used; the inner parts (the stuff of most use to us robot builders) is thrown away. Ask nicely, and they may give you these pieces at no cost.
While mat board may look like a piece of really thick paper, it’s actually composed of many layers—plies—glued to one another. The typical quality 1/8″-thick mat has 8 to 12 plies. While thicker mat board is available as a specialty item, it’s usually easier and cheaper to simply stack several 1/8″ boards together, cementing the stack using ordinary paper glue.
Cutting and Drilling Substrate Sheets
The idea with all of these materials is that they are easy to cut and drill. In most cases, ordinary hand tools are all you need. Holes can be drilled with a hand drill, making these materials better suited for robot projects involving young learners. (Give younger children pieces already cut to size, to avoid having them handle a sharp knife.)
When cutting cardboard, foamboard, or corrugated plastic, bear in mind that small pieces are inherently stiffer than larger ones. A 2-× 4-foot sheet of corrugated plastic looks awfully flimsy when you hold it, but cut down to the sizes you’ll most often use—4″ to 8″ round or square—and suddenly the stuff is remarkably more rigid than you thought.
If, after cutting to size, you think the material is too thin to do its job, consider doubling up the thickness or gluing on reinforcement strips out of thin wood or metal from the hobby store.
CUTTING WITH A KNIFE
When cutting substrate with a knife, always use a sharp blade. Dull tools make you press down too hard, which ruins the cut and increases the possibility that the knife will slip and cause you injury.
Use a metal straightedge that you can hold down with one hand. I made mine out of 2″-wide aluminum I purchased at a hardware store for $5. Put a plastic handle in the middle. (Be sure to countersink the holes on the bottom, and use flat-headed screws.) You can also glue on a block of wood or plastic as the handle. You don’t need anything fancy.
To cut:
1. Use a #2 pencil to draw the line you wish to cut, even if you’re using a straightedge. The line helps you know you’re cutting in the right spot.
2. Place the substrate material on a flat surface, covered with some kind of “sacrificial” backing board—a piece of discarded paperboard or cardboard will do. You’ll cut into this back instead of into the table.
3. Position the straightedge just to the side of the line, and hold down firmly.
4. Make an initial score (shallow) cut with the knife. Press the knife down just enough to break through the surface of the substrate.
5. Repeat again for a thorough cut with the hobby knife. For deep cuts (1/8″ or more), draw the knife over the substrate several times, being sure to retrace the same route each time.
USING A MAT CUTTER
A mat cutter, designed for cutting out picture frame mats, also works well with softer substrates like foamboard. Most mat cutters are designed with a built-in straightedge. The cutting tool is enclosed in a heavy-duty handle, which slides along the length of the straightedge.
The advantages of mat cutters are that they’re generally safer to use than hobby knives (though they can still cause injury if misused) and they’re more accurate. Be sure to use a mat cutter with which you can adjust the depth of the cut—at least equal to the thickness of the substrate material you’re using. Many penetrate up to 1/4″.
Not all mat cutters cut straight lines. Some are designed for curves and even circles. A circle cutter lets you make small, round bases—up to about 20″ diameter in some. Adjust the cutter to a smaller size and you can even pop out your own wheels! If you don’t want to buy your own circle cutter, see if your neighborhood picture framing store will make the cuts for you.
Rapid Construction with Semipermanent Fasteners
Tape, ties, hold-downs, cable clamps, and hook-and-loop are used to produce semipermanent rapid prototypes. The level of permanence depends on the product, the surface area (larger tape = higher bond), and the material of your robot.
What follows applies to consumer-grade tape, Velcro, and other products. If you can get your hands on the industrial-grade stuff, it’ll work the same but will give you greater holding power. Naturally, it’s harder to find, more expensive, and often available only in bulk. Try specialty industrial suppliers, such McMaster-Carr.
Don’t forget you can use regular machine screw and nut fasteners with rapid prototypes. Assembly can still be fast, especially when you use a motorized screwdriver. A word of advice: When using cardboard, foamboard, and other soft substrates, add flat washers on both sides of the fasteners. This helps prevent the screw and nut from popping through the material.
HOOK-AND-LOOP FASTENERS
Velcro was discovered when its inventor noticed how burrs from weeds stuck to the fur of his dog. The construction of Velcro is a two-part fabric: one part is stiff (the burrs) and the other soft (the dog). Attach them together and they stick. The term “Velcro” is a combination of the French words “velour” and “crochet.”
Velcro is a trade name for a kind of hook-and-loop fastener, and the Velcro company probably sells more of it than any other. It’s available in a variety of sizes and types, from ordinary household Velcro you already know about to heavy-duty industrial strips that can support over 100 pounds. Figure 14-2 shows some Velcro in action on a robot. It’s being used to mount a wheel caster.
Among the most useful hook-and-loop products is the continuous strip, which you can cut to the desired length. The strip comes in packages of one foot to several yards, in any of a number of widths, with 1/2″ and 1″ wide being the most common. The strips come with a peel-off adhesive backing. If the adhesive is not strong enough (which is sometimes the case), you can reinforce the material with a heavy-duty epoxy, screws, staples, or the like.
While Velcro may be the best-known hook-and-loop material, it’s not the only kind. A great alternative—sold in the tool department of many department stores—is 3M Dual Lock (see Figure 14-3), a unique all-plastic strip that is composed of tiny plastic tendrils. Dual Lock has no separate “hook” and “loop” components. It sticks to itself.
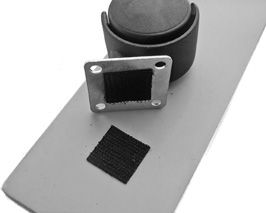
Figure 14-2 Temporarily attach parts to your robots using hook-and-loop (Velcro) fabric. Get the heavy-duty kind for holding larger components.
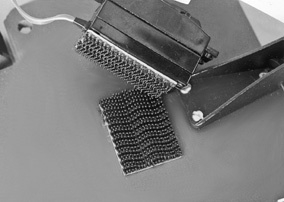
Figure 14-3 3M Dual Lock is an all-plastic version of the venerable hook-and-loop material. It’s available in different thicknesses, with or without self-adhesive backing.
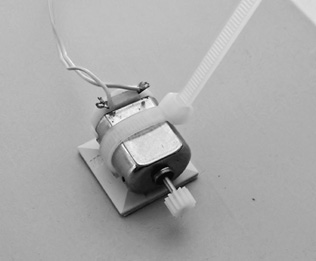
Figure 14-4 Plastic cable ties and mounts can be used to secure pieces to your robot. Use several ties for larger components. The mounts may be stuck onto the robot with self-adhesive tape or mounted using small fasteners.
PLASTIC TIES
Intended to hold bundles of wire and other loose items, plastic ties can also be used to hold things to your robot. The tie is composed of a ratcheted strip and a locking mechanism. Loop the strip into the mechanism, and pull the strip through. The locking mechanism is one-way: you can tighten the strip, but you can’t loosen it (this applies to most plastic ties; some have a releasable lock).
Plastic ties are made of nylon and are very strong and durable. They’re available in a variety of lengths, starting at 100mm (a little under 4″) to well over 12″. Anchor the tie into a hole you’ve drilled in your robot, or use one of several mounts specifically designed for use with plastic ties (see Figure 14-4). I prefer mounts designed for use with hardware fasteners; they provide a stronger hold.
STICKY TAPE
Sticky tape is a broad family of products that have an adhesive on one or both sides of the tape. Sticky tape is cheap, easy to use, and bonds nearly instantly to the surfaces you apply it to. While sticky tape makes for handy construction material, remember that the tape adhesive is gummy and can leave residue on the parts. Use denatured alcohol to remove the residue. (But test first to ensure that the alcohol doesn’t dissolve the parts of your robot you want to keep!)
Most sticky tapes are not dimensionally stable; that is, under stress and load—like a drive motor—parts may shift under the adhesive. This can cause a “creep” that will result in parts becoming misaligned over time. Use sticky tape for noncritical applications only, or when you provide another way (such as mechanical stops) to keep things aligned.
DOUBLE-SIDED FOAM TAPE
A common staple in any robot builder’s workshop is a roll of double-sided foam tape. This is like the aforementioned sticky tape, but thicker. This tape is composed of a layer of springy foam, usually either 1/32″ or 1/8″ thick, and from 1/4″ to over 1″ wide. The tape is coated with an aggressive adhesive on both sides. To use, peel off the protective paper and apply the tape between the parts to be joined. The adhesive is pressure-sensitive and cures to a strong bond within 24 hours.
Many consumer-grade foam tapes are engineered with an adhesive that never fully cures. It stays gummy so that the tape can be more readily removed from walls. Maybe this is what you want, or maybe not. For a more permanent bond, look for industrial-grade double-sided foam tape; it’s available at better hardware stores, as well as industrial supply mail-order outlets, such as McMaster-Carr. One such product is 3M VHB self-adhesive tape.
CABLE CLAMPS
Motors need to be fastened to the base of the robot in such a way that they won’t easily come off or go crooked. Motor shafts akimbo result in misaligned wheels, which make your bot harder to control and steer.
When using round motors (the most common kind), look for suitably sized plastic cable clamps, available at hardware stores and online at computer accessory outlets. These clamps can accommodate cable thicknesses from 1/4″ to over 1″, and are secured to a surface using screws—see Figure 14-5 for an example. Use one or two clamps as a motor mount; if the motor is a bit too small for the clamp, wrap electrical tape around it to thicken things up a bit.
When using just a single clamp per motor, you’ll need a way to keep the clamp from pivoting at its fastener hole. You can try tightening the fastener as far as it’ll go, but a better method is to put “stops” in front of and behind the clamp. The stops—which can be something as simple as a screw head sticking out of the robot’s base—prevent the clamp from moving. For larger motors you can use two clamps, with the mounting holes on either side of the motor.
ALTERNATIVE ADHESIVE DISPENSERS FOR RAPID PROTOS
Typical adhesives are dispensed from a tube or bottle. There are other methods, too, and many of the following ones are easier to use for making rapid prototypes. Give ’em a shot.
Glue Dots, a trade name, are representative of a method of applying premetered adhesive. The dots are provided on a long roll and can be applied by hand or by machine. The dots come in various “tacks”: high-tack provides permanent bonding, and low-tack, a temporary sticking place. The dots cure upon pressure.

Figure 14-5 Cable clamps, designed to hold bundles of wires or cables together, can be used to attach small motors (and other things) to a robot.
Glue Stick, yet another trade name, is representative of polymer-based products that smear on a jelly-like adhesive from a self-contained applicator. Most consumer products are intended to be used to join paper to paper, but industrial stick adhesives are available for bonding metals, plastics, rubber, and other materials.
Adhesive transfer tapes are like ordinary adhesive tape, except only the adhesive portion—and not the tape backing—is left on the parts to the joined. 3M is a major manufacturer of adhesive transfer tapes. Their product, and others like it, are best applied using a special applicator that separates the protective backing of the tape while laying the adhesive over the material to be joined.
Aerosol adhesives are sprayed from a can, airbrush, or compressed air canister. The major advantage of aerosol adhesives is that they can be applied quickly in rather thin coats to a large area. 3M Photo Mount is a good example of this stuff.