
Chapter 7
Working with Wood
If billionaire Howard Hughes could build the world’s largest powered airplane out of spruce wood, how hard could it be to construct a small robot out of the stuff? Wood may not be high-tech, but it turns out it’s an ideal building material for hobby robots. Wood is available just about everywhere, it’s relatively cheap, and it’s easy to work with.
In this chapter, you’ll look at using wood in robots and how you can apply simple woodworking skills to construct wooden robot bodies and platforms.
FYI
Check out Chapter 8, “Build a Motorized Wooden Platform,” for a hands-on project making a robot base out of wood. This platform can serve as the foundation for a number of robot designs you may want to explore.
Hardwood Versus Softwood
While there are thousands of types of trees (and, therefore, wood) in the world, only a relatively small handful share the traits that make them ideal for building robots. Wood can be broadly categorized as hardwood or softwood. The difference is not the hardness of the wood, but the kind of tree the wood is from.
Hardwood is produced from trees that bear and lose leaves (deciduous), and softwood trees bear needles (coniferous) or do not undergo seasonal change (nondeciduous). In general, deciduous trees produce harder and denser woods, but this is not always the case. A common hardwood that’s very light and soft is balsa, often used in craft projects.
Planks or Ply
Unless you’re Abraham Lincoln, building a robot from lumber hewn from the forests of Kentucky, you’ll most likely purchase milled wood in either plank or laminate (ply) form. (Milling means it’s cut and formed to size.)

Figure 7-1 Plywood is made using several thin layers of wood, with the grain of each layer alternating to provide added strength.
Planks are lengths of wood milled from the raw lumber stock. They are available in standard widths and thicknesses and come in either precut lengths (usually 4, 6, and 8 feet) or are sold by the linear foot.
Plywood is made by sandwiching one or more types of wood together. The grain—the direction of growth of the original tree—is alternated at each ply for added strength.
Both plank and ply are made from softwoods and hardwoods. Depending on where you live, your local home improvement store is likely to have only softwood ply and just a few types of hardwood plank (mostly oak). For a wider variety you need to shop at a hardwood specialty store or mail order.
USING PLYWOOD
The best overall wood for robotics use, especially for foundation platforms, is plywood. Plywood gets its strength by sandwiching two or more pieces of wood together, where the grain (growth pattern) of the wood alternates direction—see Figure 7-1. Plywood is usually stronger than the equivalent thickness of a single slice of wood. Each thin slice strengthens and reinforces the other.
Plywoods are commonly used in residential and commercial construction, but they’re made of softwood and aren’t well suited for use in small robots. A better choice is specialty hardwood plywoods, available at craft and hobby stories. They’re more desirable because they are denser and less likely to chip.
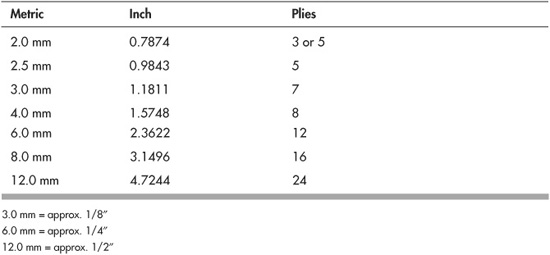
This type of hardwood plywood comes in two “grades”: aircraft and craft. A typical aircraft plywood uses birch and consists of from 3 to 24 plies—the more plies, the thicker the wood. It’s rated for use in model airplanes, where structural strength is critical. A less expensive variation is craft plywood, which is not intended for use in model planes. It’s made of less expensive woods that aren’t quite as strong. For most robotics use, the craft plywood is perfectly fine. Sheet size for both vary, depending on manufacturer and source. Hobby stores commonly carry plywoods in 12″ × 12″ squares.
Plywood comes in various thicknesses starting at about 1/4″ and going up to over 1″. Thinner sheets are good for making a small robotics platform, but only if the plywood is made from hardwood. Typical thicknesses are:
Thickness

Don’t confuse hardwood plywood with hardboard. Hardboard is a manufactured product, usually made by munching up sawdust into tiny pieces, then fusing them together under high pressure. See the section “Medium Density Fiberboard” for a kind of hardboard usable in robotics.
USING PLANKING
An alternative to plywood is planking. Hardwood planking—stuff like oak or birch—tends to be very heavy and much harder to work with. Opt for Douglas fir or pine. These softer woods are okay for smaller robots, and they are easier to cut and drill.
Plank lumber is available in widths of no more than 12″ or 15″ wide, so you must take this into consideration when designing your robot platform. Be especially wary of warpage and moisture content when using plank lumber. Borrow a carpenter’s square, and check the squareness and levelness of the lumber in every possible direction. Reject any piece that isn’t flat and square.
Wood with excessive moisture may bow and bend as it dries, causing cracks and warpage. These can be devastating in a robot you’ve just completed and perfected. Buy only seasoned lumber stored inside the lumberyard, not outside. Watch for green specks or grains—these indicate trapped moisture.
COMMON PLANKING DIMENSIONS
Plank lumber is milled in common dimensions. Unless otherwise noted, the finished milled dimension is less than the stated size, because of saw kerf. When you buy two-by-four lumber, for example, you’re really only getting 1-1/2″ × 3-1/2″.

MEDIUM-DENSITY FIBERBOARD
Medium-density fiberboard (MDF) is a manufactured product, usually available in 4- by 4- or 4- by 8-foot panel sheets, and is made by compressing wood fibers bound with a resin.
There are quite dense MDF panels that are extremely hard and durable, and these are fine for robot platforms. Others, like particleboard, consist of larger fibers and wood chunks, and aren’t as strong. Don’t use particleboard for making a robot.
Look for cut pieces of MDF at your home improvement store, so that you don’t have to purchase an entire sheet. Or find a low-cost paper clipboard at the office supply store. Many use a highly pressed wood in 1/8″ thickness. Another option is to use those small hardwood flooring samples they offer at home improvement stores. Great (and cheap!) for small robots!
Any downsides to using MDF panels? A few. A 12″ × 12″ sheet of 1/4″ MDF can easily weigh a couple of pounds. And the corners and edges can chip off more readily than with others kinds of wood. You can keep the corners from chipping if you round them off by sanding or filing.
The Woodcutter’s Art
You don’t need any special tools or techniques to cut wood for a robot platform. The basic shop cutting tools will suffice: a handsaw, a backsaw, a coping saw—you name it.
![]() When cutting plywood and wide planking, use a wood handsaw or table saw. You’ll get the straightest cuts with a table saw.
When cutting plywood and wide planking, use a wood handsaw or table saw. You’ll get the straightest cuts with a table saw.
![]() When cutting narrow planking or smaller pieces of wood, use a backsaw (my favorite), a handsaw, or a jigsaw.
When cutting narrow planking or smaller pieces of wood, use a backsaw (my favorite), a handsaw, or a jigsaw.
Make sure the blade is made for cutting wood. Wood blades have coarser teeth than blades for metal or plastic. If using a power saw, the combination blade that came with your tool isn’t the perfect choice for plywood, but it’ll do. Consider replacing it with a plywood-paneling blade. These have more teeth per inch and produce a smoother cut.
Handsaws come in two versions: crosscut and ripsaw; crosscut is the proper tool for plywood and most of the other woods you’ll be working with.
CUTTING A BASE
The easiest shape of all is square, and that’s what you’ll begin with, even if you plan on a more elaborate shape. After all, what’s a circle other than a square with lots and lots of corners!
Start with a wooden square or rectangle that’s about the size of the finished base. If you have them, you can use power tools to make short work out of cutting the wood to the basic square/rectangle shape.
It’s Not Hip to Be Square
Problem is, square is not the ideal shape for a robot base, because the corners can snag on things when the bot is driving around your living room. You can readily turn the square into octagons, hexagons, and pentagons simply by lopping off the corners. Unless you’re an expert at the table saw, do these cuts with hand tools; it’ll provide extra accuracy. Figures 7-2 and 7-3 show some variations on a theme. These more elaborate shapes don’t take that much longer to produce—just a few minutes per cut, and you’ll make a better robot.
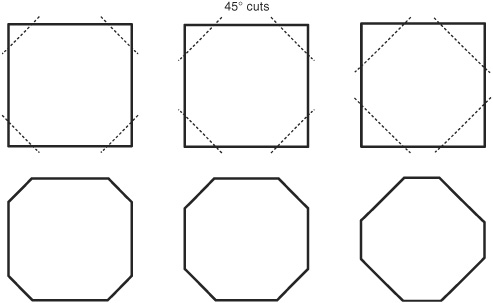
Figure 7-2 Lop off the corners of square wood pieces to streamline the shape of your robot. With all four corners cut, you end up with an octagon. The shape of the octagon depends on how much of each corner you remove.
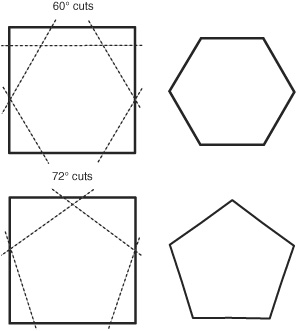
Figure 7-3 By making alternative cuts at the corners you can produce hexagon and pentagon bases. You’ll probably want to use a simple protractor (available at any school or office supply store) to measure the angles.
![]() To make an octagon (eight-sided) base, cut the corners off at 45°.
To make an octagon (eight-sided) base, cut the corners off at 45°.
![]() To make a hexagon (six-sided) base, cut the corners off at 60°.
To make a hexagon (six-sided) base, cut the corners off at 60°.
![]() To make a pentagon (five-sided) base, cut the corners off at 72°.
To make a pentagon (five-sided) base, cut the corners off at 72°.
If you have a heavy-duty motorized sander, you can lop off the corners by sanding rather than cutting. This is usually a lot quicker. Start with a coarse sandpaper (see the section later on in this chapter about sanding). As a final step, use a fine sandpaper to make the edges smooth.
Lopping Off Even More Corners
You can approximate near circles by cutting off more corners. Eight-sided octagons with their corners lopped off (chamfered) make 16-sided “circlettes,” as shown in Figure 7-4. And as shown in Figure 7-5, chamfered pentagons produce 10-sided shapes; chamfered hexagons make 12 sides.
To make these cuts, mark directly on the wood (you don’t have to be precise—to the nearest 1/4″ is usually fine), or use a piece of graph paper lightly glued to the wood. You can use paper paste—the kind you ate in grade school—or a nonpermanent glue stick.
“But I wanna make a circular base!” That’s fine, but you’ll need some special tools if you don’t want it to look like a very bad shop class reject. Circle cutting jigs are available for power routers and jigsaws. The one for jigsaws is fairly easy to use and is the least expensive. It works just like a beam compass.
Start by drilling a hole in the approximate center of the wood, then adjust the circle cutter to one-half the diameter of the circle you want. For instance, to make a 6″ circle, you adjust the cutter to the 3″ mark. You need to also make a starter hole for the jigsaw blade. Position the hole anywhere along the circumference of the circle.
Seat the anchor point of the cutting jig inside the center hole. Cut out the circle starting from the center hole you previously made.
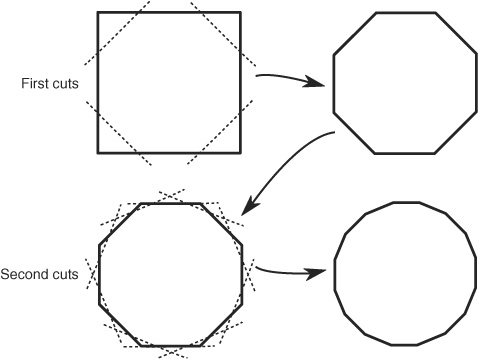
Figure 7-4 For near-circular bases you can cut off the four corners of a square base, then trim off the eight corners you just made. It’s a little extra effort, but worth it.
Making Cutout Wells for Wheels
The robot bases we’ve cut so far don’t have special cutouts (“wells”) for wheels. Wheel wells are nice to have, because they allow you to place the wheels flush (or nearly so) with the contours of the body or without having to raise the level of the base to clear the wheels. Figure 7-6 demonstrates the basic idea.
Cutting wheel wells is easier when the wheels are placed at one end of the robot. When in the middle of the robot you need to make multiple cuts to literally “carve out” the well. Well cutting works best when you use either a power jigsaw or a coping saw. The coping saw has a small blade for tight corners.
Figure 7-7 shows a simple three-cut approach. Start with a jigsaw or backsaw and make two cuts perpendicular to the side of the base.
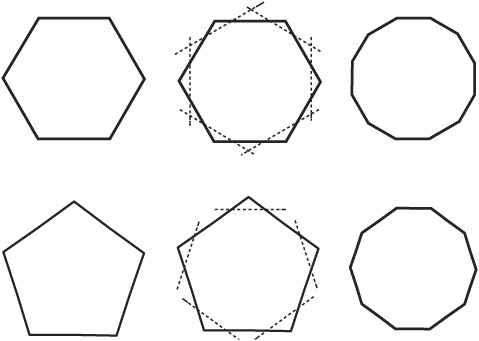
Figure 7-5 Additional corner cuts in hexagon and pentagon shapes make for even sleeker designs.
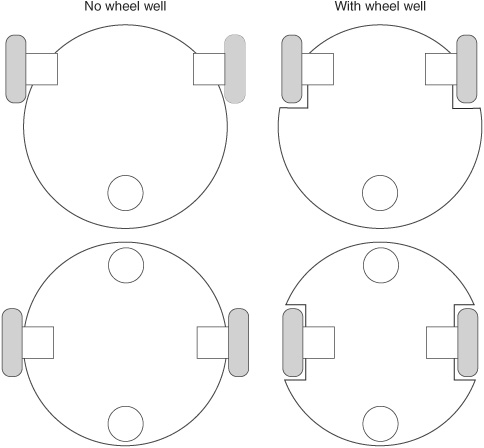
Figure 7-6 Wheel well cutouts allow the robot to have a slimmer profile for any given size of base. The wheels fit into the cutouts, rather than jut out to the sides.

Figure 7-7 The basic wheel well is created by marking a rectangle into the base and cutting as shown. Drill a hole to insert the jigsaw blade.
1. Cut in only as deep as you want to make the wheel—an inch or two is usually enough.
2. Use a 1/4″ bit and drill a hole at one of the inside corners of the well. Position the hole so that it’s on the inside of the well; that way you won’t have the remnants of the hole after the well has been cut out.
3. If using a jigsaw, insert the blade into the hole and cut toward the opposite end of the well. If using a coping saw, remove one end of the blade from the saw frame and pass the blade through the wood. Reattach the blade to the frame and begin cutting.
Figure 7-8 shows another technique that’s ideal when using only hand tools.
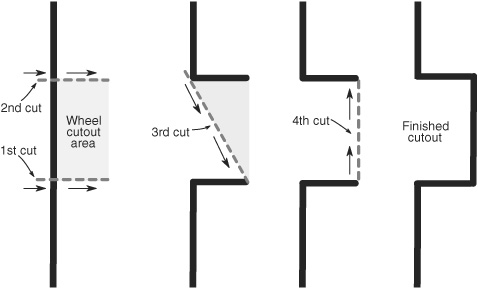
Figure 7-8 A wheel well can be cut using only hand tools, such as a coping saw. Begin with two parallel cuts for the side of the well. The coping saw blade is fine enough to make tight turns.
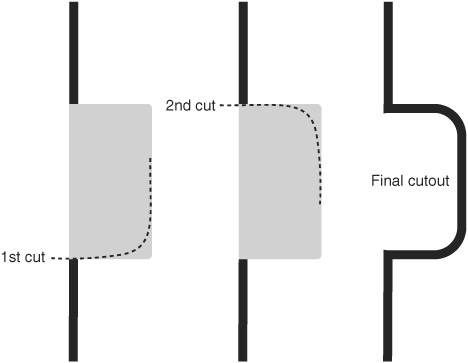
Figure 7-9 Rounded shapes may be cut using a jigsaw, coping saw, or scroll saw. This method requires a bit of practice to get right.
1. Use a backsaw to make cuts 1, 2, and 3. A backsaw is preferred because it will make straighter cuts.
2. Use a coping saw for the fourth and final cut.
And finally, there’s no reason why the wheel wells must have right-angle corners. Figure 7-9 shows the rounded contour of the wheel well when using a jigsaw (or a coping saw) to make just two cuts. Go slow, and make a couple of trial cuts first on a piece of scrap. This technique requires a bit of patience and a little skill for good results.
CUTTING A FRAME
Frame construction allows you to make larger but lighter robots. The frame provides the overall skeletal structure of the bot, and over the frame you can place light materials to support the components of your machine. Frames also allow you to build tall robots in the same way they construct multistory buildings. You can stack multiple frames on top of one another, with the equivalent of pillars between them.
Wood frames can be constructed using strips of hardwood. Most hobby stores stock birch and mahogany, both excellent choices. You can buy the strips premade or cut your own if you have a table saw. For frames under 10″ square, strips 1/2″ to 3/4″ wide are adequate; use 1″ or wider wood for larger robots.
Wood selection for framing is critical. Stay away from softwoods, such as pine, fir, and redwood. They are not strong enough except for the smallest of bases. Aircraft-grade hardwood plywood is also a good choice.
Frames are best made using a small miter box and a backsaw. You can purchase both of these for under $20 total. It’s a small but wise investment. The miter box helps you make the straight and angled cuts necessary for frame construction.
Accurate Measuring a Must
The miter box will help you to make proper 45° angle cuts, but you still have to be careful that each of the four pieces of the frame is the exact proper length. Otherwise, the frame will not be a perfect square—or a perfect rectangle, whatever the case may be.
Follow these steps to ensure proper measuring and cutting of your frame.
1. Determine the outside dimension of the frame. For example purposes, we’ll assume you’re making a 9″ square robot.
2. Let’s start with the top frame piece. Using the miter box, cut a “left-hand” miter at the tail end of a wood strip. I refer to it as a left-hand miter because the joint will be on the left side of the frame.
3. With the tape measure placed at the top corner that you just cut, measure exactly 9″. Using a pencil, make a mark to the immediate right of the 9″ mark on the tape.
4. Again using the miter box, cut a “right-hand” miter, lining up the top of the cut with the mark. When cutting, be sure the blade is just to the right of the mark. This is called “keeping the line,” and it ensures the length of the piece will be exactly 9″, even considering the width of the saw blade (as you will recall from Chapter 6, this is called the kerf).
5. Now for the bottom frame piece. Pick up the strip that was left over from Step 4. It’ll already have the proper (right-hand) miter cut. Measure exactly 9″ and mark.
6. Turn the piece over and place in the miter box. Cut a left-hand miter, being sure to leave the line as you did in Step 4. I’m having you turn the wood strip over so that the mark at 9″ is along the top. It’s easier to see that way.
7. Now, compare the two frame pieces you’ve cut. If they are slightly different lengths, carefully sand the longer piece down. When sanding be careful not to round off the cut, or else the mitered corners won’t meet well.
8. Repeat steps 2 through 7, this time for the left and right pieces. These are also 9″, so the steps are duplicated exactly.
Assembling the Frame
Once the pieces are cut out, they are then assembled to make a frame. The frame pieces are held together using L-shaped angle brackets and steel fasteners.
Start by assembling the upper-left corner, using one side piece and one top piece. With a bracket as a guide, mark a hole for drilling at the corner of one of the frame pieces. Do just one “leg” of the bracket at a time; don’t try to mark multiple holes. With the wood marked, move the bracket out of the way and drill the hole (see the next section for details about drilling). Assemble the bracket on the frame piece following the example in Figure 7-10. Use a flat washer next to the nut.

Figure 7-10 An L angle bracket connects the frame pieces together. Use machine screws, nuts, and washers for a solid construction.
Now for the adjoining frame piece. Align it to the corner you just assembled. Using the other “leg” of the bracket, mark a hole in the second piece. As you did before, drill the hole and finish the corner by adding the fasteners.
Put this corner aside, and repeat the steps for the lower-right corner. When done you will have the top left side of the frame as one piece and the bottom right side as the other piece.
Complete the frame the rest of the way by carefully lining up the corners, marking, drilling, and assembling with fasteners.
I don’t recommend assembly techniques using nails, staples, or glue. Though these are cheaper and may take less time, the finished frame isn’t strong enough for robot use. Besides, when using hardware brackets and fasteners you can readily disassemble the frame pieces should you decide to rebuild it.
DRILLING WOOD
Holes are for mounting things to your robot, and holes are made with the drill and bit. You can use a hand or electric power drill to make holes in wood. Electric drills are great and do the job fast, but you can also use a hand drill if you feel uncomfortable with power tools. Either way, it’s important that you use only sharp drill bits. If your bits are dull, replace them or have them sharpened.
It’s important that you drill straight holes, or your robot may not go together properly. If you have a drill press, and it’s large enough, you can use it to drill perfectly straight holes in plywood and other large wood stock.
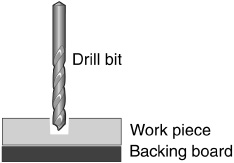
Using a Backing Board
To prevent splintering, place a piece of scrap wood behind the piece you’re drilling. Use a soft wood, like pine, so you can “feel” when the bit has penetrated the wood you’re drilling.
If you’re still getting splintering on the underside of the wood as you drill, try pushing the bit through more slowly. And be sure you’re using a sharp bit. Replace if necessary.
Adjusting the Speed of Drilling
As first noted in Chapter 6, “Mechanical Construction Techniques,” you can use fairly high speeds when drilling through wood. The exact speed depends on the type of wood—hardwoods need a little slower speed because they are denser.
But there is no exact right speed for each wood, and it comes down to experience. My advice: Practice drilling using some scrap pieces of the type of wood you’ll be using in your projects. Inspect the quality of the holes you’ve drilled. You’ll soon get the hang of picking the right speed.
FINISHING WOOD
You can extend the life of your wood robot bases and frames, not to mention enhance their looks, with simple finishing. Wood finishing involves sanding, which smoothes down the exposed grain, then painting or sealing. Small pieces can be sanded by hand, but larger bases benefit from a power sander.
Coarse Filing and Shaping
You can shape wood using rasps. A rasp is the same as a file—both are covered with a surface of sharp teeth to grind down the wood—but the teeth of a rasp are much more coarse. You can also shape wood using a heavy-duty drum or disc sander, outfitted with very coarse sandpaper (see the section immediately following, on sandpapers).
Sanding
Sandpapers are used to smooth wood, removing saw marks, chips, and other imperfections. Sandpapers are available in a variety of grits—the lower the grit number, the coarser the paper. With a higher coarseness you remove more wood at a time as you use the paper.
The recommended approach is to start with a coarse grit to remove splinters and other rough spots, then finish off with a moderate- or fine-grit paper. For wood, you can select between aluminum oxide and garnet grits. Aluminum oxide lasts a bit longer. Sandpapers for wood are used dry. For hand sanding, wrap the paper around a wood or plastic block to provide even pressure.
Grit


Painting
Wood can be painted with a brush or spray. Brush painting with acrylic paints (available at craft stores) takes longer but produces excellent results with little or no waste. One coat may be sufficient, but two may be necessary. Woods with an open grain may need to be sealed first using a varnish, primer, or sealer, or else the paint will “soak” into the wood. You may also opt to skip the painting step altogether and apply only the sealant.
Spray paints are an alternative to brush painting. Be sure to use the spray can according to the directions on the label. Use only outdoors or in a well-ventilated area.