
Chapter 9
Working with Plastic
It all started with billiard balls. In the old days, billiard balls were made from elephant tusks. By the 1850s, the supply of tusk ivory was drying up and its cost had skyrocketed. So in 1863, Phelan & Collender, a major manufacturer of billiard balls, offered a $10,000 prize for anyone who could come up with a suitable substitute for ivory. A New York printer named John Wesley Hyatt was among several folks who took up the challenge.
Hyatt didn’t get the $10,000. The material he promoted, celluloid, carried with it too many problems—like occasionally exploding during its manufacture. While Hyatt’s name won’t go down in the billiard parlor hall of fame, he will be remembered as the man who helped start the plastics revolution. Celluloid was perfect for such things as gentlemen’s collars, ladies’ combs, containers, and eventually even motion picture film.
Since the introduction of celluloid, plastics have taken over our lives. Plastic is sometimes the object of ridicule—from plastic money to plastic furniture—yet even its critics are quick to point out its many advantages:
![]() Plastic is cheaper per square inch than wood, metal, and most other construction materials.
Plastic is cheaper per square inch than wood, metal, and most other construction materials.
![]() Certain plastics are extremely strong, approaching the tensile strength of such light metals as copper and aluminum.
Certain plastics are extremely strong, approaching the tensile strength of such light metals as copper and aluminum.
![]() Some plastic is “unbreakable.”
Some plastic is “unbreakable.”
So you can imagine that plastic is ideal for use in hobby robotics. Read this chapter to learn more about plastic and how to work with it. In the next chapter I’ll show you how to construct an easy-to-build “turtle robot”—the PlastoBot—from inexpensive plastic parts.
Main Kinds of Plastics for Bots
Plastics represent a large family of products. They often carry a fancy trade name, like Plexiglas, Lexan, Acrylite, or Sintra. Some plastics are better suited for certain jobs, and only a relatively small number of them are appropriate for robotics.
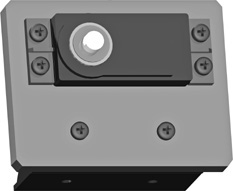
Figure 9-1 Plastic can be used for the entire robot or just parts of it, like this all-plastic bracket for mounting a radio control servo motor to a robot.
You can use plastic for the entire robot or just parts of it—mixing and matching materials is not only allowed in robot construction, it’s encouraged. For example, the inexpensive motor mount in Figure 9-1 is made of a lightweight plastic; you can combine the mount with robots made of wood, any kind of plastic, metal, cardboard, or any other material.
Here’s a short rundown of the plastics that I find most useful in robotics:
ABS is short for “acrylonitrile butadiene styrene,” should you care about this sort of thing. ABS is most often used in sewer and wastewater plumbing systems; it’s the large black pipes and fittings you see in the home improvement store. But it can be any color, and it can come in any shape; LEGO building blocks are made of ABS plastic. You can get ABS plastic in sheets.
Acetal resin is called an “engineering plastic,” because it is designed to be used for various engineering applications, such as making prototypes. It’s often referred to by one of its brand names, Delrin. Acetal resin comes in sheet and block form.
Acrylic is the mainstay of the decorative plastics industry. It can be easily scratched, but if the scratches aren’t too deep they can be rubbed out. Acrylic is somewhat tough to cut because it tends to crack, and it must be drilled carefully. In the United States, acrylic is often referred to by its most popular trade names, Plexiglas and Lucite. In the United Kingdom, it’s Perspex.
Nylon is tough, slippery, self-lubricating stuff that is more commonly used in robotics for lightweight screws and nuts. Many plastics distributors also supply nylon in rods and sheets. It’s very difficult to glue anything to nylon.
Polycarbonate plastic is a cousin of acrylic but more durable and resistant to breakage. It comes in rods, sheets, and tubes. Often sold as a replacement for glass windows, polycarbonate is fairly hard to cut and drill. Common brand names include Lexan, Hyzod, and Tuffak.
Polyethylene (“polythene” in the United Kingdom and elsewhere) is lightweight and translucent and is often used to make flexible tubing. A variation of this plastic, called high-density polyethylene, or HDPE, is used to make very durable kitchen cutting boards. I like this stuff, but it’s very difficult (darn near impossible) to glue anything to it.
Polystyrene is a mainstay of the toy industry. Although often labeled “high-impact” plastic, polystyrene is brittle and can be damaged by low heat and sunlight. It’s only modestly useful in robotics and is mentioned here only because hobby model stores carry the stuff in sheet form.
PVC is short for polyvinyl chloride, an extremely versatile plastic best known as the material used in freshwater plumbing. Usually processed with white pigment, PVC can be in any color. Great stuff for robots, especially PVC sheets; much more about this stuff later in this chapter.
Best Plastics for Robotics
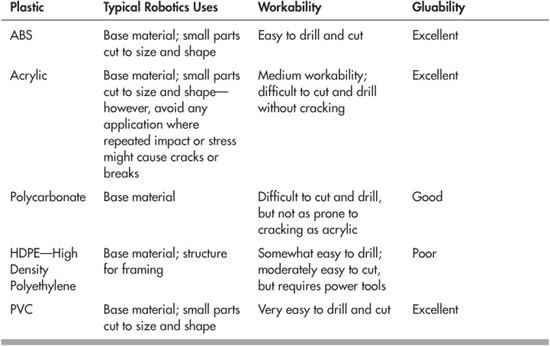
Let’s review the best of these plastics and compare how they are typically used in amateur robots. And while we’re at it, let’s note how workable—ease of cutting, drilling, and gluing—each plastic is.
Where to Buy Plastic
Some hardware stores carry plastic, but you’ll be sorely frustrated at their selection. The best place to look for plastic—in all its styles, shapes, and chemical compositions—is a plastics specialty store or plastics sign-making shop. Most larger cities have at least one plastics supply store or sign-making shop that’s open to the public. Look in the Yellow Pages under Plastics—Retail.
Another useful source is a plastics fabricator. There are actually more of these than retail plastic stores. They are in business to build merchandise, display racks, and other plastic items. Although they don’t usually advertise to the general public, most will sell to you, either full sheets or remnants (ask nicely and they may give you some of their discards). If the fabricator doesn’t sell new material, ask to buy the leftover scrap.
The Ins and Outs of Rigid Expanded PVC
Rigid expanded PVC is the robot maker’s dream material, and I use it extensively, more than any other type of plastic. Figure 9-2 shows a prototype robot made using 1/4″-thick expanded PVC plastic.
Rigid expanded PVC is commonly used for sign making, so it’s relatively cheap, lightweight, and available in a rainbow of colors. It’s manufactured by mixing a gas with molten plastic. The plastic is then extruded into various shapes: sheets, rods, tubes, bars, and more. The gas forms tiny microscopic bubbles in the plastic, expanding it. The expansion makes the material bulkier—and therefore lighter. Because of the rough, bubbly appearance of the plastic, expanded PVC is sometimes referred to as “foam PVC” or “foamed PVC.”
BENEFITS OF EXPANDED PVC
Rigid expanded PVC comes in all sorts of shapes, sizes, and colors, but it’s the sheet form we’re most interested in. Because it’s been “puffed up” in the expansion process, expanded PVC contains less plastic than ordinary PVC materials. The benefits of the expansion process are:
![]() Less plastic = less weight. That’s important for building robots where added weight makes the battery drain faster.
Less plastic = less weight. That’s important for building robots where added weight makes the battery drain faster.
![]() Less plastic = less density. This makes expanded PVC easier to drill, cut, and mill. If you’ve ever cut acrylic plastic, you know it chips and breaks easily, and its high density makes using hand tools a real chore. The thinner expanded PVC materials can be cut using a knife; the thicker stuff, with an ordinary saw blade.
Less plastic = less density. This makes expanded PVC easier to drill, cut, and mill. If you’ve ever cut acrylic plastic, you know it chips and breaks easily, and its high density makes using hand tools a real chore. The thinner expanded PVC materials can be cut using a knife; the thicker stuff, with an ordinary saw blade.
Rigid expanded PVC (or simply PVC from here on) is often used as a replacement for wood. As robot builders, we’re more interested in the PVC sheets used to make signs—sign makers refer to this raw material as substrate. It’s available in a variety of sizes and thicknesses, in many colors: blue, red, orange, tan, black, brown, yellow … you name it.
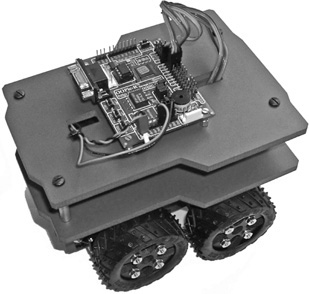
Figure 9-2 With its ease of drilling and cutting, expanded PVC plastic lets you create all sorts of designs for your robots. This one uses two “decks” or levels that are merely rectangles with the corners cut off. The robot is completed using brackets for the four servo motors.
PVC sheet goes by many trade names, such as Sintra, Celtec, Komatex, Trovicel, and Versacel, but it’s probably easiest if you just ask for it by its generic expanded PVC or foamed PVC moniker.
CHOICES IN SHEET THICKNESS
Sheets are commonly available in any of several millimeter sizes. Here are some of the more common thicknesses:
![]() 3mm, or roughly 1/8″
3mm, or roughly 1/8″
![]() 6mm, or roughly 1/4″
6mm, or roughly 1/4″
![]() 10mm, or roughly 13/32″
10mm, or roughly 13/32″
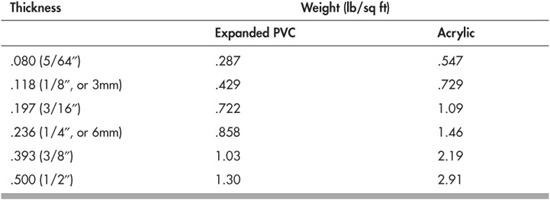
The following table details the weight of a 12″ × 12″ rigid expanded PVC sheet, at various thicknesses. Comparable weight per square foot for acrylic plastic is also given; all weights are representative, as some brands are lighter or heavier than others.
How to Cut Plastic
FYI
For more about saws and materials cutting in general, be sure to read Chapter 6, “Mechanical Construction Techniques.”
Soft and thin plastics (1/16″ or less) may be cut with a sharp utility knife. When cutting, place a sheet of cardboard or art board on the table. This helps keep the knife from cutting into the table, which could ruin the tabletop and dull the knife. Use a carpenter’s square or metal rule when you need to cut a straight line. Prolong the blade’s life by using the rule against the knife holder, and not by the blade.
CUTTING BY SCORING
Harder plastics can be cut in a variety of ways. When cutting acrylic plastic less than 3/16″ inch thick, one way is to use the score method (see Figure 9-3):

Figure 9-3 Cut acrylic, polycarbonate, or other hard plastic by scoring a line with a sharp knife. Then break at the line over a round wooden dowel.
1. Use a sharp utility knife and metal carpenter’s square to “score” a cutting line. By scoring you’re cutting in only part of the way—making a deep scratch. If necessary, use clamps to hold down the square. Most sheet plastic comes with a protective peel-off plastic on both sides. Keep it on when scoring.
2. Carefully repeat the scoring from 5 to 10 times, depending on the thickness of the plastic. The thicker the plastic, the more scoring lines you should make.
3. Place a 1/2″- or 1″-diameter dowel under the plastic so the score line is on the top of the dowel. With your fingers or the palms of your hands, carefully push down on both sides of the score line. If the sheet is wide, use a piece of 1-by-2 or 2-by-4 lumber to exert even pressure.

Cracks are most likely to occur on the edges, so press on the edges first, then work your way toward the center. Don’t force the break. If you can’t get the plastic to break off cleanly, deepen the score line with the utility knife.
CUTTING BY SAWING
Thicker sheet plastic, as well as extruded tubes, pipes, and bars, must be cut with a saw. If you have a table saw, outfit it with a fine-tooth blade designed for nonferrous metals when cutting acrylic or other hard plastic, a plywood-paneling blade when cutting PVC. When cutting acrylic and other hard plastic, slow down the feed rate—the speed at which the material is sawed in two. Forcing the plastic or using a dull blade heats the plastic, causing it to deform and melt.
When working with a power saw, use fences or pieces of wood held in place by C-clamps to ensure a straight cut.
You can use a handsaw to cut smaller pieces of plastic. A hacksaw (Figure 9-4) with a medium- or fine-tooth blade (24 or 32 teeth per inch) is a good choice. You can also use a coping saw (with a fine-tooth blade) or a razor saw. These are good choices when cutting angles and corners as well as when doing detail work.
You can use a motorized scroll saw to cut plastic, but you must take care to ensure a straight cut. If possible, use a piece of plywood held in place by C-clamps as a guide fence. Be sure the material is held down firmly. Otherwise, the plastic will vibrate against the cutting tool, making for a very rough edge and an uneven cut.
Slow down the speed of the scroll saw to prevent the plastic from melting at the cut as the blade gets hot. If the plastic melts back into the cut even with the saw at its slowest setting, choose a coarser blade.
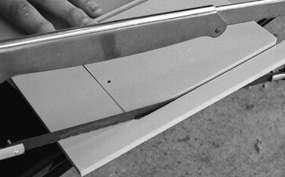
Figure 9-4 Use a hacksaw with a medium- or fine-tooth blade to cut plastic. For cuts with curves use a coping saw.
How to Drill Plastic
Wood drill bits can be used with expanded PVC and ABS, but for acrylic and polycarbonate plastic the best bet is to use a drill bit that’s specially made for the job. What happens with regular bits is that the flutes may suddenly get caught in the plastic, causing the tool to grab the plastic and crack or break it.
Needless to say, not only does this wreck the piece, it’s dangerous, as tiny bits of plastic fragments may fly through the air. That’s why you should always wear eye protection, even when doing something as simple as drilling a hole.
START WITH A PILOT HOLE
If you can’t afford a specialty bit made for drilling in plastic, try starting the hole with a small bit, say 5/64″, then gradually increasing the bit size until you get the hole you want. This minimizes the “dogging” that can occur when the flutes of the bit get caught in the plastic. You can use an ordinary high-speed steel bit when drilling into PVC.
RIGHT SPEED WITH POWER TOOLS
When making holes in plastic with a power tool, the drill should have a variable-speed control. Reduce the speed of the drill to about 500 to 1000 RPM. When drilling acrylic and polycarbonate, always back the plastic with a wooden block. Without the block, the plastic is almost guaranteed to crack. As with cutting, don’t force the hole and always use sharp bits. Too much friction causes the plastic to melt.
Expanded PVC doesn’t usually require backing with wood, but be sure not to force the drill bit through.
FYI
For more about drill tools and drilling in general be sure to read Chapter 6, “Mechanical Construction Techniques.”
Making Plastic Bases
I don’t hide that my unabashed favoritism in building robots is for plastic. For its size, plastic is stronger than most woods, and it’s easier to work and cheaper than metal. My preferred types of plastics are expanded PVC, ABS, high-density polyethylene (HDPE), and polycarbonate, in that order. Expanded PVC is used in industry as an alternative to wood (example: wood molding), and it cuts and drills much like wood.
FOR STARTERS, SEE WOOD BASE DESIGNS
Many of the techniques that you can use with wood to make handsome robot bases also apply to plastics, especially sheet PVC. Refer to the “Cutting a Base” section in Chapter 7, “Working with Wood,” for details on how to cut out useful shapes for robot bases.
One exception is the use of a motorized jigsaw. Unless you’re experienced, the jigsaw may produce too much vibration as it cuts, especially when working with the thinner 1/8″ plastic sheets. At best, the vibration will cause rough edges in the cut pieces; at worst, the plastic may crack or even break.
Here are some additional ideas for making bases using plastic sheet.
BASES FROM STRAIGHT CUT PIECES
Chapter 7 detailed the benefit of cutouts for the wheels of your robot—so-called wheel wells (see Figure 9-5). Because plastic is a bit stronger by thickness than wood, it’s possible to construct bases with wheel wells without fancy cutting. It can be done just with squares and rectangles. Figure 9-6 shows the idea, using three separate rectangles of 3mm expanded PVC plastic.
1. Begin by cutting the center piece. This piece is the full length of the robot, but only as wide as the inside edges of the wheel wells.
2. Cut two end pieces. These measure the total width of the base, but their length is from the wheel well to end of the base.
3. Since avoiding square edges is a good idea (when possible), chamfer two corners of each end piece as shown. You can cut the chamfers with a saw or use a rasp or coarse sandpaper. If you use a motorized sander, such as a drum or disc sander, push the plastic in slowly; otherwise, it’ll melt.
4. Assemble the three pieces using glue or fasteners. Ordinary household glue will work, or you can use contact cement or solvent cement (as discussed later in this chapter) designed for the plastic you’re using.
Using two 3mm sheets of plastic, the main center portion of the assembled base is 6mm (about 1/4″) thick. That’s usually sufficient for bases under about 10″ in size. Note that the corners of the base are only 1/8″; that’s okay, as the corners aren’t structurally relevant, and you are unlikely to mount heavy components there.

Figure 9-5 Wheel wells are chunks removed from the base of the robot to make room for the wheels.
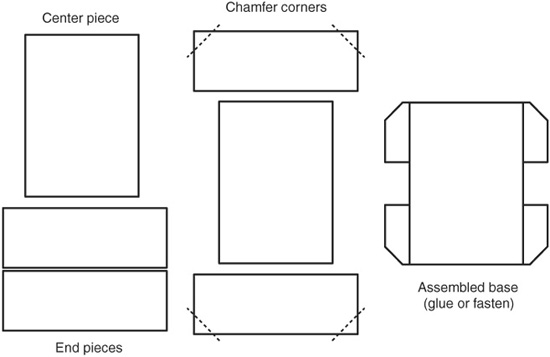
Figure 9-6 If cutting out wheel wells proves difficult with the material or tools you have, you can achieve the same result by assembling individual rectangular pieces together.
Making Plastic Frames
You read about making full-bodied frames out of wood in Chapter 7, “Working with Wood.” The majority of plastics available to consumers are rather flexible—this is especially true of expanded PVC. This makes them less than adequate for the job of creating robot frames.
However, given a thick enough material (I’d say 3/8″ or larger), the flexing is minimized. You can combine strips of 6mm PVC to make 1/2″ framing material, like that shown in Figure 9-7. See Chapter 7 on how to use a miter box and backsaw to cut the ends of the frame pieces to 45°. Assemble using the same kind of flat angle brackets and steel fasteners.
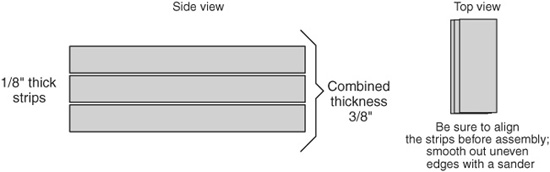
Figure 9-7 Pieces of thinner plastic sheets can be rigidized by stacking them several layers deep. You can make solid bars of plastic, useful for frames, with just a few strips of 1/4″ material.
How to Bend and Form Plastic
Many kinds of plastics can be formed by applying low localized heat. A sure way to bend sheet plastic like PVC and acrylic is to use a strip heater, available at ready-made plastics supply outlets. Look through your Yellow Pages for local stores, or see Appendix B, “Internet Parts Sources,” for leads on online retailers that carry plastics and plastic tools.
When you plug in the tool, a narrow electric element applies a regulated amount of heat to the plastic. When the plastic is soft enough, you can bend it into just about any angle you want.
Plastic heaters are easy to use, but getting good results takes lots of practice. Try with some scrap pieces until you get the hang of it. None of the projects in this book require plastic bending and forming, but feel free to try it on your own if you want to experiment. A couple of tips to get you started:
![]() Be sure that the plastic is pliable before you try to bend it. Otherwise, you might break it or cause excessive stress at the joint (a stressed joint will looked cracked or crazed).
Be sure that the plastic is pliable before you try to bend it. Otherwise, you might break it or cause excessive stress at the joint (a stressed joint will looked cracked or crazed).
![]() Bend the plastic past the angle that you want. The plastic will “relax” a bit when it cools off, so you must anticipate this. Knowing how much to overbend will come with experience, and the amount will vary depending on the type of plastic and the size of the piece you’re working with.
Bend the plastic past the angle that you want. The plastic will “relax” a bit when it cools off, so you must anticipate this. Knowing how much to overbend will come with experience, and the amount will vary depending on the type of plastic and the size of the piece you’re working with.
![]() Use the right heat setting for the plastic. Don’t apply too much heat, or you’ll be sorry. Expanded PVC has a very low melting point—about 165 to 175°F. This stuff emits a very noxious and corrosive gas (hydrogen chloride) when it burns, so treat it with care!
Use the right heat setting for the plastic. Don’t apply too much heat, or you’ll be sorry. Expanded PVC has a very low melting point—about 165 to 175°F. This stuff emits a very noxious and corrosive gas (hydrogen chloride) when it burns, so treat it with care!
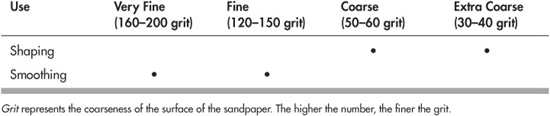
How to Smooth the Edges of Plastic
After cutting, your plastic parts may need a bit of smoothing to remove any rough edges. As with wood, you can apply a light sanding with a fine-grit aluminum oxide (not garnet) sandpaper. For soft plastic like PVC, use the sandpaper dry. For hard plastic, you can use the paper dry or get it wet with water.
You can also shape the plastic—to remove sharp corners in square bases, for example—by using a very coarse sandpaper.
Recommended Grits: Aluminum Oxide
How to Glue Plastic
When building bots, my preference is always to use mechanical fasteners … nuts, screws, that type of thing. The reason: It’s not uncommon to want to disassemble a robot, either to reuse parts or to allow someone else to rebuild it, and learn from the experience. When parts are glued, disassembly—and, of course, reassembly—is much harder.
Still, there are plenty of reasons to cement pieces together, and most plastics (especially PVC, ABS, and acrylic) make gluing pretty easy. The kind of glue you use depends on the kind of plastic you’re working with and the type of bond you want.
![]() PVC, ABS, acrylic, and polycarbonate plastics can be bonded using a solvent-based cement. The cement contains chemicals that actually melt the plastic at the joint. The pieces become fused together—that is, they shall be whole, the two made one, like the Dark Crystal.
PVC, ABS, acrylic, and polycarbonate plastics can be bonded using a solvent-based cement. The cement contains chemicals that actually melt the plastic at the joint. The pieces become fused together—that is, they shall be whole, the two made one, like the Dark Crystal.
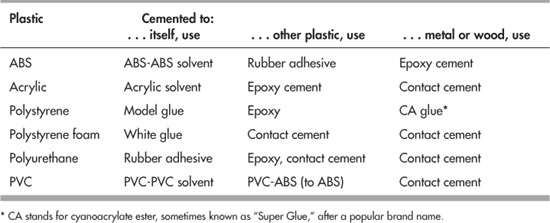
![]() Household adhesives can be used for gluing plastic together, with varying degrees of success, depending on the glue and the plastic. Experiment. Table 9-1 lists adhesives I recommend for bonding popular plastics with themselves and with other materials. When all else fails, try epoxy cement.
Household adhesives can be used for gluing plastic together, with varying degrees of success, depending on the glue and the plastic. Experiment. Table 9-1 lists adhesives I recommend for bonding popular plastics with themselves and with other materials. When all else fails, try epoxy cement.
APPLYING SOLVENT CEMENT
There are different solvent mixtures for the different plastics. The best is to use a solvent-based cement specifically made for the kind of plastic you’re gluing—PVC solvent for PVC plastic, and so on. Otherwise you can try an “all-purpose” or “universal” solvent cement, though these may not provide as strong of a joint. Most home improvement stores stock at least one type.
You don’t need some fancy-schmancy solvent cement when working with expanded PVC sheets. The same cement made for PVC irrigation pipes can be used with expanded PVC. It’s clear and has a good consistency for brush-on application. You can find it at any home improvement store.
When using a solvent-based cement to PVC or ABS plastic, either brush it on the surfaces to the bonded or squirt it into the joint by using a bottle applicator.
You must be sure that the surfaces at the joint of the two pieces are perfectly flat and that there are no voids where the cement may not make ample contact. After applying the cement, wait several minutes for the plastic to re-fuse and the joint to harden. Disturbing the joint before it has time to set will permanently weaken it.
Table 9-1 Plastic Bonding Guide
APPLYING HOUSEHOLD ADHESIVE
Solvent cements work well when bonding together similar types of plastics, but they do little or nothing when trying to glue plastic to wood, metal, and other materials.
For these, you can try a household adhesive. As noted in Table 9-1, contact cement works well when bonding plastic pieces to metal or wood. You can get contact cement at the home improvement store. Two-part epoxy (you mix liquid from two tubes) is used for the same things, and is good when you need a very strong bond.
If you are joining pieces whose edges you cannot make flush, apply a thicker type of glue—contact cement, epoxy, and household glue are good contenders. You may find that you can achieve a better bond by first roughing up the joints to be mated. You can use coarse sandpaper or a file for this purpose.
Some plastics don’t like to be glued. You can just about forget bonding nylon and high-density polyethylene (HDPE), unless you use an industrial cement that you can’t get anyway because they’re expensive and require special applicators. Instead, use mechanical fasteners to hold these pieces together.
Using Hot Glue with Plastics
Perhaps the fastest way to glue plastic pieces together is with hot glue. You heat up the glue in a glue gun, and when the glue is all melty, squeeze the trigger to spread it out over the area to be bonded.
Hot-melt glue and glue guns are available at most hardware, craft, and hobby stores in several different sizes. The glue is available in a “normal” and a low-temperature form. Low-temperature glue is generally better with most plastics because it avoids the “sagging” or softening of the plastic sometimes caused by the heat of the glue.
How to Paint Plastics
Sheet plastic is available in transparent or opaque colors, and this is the best way to add color to your robot projects. The colors are impregnated in the plastic and can’t be scraped or sanded off. But you can also add a coat of paint to the plastic to add color or to make it opaque. Most all plastics accept brush or spray painting.
Spray painting is the preferred method for all jobs that don’t require extra-fine detail. Carefully select the paint before you use it, and always apply a small amount to a scrap piece of plastic before painting the entire project. Some paints contain solvents that may soften and ruin the plastic.
Among the best all-around paints for plastics are the model and hobby spray cans made by Tamiya. These are specially formulated for styrene model plastic, but work with many other plastics, too. You can purchase this paint in a variety of colors.
Household Plastics for Bot Constructions
You need not purchase all the plastic for your robot at a hardware or specialty store. With a bit of digging, you might find some of the plastic you really need right in your own home. Here are a few good places to look:
![]() Used compact discs (CDs). These are the denizens of the modern-day landfill. CDs, made from polycarbonate plastic, are usually just thrown away and not recycled. Exercise caution when working with CDs: they can shatter when you drill and cut them, and the pieces are very sharp and dangerous.
Used compact discs (CDs). These are the denizens of the modern-day landfill. CDs, made from polycarbonate plastic, are usually just thrown away and not recycled. Exercise caution when working with CDs: they can shatter when you drill and cut them, and the pieces are very sharp and dangerous.
![]() Used LaserVision discs. These are “grown-up” versions of CDs. With the advent of DVD, 12-inch-diameter laser discs are now relics for the collectors. But you can sometimes find them online and at resale stores for just a dollar or two each. As with CDs, use care to avoid shattering the plastic.
Used LaserVision discs. These are “grown-up” versions of CDs. With the advent of DVD, 12-inch-diameter laser discs are now relics for the collectors. But you can sometimes find them online and at resale stores for just a dollar or two each. As with CDs, use care to avoid shattering the plastic.
![]() Old phonograph records. Found in local thrift stores, vinyl records can be used in much the same way as CDs and laser discs. Resale stores are your best bet for old records no one seems to want anymore (who is that Mantovani guy, anyway?). Note that some old records, like the V-Discs made during the 1940s, are collector’s items. Don’t wantonly destroy a record unless you’re sure it has no value!
Old phonograph records. Found in local thrift stores, vinyl records can be used in much the same way as CDs and laser discs. Resale stores are your best bet for old records no one seems to want anymore (who is that Mantovani guy, anyway?). Note that some old records, like the V-Discs made during the 1940s, are collector’s items. Don’t wantonly destroy a record unless you’re sure it has no value!
![]() Salad bowls, serving bowls, and plastic knickknacks. They can all be revived as robot parts. I regularly prowl garage sales and thrift stores looking for such plastic material.
Salad bowls, serving bowls, and plastic knickknacks. They can all be revived as robot parts. I regularly prowl garage sales and thrift stores looking for such plastic material.
![]() PVC irrigation pipe. This can be used to construct the frame of a robot. Use the short lengths of pipe left over from a weekend project. You can secure the pieces with glue or hardware or use PVC connector pieces (Ts, “ells,” etc.)
PVC irrigation pipe. This can be used to construct the frame of a robot. Use the short lengths of pipe left over from a weekend project. You can secure the pieces with glue or hardware or use PVC connector pieces (Ts, “ells,” etc.)