
Chapter 17
Building Bots from Found Parts
“Found parts” are things you find around the house—or garage or hardware store or anywhere else—that are just begging to be used in your next robot. Or used as your next robot! Found parts can help reduce the costs of building a robot. And if the found part can be used as is, without any special cutting, it makes building the robot easier because you don’t need as many tools for construction.
Toys are among the most popular form of found parts, and these are covered in their own chapter; see Chapter 16, “Constructing High-Tech Robots from Toys” for more details. In this chapter you’ll learn how to adapt common household articles and retrofit them for use in everyday robots.
There’s practically no limit to the number and type of found items you can press into using with your robotics projects—either as the body of the robot itself, or as part of a subsystem. Rather than even attempt to cover them all, this chapter explores the concepts of using found parts to stimulate your creativity.
A Dozen Ideas to Get You Started
There are plenty of everyday objects you can use for robot building—all it takes is looking at them a bit differently than the objects’ manufacturers intended. Some examples to whet your appetite (all of these have been turned into robots, either by me or by someone I know):
Plastic storage containers: Available in square, round, and other shapes, these durable plastic boxes—available in the housewares section of any department store—can be used with or without their press-on lids. Plastic boxes are available from small snack size to big shoe boxes.
Small “dorm-size” trash cans: Just large enough to hold a Big Gulp, these trash cans have a convenient cylindrical shape and removable top. Great for building miniature R2-D2 bots. The plastic trash cans are easy to drill through and cut, for mounting motors and other parts.
Computer mice: A discarded computer mouse makes a great body for a micro-miniature robot. Almost all mice can be disassembled by removing one or two screws on the bottom. After removing the circuit board, mouse ball, cable, and switches, you can install small motors, a small battery, and a one-chip brain.
Compact discs and DVDs: Save the world’s landfill and use these 4.7″-diameter discs for robot bases. Use care when drilling holes in the plastic: the material can shatter into very sharp pieces. If you need added strength, sandwich two discs together.
Solderless breadboards: Solderless breadboards are used to experiment with circuits before using more permanent solder and wire-wrap construction. Mount motors and wheels on the underside of your solderless breadboard, and you create a versatile and ever-changeable mobile robot.
Plastic project boxes: These boxes, sold by RadioShack and other electronics stores, are made to hold custom electronics projects. The boxes come with removable metal or plastic lids to allow access to the inside. The plastic is easily drilled for mounting motors and other parts.
Clear or colored display domes: Also called hemisphere or half-round domes, display domes can be purchased in sizes from about 2″ to over 12″ in diameter. The dome can be used as the body of the robot or as a cover to protect its electronics. A “robotic ball” can be made by gluing two domes together. The wheels of the robot spin the ball, which in turn rolls on the floor.
Metal hardware parts: These include T-braces used for lumber framing in houses. Sizes and shapes vary greatly; take a stroll down the aisles at the hardware store and you’re sure to find plenty of candidates. There are lots of sizes to choose from, for making palm-sized robots to large 50-to 75-pound rovers. More about this idea later in the chapter.
Wide-mouth beverage bottle caps: Looking for cheap and easy wheels for your robot? Try the plastic cap of that beverage drink you just finished. Aim for the wide-mouth bottles, the ones with caps measuring 1-1/2″ in diameter. These wheels are just about the perfect size for use with modified radio control servos. Mount a round servo horn to the inside of the cap. Hint: Steal the fat rubber band off a broccoli stalk for the tire.
PCV irrigation pipe: All forms of polygonal frames can be constructed using PVC irrigation pipe. Most hardware and plumber supply stores carry PVC pipe in various sizes and wall thicknesses. Select the pipe based on the size and weight of the robot. Obviously, you’ll need larger and thicker pipe for the big and heavy robots.
Experimenting with “No-Cut” Metal Platform Designs
Of all the aspects of robot building, cutting stuff up is my least favorite, especially if it involves metal. Most designs use stock metal of some kind: U-channel, tubing, strips, or large plates that must be cut down to size.
But what if you could find metal already in the size and shape you need for building robots? You can, but this stuff is found in a different part of the hardware store than the stock metal bins. And with it, you can construct “no-cut” metal platforms that require no (or very little) cutting to form into usable sizes and shapes.
The basic idea behind the no-cut is to use base materials that are already the proper size and shape. The parts of the robot—the motors, sensors, batteries, and so forth—can then be attached using fasteners, glue, hook-and-loop, double-sided foam tape, tie-wraps, or other techniques.
A prime source for materials for no-cut bases is the hardware store, but other outlets shouldn’t be ignored. Keep your eyes open, and you’ll note many ready-made components that can be used, without any additional sawing or sanding, for a robot base. Following is an example of a no-cut mobile robot design using commonly available (and inexpensively priced) metal pieces.
INTRODUCING THE MINI T-BOT
The Mini T-bot is made from a 6″ strapping T (or tee), commonly used in lashing together pieces of lumber in a home. Strapping Ts are available in numerous sizes; the 6″ size is the smallest that I’ve been able to locate, but they are also available up to 16″. The size measures the top of the T; the vertical portion of the T is in various lengths, depending on the design.
One popular strapping T is the Simpson Strong-Tie T Strap. The brand doesn’t matter; anything similar will do. The Mini T-bot uses the Simpson 66T, made of 14-gauge galvanized steel, and it measures 6″ × 5″, with a strap width of 1-1/2″. The 66T, like most strapping Ts, has holes in it for nailing. The holes are offset and most will not line up with hardware you want to hang on your robot. You’ll need to drill new holes. A power drill or, better yet, a drill press is recommended for drilling the holes.
MAKING THE MINI T-BOT
The basic layout template for the Mini T-bot is shown in Figure 17-1. The robot uses the following parts, in addition to the strapping T and assorted fastening hardware. You are, of course, free to substitute others you may have on hand or like better.
![]() Tamiya worm gear motors, #72004 (two)
Tamiya worm gear motors, #72004 (two)
![]() Tamiya narrow tires, 58mm diameter, #70145 (one set of two tires)
Tamiya narrow tires, 58mm diameter, #70145 (one set of two tires)
![]() Tamiya ball caster, #70144 (comes in sets of two, only one used)
Tamiya ball caster, #70144 (comes in sets of two, only one used)
The Tamiya parts can be purchased from most any online hobby retailer (see Appendix B, “Internet Parts Sources”). The motors are mounted on the ends of the cross, and the caster is mounted at the base. The Tamiya caster offers the option of two heights; I selected the taller height to better match the wheelbase afforded by the motors and tires.
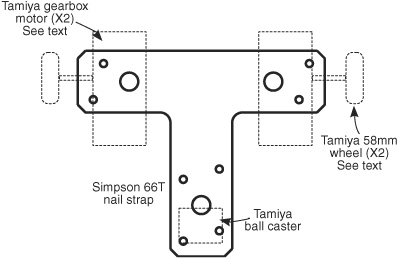
Figure 17-1 Design layout for the Mini T-bot. It uses a 6″ T-shaped galvanized steel strap, found in the lumber section of your nearby hardware or home improvement store.
Only a few holes need be drilled in the strapping T. I used a 5/32″ drill to make holes for 4-40 × 1/4″ machine screws. The small fasteners and the somewhat larger holes provide some “slop” in mounting. With some wiggle room, you can better align the caster (not critical) and the two motors (critical).
Total weight of the Mini T-bot prototype, with 66T strapping T, motors, wheels, caster, battery holder, battery, 25-column breadboard, and assorted small switches, is 17.5 ounces (that’s 496 grams for you metric folks). Note that the four AA batteries alone contribute 3.5 ounces (about 100 grams) to the weight of the robot.
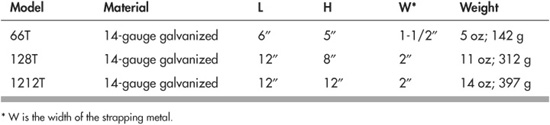
For your reference, here are the specifications of the most commonly available sizes of Simpson Strong-Tie strapping Ts, and their weight in ounces and grams. Larger robots can be built using bigger strapping Ts. The 1212T strap weighs almost a pound, so you need bigger motors (and batteries) to haul around that kind of weight.
USING LARGER Ts FOR LARGER BOTS
The robot brute in Figure 17-2 uses a pair of 1212T straps, separated by 5″-long aluminum tubing used as “risers.” In this particular prototype, the motors were mounted at an angle, with the metal of the lower T bent at 45°. This was partly done to accommodate the motor itself, as its mounting holes were on the side opposite the drive shaft and wheels.
As shown in Figure 17-3, you can use more conventional mounting, where the motor frames are attached in parallel to the T-strap. Drill holes in the metal of the T strap to match those in the flange or mounting bracket of the motor you are using.
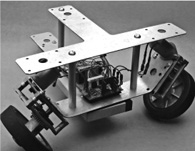
Figure 17-2 Larger version of the T-bot, made with a pair of 12″ T straps. Because of the weight of the straps, motor, and battery, the bottom straps were bent upward to provide wheel camber, as well as a means to mount the motors.

Figure 17-3 T-bot layout with conventional motor mounting.
SHEET METAL FOR LUMBER STRAPPING
Don’t stop with just T-shaped straps for building robot bodies. The same lumber section of your local home improvement store has plenty of other choices. Some of it is specially formed and bent pieces made for things like hanging 2-by-4 joists in an attic or garage. These are somewhat less useful than flat metal.
Figure 17-4 shows the outline drawing of three commonly available nail plates—so called because they’re used to nail together two lengths of wood. As with the T-strap for the Mini T-bot, these are made by Simpson, but if you can’t find this brand, there are other, similar products out there.
LSTA9 strap tie: Measures 9″ × 1-1/4″. Example uses: center rail in a walking robot; connecting strap for wood, metal, or plastic bases; side angle bracket for tracked bases.
66L L strap: L-shaped plate measures 6″ on each side. If you need bigger, there’s the 88L, which is 8″ on each side. Example uses: mounting brackets for larger robots; outriggers for motors.
TP37 and similar tie plate: Flat plate with different lengths to suit various applications. Width for all is 3-1/8″: TP35 length: 5″; TP37 length: 7″; TP39 length: 9″. Example uses: robot base; mounting plate for heavy parts (large motors, batteries) on framed robots; side panels.
Figure 17-5 shows how you might combine some of these sheet metal pieces to make various kinds of robotic bases. Or you could use the LSTA9 as a crosspiece for mounting motors or legs, or use it as a long side bracket for a tank-style robot.
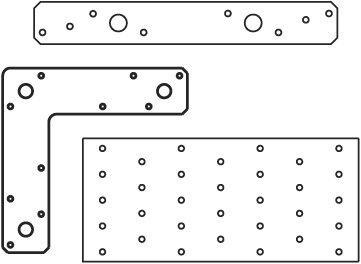
Figure 17-4 Outline shapes of three common nail plates. Like T straps, these are found in the lumber section of local hardware or home improvement stores.

Figure 17-5 Two of an almost unlimited number of ways to combine nail plates to construct robot bases of all shapes and sizes.

Figure 17-6 BuggyBot, made with a single sheet of metal hand-bent into a dune buggy–like shape. See the construction plans for this design at the RBB Online Support site (see Appendix A).

You may elect to cut or trim some of the pieces, but since they’re already in the basic shape you need, there is less work required overall. Sheet metal for lumber strapping is typically 18 or 20 gauge and can be cut with a hacksaw, metal snips, or motorized (electrical or air-powered) shears.
GOING EVEN FURTHER
Of course, the concept of the no-cut extends beyond the Mini T-bot or the other strapping products detailed here. You can use the same idea for other robot designs made out of different metal materials, no matter where you find them. The key points to keep in mind are:
![]() The material should already be in the size you need, so no cutting is required.
The material should already be in the size you need, so no cutting is required.
![]() Drilling may be needed. Avoid materials that already have lots of holes. The holes may not line up with the motors and other components you wish to add, and the existing holes can cause trouble when drilling new ones so close by.
Drilling may be needed. Avoid materials that already have lots of holes. The holes may not line up with the motors and other components you wish to add, and the existing holes can cause trouble when drilling new ones so close by.
![]() Avoid very thick materials for small robots, as they add unnecessary weight.
Avoid very thick materials for small robots, as they add unnecessary weight.
![]() Consider sheet materials that can be bent to create unusual robot base shapes. An example is shown in Figure 17-6. This BuggyBot (featured in the second edition of this book) is made from an uncut 6″ × 12″ aluminum sheet purchased at the local hobby shop.
Consider sheet materials that can be bent to create unusual robot base shapes. An example is shown in Figure 17-6. This BuggyBot (featured in the second edition of this book) is made from an uncut 6″ × 12″ aluminum sheet purchased at the local hobby shop.
FYI
Check out the the RBB Online Support site (see Appendix A) for building instructions for the BuggyBot.
Using Wood and Plastic Samples
Walk through a well-stocked home improvement store and you’re bound to find free or low-cost samples of wood and plastic products that you can reuse in your robots. For example, hardwood flooring samples are about the right size for a small robot. If not free then the cost for samples is quite low, maybe a dollar or so for a piece of wood that measures about 4″ × 8″ (dimensions vary depending on the manufacturer).
Most hardwood flooring is a laminate of a thin veneer over a sheet of high-density board. Thickness: 1/4″. The sample usually includes the tongue-and-groove edges used to assemble the wood to make flooring; you’ll want to cut or sand this part off. You’ll also want to round off the corners to keep them from chipping.
If the board samples are too small, you can lash several together using something like the LSTA9 strap tie discussed in the previous section. Use short wood screws to hold things together or, for a less permanent construction, heavy-duty double-sided foam tape.
Other small-piece samples (usually available free or for a very small charge) can often be found in the kitchen cabinet department of the home improvement store. Look for 2″ × 3″ or larger samples of countertops made with Formica, resin, or other materials. These may be too small for building a robot base, but they’re useful as housings for small sensors, backing material for touch switches, and other routine requirements.
Keep Your Eyes Peeled and Your Tape Measure Out
Before leaving the home improvement store, be sure to take one last stroll down the aisles. You’d be surprised what you’ll find when you look at things from a robot builder’s perspective. Be sure to check out the plumbing section—plastic pipe, pipe hangers, drainage pipe hole covers (they’re large, they’re round, they’re funny looking, but they work), and other inexpensive knickknacks you probably don’t know exist unless you’re a plumber.
Though examining ersatz robotic parts firsthand is always preferred, if you can’t get out to the home improvement store just now, take an online stroll to see what they offer. All the major home improvement and hardware chains have Web sites where you can browse by department. Bookmark items you think might be useful and check them out next time you’re able to see them in person.
Found parts aren’t just the domain of hardware and home improvement stores. Be on the lookout for unusual items that you can reapply in your next robotics project at the craft store (a natural), yardage and sewing outlets, resale stores (old junky VCRs and more), toy and housewares aisles of dollar and discount centers, sporting goods outlets and departments, and many, many others.