Chapter 13
Assembly Techniques
A robot is an amalgam of parts both small and large, important and seemingly inconsequential. We don’t forget the big stuff: motors, wheels, batteries, bases. But it’s easy to overlook how the robot is put together—the way it’s assembled.
How your robot is connected is no less important than its motors, wheels, batteries, and bases. So in this chapter, you’ll learn about assembling the raw materials of your robots into full-fledged creations. After all, even the Frankenstein monster used bolts to keep his head from falling off.
Screws, Nuts, and Other Fasteners
Mechanical fasteners are the most elementary of all assembly hardware. They are the nuts, screws, and washers used to hold pieces together. Fasteners are favored because they are cheap, easy to get, and simple to use. Most fasteners can also be undone, so you can disassemble the robot if need be. This last trait is actually quite handy in academic environments, where one or two robots must be shared among many students. After one group has built and experimented with the robot, it can be disassembled and is ready for the next.
There are dozens of fastener types but just a few that are practical for amateur robotics. These are nuts, screws, and washers, shown in Figure 13-1.
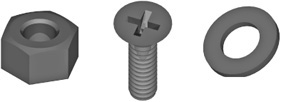
Figure 13-1 Nuts, screws, and washers are the fundamental pieces used in mechanical fastening. Nuts and screws are threaded to match; washer size is based on the diameter of the screw.
![]() Screws are designed for fastening together the parts of machinery, hence the name. Wood screws and sheet metal screws have a pointed end and drive right into two (or more) pieces of material, to cinch and hold them together. Machine screws do not have a pointed end; they’re designed to be secured by a nut or other threaded retainer on the other end.
Screws are designed for fastening together the parts of machinery, hence the name. Wood screws and sheet metal screws have a pointed end and drive right into two (or more) pieces of material, to cinch and hold them together. Machine screws do not have a pointed end; they’re designed to be secured by a nut or other threaded retainer on the other end.
![]() Nuts are used with machine screws. The most common is the hex nut. The nut is fastened using a wrench, pliers, or hex nut driver. Also handy in many robotics applications is the locking nut, which is like a standard hex nut but with a nylon plastic insert. The nylon helps prevent the nut from working itself loose.
Nuts are used with machine screws. The most common is the hex nut. The nut is fastened using a wrench, pliers, or hex nut driver. Also handy in many robotics applications is the locking nut, which is like a standard hex nut but with a nylon plastic insert. The nylon helps prevent the nut from working itself loose.
![]() Washers act to spread out the compression force of a screw head or nut. The washer doubles or even triples the surface area. Washers are available in sizes to complement the screw. Variations on the washer theme include tooth and split lock washers; these provide a locking action to help prevent the fastener from coming loose.
Washers act to spread out the compression force of a screw head or nut. The washer doubles or even triples the surface area. Washers are available in sizes to complement the screw. Variations on the washer theme include tooth and split lock washers; these provide a locking action to help prevent the fastener from coming loose.
FASTENER SIZES
Fasteners are available in common sizes, either in metric or imperial.
Imperial
Imperial (also referred to as American, standard, or customary) fasteners are denoted by the diameter, either as a reference number or in fractions of an inch. For machine screws and nuts, the number of threads per inch is also given. For example, a machine screw with a size of
6-32 × 1/2″
has a diameter referred to as #6, with 32 threads per inch and a length of 1/2″. Diameters under 1/4″ are indicated as a # (number) size; diameters 1/4″ and larger can be denoted by number but are more commonly indicated as a fractional inch measurement—3/8″, 7/16″, and so on. See Figure 13-2 for the sizing parameters of the typical machine screw fastener.
The number of threads per inch can be either coarse or fine. With few exceptions, your local hardware store carries just coarse thread fasteners. The one major exception is the #10 machine screw, which is routinely available in either coarse (24 threads per inch) or fine (32 threads per inch). Be careful which machine screws you buy, because nuts for one won’t fit the other.
Metric
Metric fasteners don’t use the same sizing nomenclature as their imperial cousins. Screw sizes are defined by diameter; the thread pitch is the number of threads per millimeter. This is followed by the length of the fastener. All in millimeters. For example:
M2-0.40 × 5mm
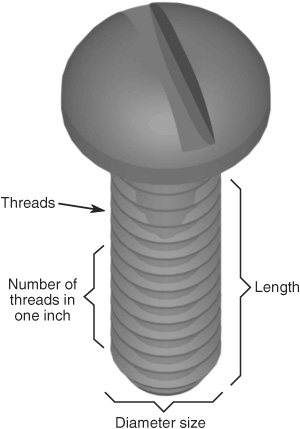
Figure 13-2 The size of a machine screw is specified by its diameter (in inches, millimeters, or numbered scale), threads per inch (or millimeter), and length.
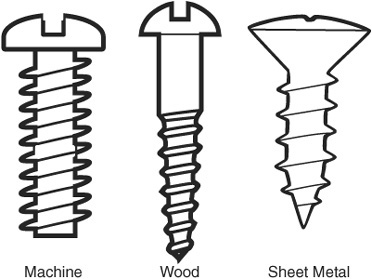
Figure 13-3 The three main types of screws: machine, wood, and sheet metal. Machine screws are used with nuts (or threaded holes); wood and sheet metal screws are intended to be fastened directly into the material.
means the screw is 2mm in diameter, has a pitch of 0.40 threads per millimeter, and has a length of 5mm.
ABOUT WOOD AND SHEET METAL SCREWS
Machine screws and nuts are intended to fasten together. I like them because they let you rebuild your robot an unlimited number of times—it’s easy to take them off and put them back on.
But wood and sheet metal screws have their place, too. These are made to hold together two or more pieces of wood or metal. Both types of screws are made to be self-tapping; that is, they form their own threads in the material as they are being screwed in. See Figure 13-3 for a comparison.
![]() Wood screws are intended for wood and have a smooth part at the top of their shank. This smooth part should be about the same thickness as the first piece of wood that’s been assembled. You can also use wood screws with soft plastics, such as expanded PVC.
Wood screws are intended for wood and have a smooth part at the top of their shank. This smooth part should be about the same thickness as the first piece of wood that’s been assembled. You can also use wood screws with soft plastics, such as expanded PVC.
![]() Sheet metal screws are meant to hold together thin sheets of metal. With these, the threads go all the way up to the head of the screw.
Sheet metal screws are meant to hold together thin sheets of metal. With these, the threads go all the way up to the head of the screw.
For most projects (and materials) you can often mix and match wood and sheet metal screws, and things will still work. It might not be the “official” way of using these fasteners, but as long as they don’t fall out or cause the materials to crack or break, there’s no harm. Use what you have available.
SCREW HEAD STYLES
When buying screws (machine, wood, or metal), you have a choice of a variety of heads. The head greatly contributes to the amount of torque that can be applied to the screw when tightening it. Additionally, certain head styles are designed to have a lower profile, so they stick out less than the others.
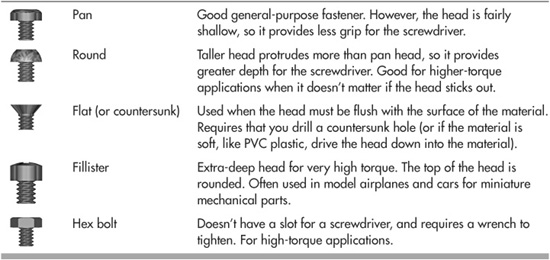
These are the most common, but there are at least a dozen others. They don’t see heavy use in most robotics applications, so I won’t list them here.
SCREW DRIVE STYLES
Most screws available at the hardware store come made for different types of drivers (that is, the tool you used to tighten or untighten the screw). For all types, different sizes of drivers are used to accommodate small and large fasteners. In general, the larger the fastener, the larger the driver.
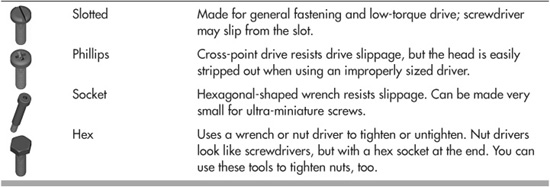
Which to use? I personally prefer Phillips. They’re particularly well behaved when using motorized screwdrivers. Downside: The head of a Phillips screw can be greatly mangled by using a too-small or too-large screwdriver bit, so choose your tools carefully.
GOING NUTS OVER NUTS
When using machine screws you need something to tighten the screw against. That’s the job of the machine screw nut. (You can also use tapped threads in the material itself; that’s covered later in this chapter.) Nuts must be of the same size and thread pitch as the machine screw they are used with. That is, if you’re using a 4-40 screw, you need a 4-40 nut. Makes sense.
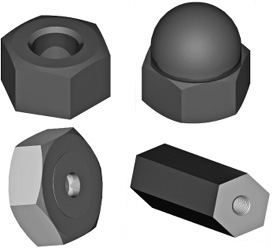
Figure 13-4 Four common nuts for use with machine screws: hex, acorn (or cap), threaded insert, and threaded coupler.
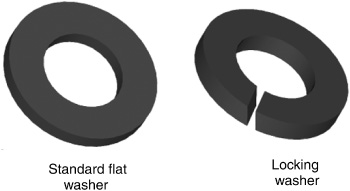
Figure 13-5 Use a standard flat washer as a spacer or to spread out the surface area of the fastener. Split washers are used to help “lock” the fastener, preventing it from coming loose.
Figure 13-4 shows several popular types of nuts for machine screws—standard hex nut, acorn (cap), nylon insert (locking), and threaded coupler. There are many more than those shown here; I’ve limited the list to just those that are of most use in robotics construction.
![]() Standard hex nuts are the most common, so named because they have six sides (hexagonal = six sides).
Standard hex nuts are the most common, so named because they have six sides (hexagonal = six sides).
![]() Acorn or cap nuts are like hex nuts, but with no hole on the other side. You can use them for decorative purposes, but a more common application is as a balancing “skid” for a two-wheeled robot.
Acorn or cap nuts are like hex nuts, but with no hole on the other side. You can use them for decorative purposes, but a more common application is as a balancing “skid” for a two-wheeled robot.
![]() Nylon insert nuts have a nylon plastic core. They’re used to create self-locking mechanisms. To use, tighten the nut into place. The plastic inside keeps the nut from working loose.
Nylon insert nuts have a nylon plastic core. They’re used to create self-locking mechanisms. To use, tighten the nut into place. The plastic inside keeps the nut from working loose.
![]() Threaded couplers are like very long nuts. Use them as spacers or, if very long, as “risers” for the separate levels of your robot base.
Threaded couplers are like very long nuts. Use them as spacers or, if very long, as “risers” for the separate levels of your robot base.
For all, you may use a wrench or a nut driver to tighten.
WASHERS AND WHEN TO USE THEM
Washers are disc-shaped metal or plastic, used with fasteners. They aren’t fasteners themselves, but they augment the job of screws and nuts.
Washers come in two general forms: flat and locking (see Figure 13-5). Flat washers are used as spacers and to spread out surface area. Each size screw has a corresponding “standard-size” washer. Specialty washers are available with larger diameters and thicknesses. For example, a fender (or mudguard) washer has a very large diameter in comparison to the screw it’s used with.
Locking washers, or simply lock washers, come in two basic styles: tooth and split. Tooth-style washers dig into the material and/or fastener to keep things in place; split lock washers use compression to keep pressure against the fastener.

Which type of lock washer should you use? Split washers provide the highest locking power. But to do their job, you have to tighten the fastener enough that the split in the washer is compressed. That means they’re best suited for metal.
Toothed lock washers are best used with softer materials like wood, plastic, or even aluminum (the teeth dig into the material to hold it), and for those applications when you must use nylon fasteners or can’t apply a lot of force when tightening.
FASTENER MATERIALS
The most common metal fastener is steel plated with zinc, and these are the kind you’ll use for almost everything. But so you know, other fastener materials may include brass (typically used for decorative purposes), stainless steel, and nylon. Nylon fasteners are lighter than steel fasteners, but can’t be used where high strength is required.
SHOPPING FOR FASTENERS
You can save considerable money by purchasing your fasteners in quantity. If you think you’ll make heavy use if a certain size of fastener in your robots, invest in the bigger box and pocket the savings. Of course, buy in bulk only when it’s warranted. As you build your robots, you’ll discover which sizes you use the most. These should be the ones you purchase in bulk.
Robot builders gravitate toward favorite materials, and fasteners are no exception. I can’t tell you which sizes of fasteners to buy, because your design choices may be different from mine. But I can tell you what is used the most in my robot workshop. Perhaps that’ll give you a starting point if you’re just now stocking up.
For small tabletop robots I try to use 4-40 screws and nuts whenever possible, because they’re about half the weight of 6-32 screws and, of course, they’re smaller. I use 4-40 × 1/2″ screws and nuts to mount servos on brackets, and 4-40 × 3/4″ screws for mounting small motors. Larger motors (up to about a few pounds) may be fastened using 6-32 or 8-32 hardware.
I try to keep a few dozen of the following fasteners in stock at all times:
![]() 4-40 steel machine screws in lengths 1/2″, 3/4″, and 1″
4-40 steel machine screws in lengths 1/2″, 3/4″, and 1″
![]() 6-32 steel machine screws in lengths of 1/2″ and 3/4″
6-32 steel machine screws in lengths of 1/2″ and 3/4″
![]() 8-32 steel machine screws in lengths 1/2″ and 1″
8-32 steel machine screws in lengths 1/2″ and 1″
![]() #6 × 1/2″ and #6 × 3/4″ wood screws, for fastening together panels of rigid expanded PVC
#6 × 1/2″ and #6 × 3/4″ wood screws, for fastening together panels of rigid expanded PVC
And, of course, I keep around corresponding stock of nuts, plus some flat washers and lock washers in #4, #6, and #8 sizes. For all other sizes I buy them when needed.
TAPPING THREADS
You don’t absolutely need a nut to hold a machine screw in place. If the materials you’re assembling are thick enough, you might be able to use self-tapping machine screws or tap the hole with threads so that the screw will firmly anchor inside it.
Self-tapping machine screws look a lot like regular screws, except they’re pointed at the very end. The threads are much coarser, as well. They’re best used in soft plastics and metal (like aluminum). To use, you drill a hole just smaller than the diameter of the screw. You then tighten the screw into the hole, making threads as it goes.
Tapping threads involves using a tap, a special tool that looks like a drill bit. It works much like a self-tapping machine screw, except it makes standard threads, allowing you to then use regular machine screws.
For tapping to work when using metal, the material must be at least 1/16″ thick, or roughly the equivalent of two or three threads of the screw—the more threads the better. For example, when using 4-40 screws, there are 40 threads per inch, which is slightly more than two threads when using materials of 1/16″ thickness.
When using plastic, the minimum thickness should be no less than four or five threads, and 8 to 10 threads if using expanded PVC. Any fewer and it’s likely the screw will simply strip the threads out of the hole when the fastener is tightened.
FYI
See Chapter 11, “Working with Metal,” for step-by-step instructions on how to use a tap to make threaded holes. The technique works for most plastic, too.
Brackets
Brackets are used to hold two or more pieces together, usually—but not always—at right angles. You might use a bracket to mount a servo motor to a robot base, for example. Brackets come in a variety of shapes and materials. Here’s what you need to know.
ZINC-PLATED STEEL BRACKETS
Though intended to lash two pieces of wood together, steel zinc-plated hardware brackets are ideal for general robotics construction. These brackets are available in a variety of sizes and styles at any hardware store. You can use the brackets to build the frame of a robot constructed with various stock. See the “Cutting a Frame” section in Chapter 7 for ways brackets are used in robot construction.
The most common brackets are made of 14-to 18-gauge steel; the lower the gauge number, the thicker the metal. In order to resist corrosion and rust, the steel is zinc plated, giving the brackets their common “metallic” look. (Some brackets are plated with brass and are intended for decorative uses.)
Common sizes and types of steel brackets, shown in Figure 13-6, are:
![]() 1-1/2″ × 3/8″ flat corner (or L) brackets. Use these with wood, plastic, or metal pieces cut at 45° miters to make a frame.
1-1/2″ × 3/8″ flat corner (or L) brackets. Use these with wood, plastic, or metal pieces cut at 45° miters to make a frame.
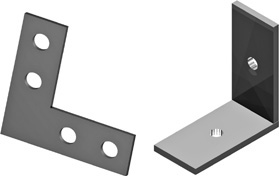
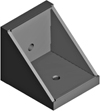
Figure 13-6 Angle brackets, both flat corner (L-shaped) and 90°. They come in a variety of sizes, thicknesses, and materials. See text for common sizes for robots.
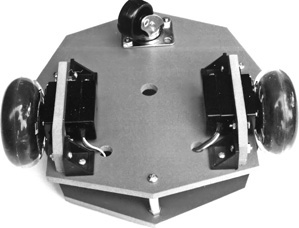
Figure 13-7 Plastic brackets may be used to secure parts to robot bases, like this pair of brackets used to secure radio control servo motors to the underside of a robot.
![]() 1″ × 3/8″ or 1″ × 1/2″ corner angle brackets. Typical uses are for attaching pieces at right angles to base plates and for securing various components (such as motors) to the robot.
1″ × 3/8″ or 1″ × 1/2″ corner angle brackets. Typical uses are for attaching pieces at right angles to base plates and for securing various components (such as motors) to the robot.
PLASTIC BRACKETS
Metal brackets can add a lot of extra weight to a robot. Plastic brackets add only a little weight and for small robots are just as good. The bracket is made of a durable plastic, such as high-density polyethylene (HDPE).
To add strength, the bracket uses molded-in gussets that reinforce the plastic at its critical stress points. The result is a bracket that is about as strong as a steel bracket but lighter. Figure 13-7 shows a pair of plastic brackets used to secure servo motors in their mounts. The brackets make it easy to assemble and disassemble the parts of the robot.
Alas, plastic gusset brackets are not easy to find. They are available from some furniture-building outlets, as well as select online resources. See the RBB Online Support site (refer to Appendix A) for leads. Sizes and styles are fairly limited, but those sizes tend to be quite adequate for most jobs.
Selecting and Using Adhesives
Glues have been around for thousands of years—stuff like tree sap, food gluten, and insect secretions. Maybe the first Post-it was made with a piece of papyrus soaked in camel spit. You never know!
Modern glues—more accurately called adhesives—are chemical concoctions designed to bond two surfaces together. While there are bazillions of adhesives out there, only the ones available to consumers are covered here. Intentionally left out are the glues that need expensive tools to apply, are very dangerous to use, or are only available in 55-gallon drums.
SETTING AND CURING
All glues bond by going through a number of phases. The main phases are setting (also called fixturing), then curing. During the first phase, setting, the adhesive transforms from a liquid or paste to a gel or solid. Though the adhesive may look to be “hard” when set, it is not yet very strong. This requires curing. Setting times for most adhesives are measured in minutes or even seconds. But curing takes a lot longer—typically 12 to 24 hours (see Figure 13-8), and often more.
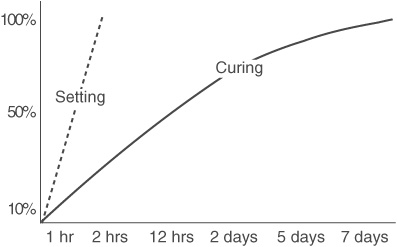
Figure 13-8 Adhesives have both a setting time and a curing time. So-called instant glues have a short setting time, but their curing time can be minutes, hours, even days.
For most adhesives, curing time is greatly dependent on several factors:
![]() Surface temperature. Warm surfaces tend to promote faster curing. This is most notable when gluing metal.
Surface temperature. Warm surfaces tend to promote faster curing. This is most notable when gluing metal.
![]() Adhesive volume. The more adhesive that is applied to a joint, the longer it takes to cure. That’s why you shouldn’t apply too much glue.
Adhesive volume. The more adhesive that is applied to a joint, the longer it takes to cure. That’s why you shouldn’t apply too much glue.
![]() Air temperature. The warmer the air, the faster the curing (and setting time, for that matter).
Air temperature. The warmer the air, the faster the curing (and setting time, for that matter).
![]() Air humidity. Adhesives differ in their affection for moisture in the air. Some, like Super Glue, cure faster when the air is moderately humid. Others, like epoxy, cure faster when it’s dry.
Air humidity. Adhesives differ in their affection for moisture in the air. Some, like Super Glue, cure faster when the air is moderately humid. Others, like epoxy, cure faster when it’s dry.
ALL ABOUT “HOUSEHOLD” GLUE
The term “household glue” is a large, diverse, and not very accurate way to describe glues that you’d use for normal household chores, like fixing broken plates or mending a busted chair. They’re also good for most robotics chores because they’re easy to get, inexpensive, and most won’t kill you the moment you uncap the bottle.
PVAc
PVAc-based adhesives are among the most popular general-purpose glues now available, and they are often sold as white and yellow “woodworking” glues. They are water-based, easy to clean up, and inexpensive. They’re best with porous material, like wood.
Silicone
Silicone-based adhesives are used for both gluing and sealing. They can bond most any non-porous surface to another, such as metal to hard plastic. A common trait of silicone adhesives is that they remain elastic. Use only in well-ventilated areas. After use, be sure the bottle or tube is recapped tightly so that no moisture can enter.
Contact Cement
Contact cement is based on various volatile organic compounds, which I personally can’t tolerate without getting a major headache. So I tend to stay away from it. Still, it’s great stuff for cementing just about anything to anything else.
As its name implies, this adhesive is designed to bond more or less instantly on contact. This is accomplished by applying a thin layer of the cement on one or both surfaces to be joined, then briefly waiting for the cement to partially set up. Applying pressure to the joint aids in creating a strong bond. Popular contact cements include Weldwood and Fastbond.
Solvent Cement
Solvent cement uses a chemical that dissolves the material it is bonding. It can be tricky to use because if the solvent isn’t precisely matched with the material, nothing happens!
The most common solvent-based adhesive is for bonding PVC irrigation pipe, which can also be used with expanded PVC sheets, detailed in Chapter 9, “Working with Plastic.” Other solvent-based cements are available for ABS plastic, polycarbonate, acrylic, and styrene.
APPLYING HOUSEHOLD ADHESIVES
With very few exceptions, household adhesives (those grouped above, at any rate) use single-part chemistries, so there is nothing to mix. Just open the tube, can, or jar, and apply the adhesive to the surfaces to be joined.
![]() Use all adhesives sparingly. A common mistake is to think that if a little bit of adhesive will do the job, a lot must be better. In fact, the reverse is true.
Use all adhesives sparingly. A common mistake is to think that if a little bit of adhesive will do the job, a lot must be better. In fact, the reverse is true.
![]() For adhesives with a watery consistency, apply with a small brush or cotton-tipped swab. For thicker consistencies, apply directly from the tube or with a wooden toothpick or a manicure (orange) stick.
For adhesives with a watery consistency, apply with a small brush or cotton-tipped swab. For thicker consistencies, apply directly from the tube or with a wooden toothpick or a manicure (orange) stick.
![]() Very few adhesives will stick to grease and dirt, so be sure to always clean the surfaces to be joined. Household-grade rubbing (isopropyl) alcohol does the trick.
Very few adhesives will stick to grease and dirt, so be sure to always clean the surfaces to be joined. Household-grade rubbing (isopropyl) alcohol does the trick.
![]() Avoid moving the glued joint until the adhesive has had a chance to set. As needed, clamp the or tape the bonded parts together.
Avoid moving the glued joint until the adhesive has had a chance to set. As needed, clamp the or tape the bonded parts together.
ALL ABOUT TWO-PART EPOXY ADHESIVES
When normal household adhesives aren’t enough, you need to turn to the “big guns”: two-part epoxy adhesives. They’re called two-part because at the time of application you combine a separate resin and a hardener (also called a catalyst). Separately, these materials remain in a liquid form. But when combined at the time of use, the hardener reacts with the resin and the mixture sets quickly. During this process, a bond is created as the epoxy liquid fills pores, cracks, and crazes in the surfaces of the material.
Why Is Epoxy So Special?
Epoxy sets up relatively quickly, generally in from 5 to 30 minutes. Epoxy tends to be a thick and gooey adhesive, so it has good gap-filling qualities. That’s great for assembling parts that don’t quite fit together. And epoxies can bond to many surfaces, including paper, wood, metal, fiberglass, most plastics, and fabric.
The typical package of epoxy adhesive consists of two tubes or bottles: one is the resin, and the other is the hardener. The tubes are separate in some products, and in others they are joined as one unit, with a single “plunger” in the center for accurately metering the resin and hardener. Figure 13-9 shows a typical plunger-style tube applicator. These are a lot easier to use than the two-tube products.
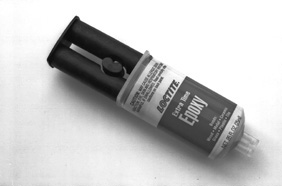
Figure 13-9 Two-part epoxy can be quickly and accurately applied when using a two-tube plunger.
So-called 5-or 30-minute epoxies represent the setting time, not the curing time. It takes 6 to 24 hours for most epoxies to cure to 60 percent to 80 percent, then the remainder over a period of several days. Once cured, the bond achieves its maximum strength.
Using Two-Part Epoxy
To use a two-part epoxy, it’s necessary to first mix the materials together, or else use an applicator that thoroughly premixes them. The latter is not common for consumer use, so we’ll concentrate on the manual mixing method. With most epoxies for consumer use, the liquids are mixed in a 1:1 ratio.
1. Apply short (1″ to 2″) but equal-length parallel beads of resin and hardener to a piece of index card paper. It’s always better to mix too little than too much, and you can always mix in more as you need it.
2. Use a wooden (not metal or plastic) toothpick to stir the liquids together. Mixing must be thorough. Try this: mix parallel beads of resin and hardener with a zigzag action (see Figure 13-10), then scoop the material toward a common center. Stir this center “dollop” for 15 to 20 additional seconds.
3. Apply the mixed epoxy to one or both surfaces to be joined.
4. Most epoxied joints should be taped or clamped to prevent movement of the joint during the setting time. If the joint moves while the epoxy is setting up, the bond will be greatly weakened.
Unused mixed epoxy must be discarded. It cannot be reused. Allow the unused liquid epoxy to harden on the paper card before throwing it into the trash.
YOU, YOUR ROBOT, AND SUPER GLUE
Super Glue is a trade name, but it’s often used as a generic term for a family of adhesives known as ethyl cyanoacrylates, or CAs. It’s well known as being able to bond to most anything within seconds. But with the good also comes some bad. If used incorrectly, CA glues may provide only a weak and temporary bond. Keep the following in mind when using cyanoacry-late adhesives:
No gaps, please. The most common cyanoacrylate is water-thin and unable to fill in any gaps between the materials to be joined (if you need that, get the thicker “gap-filling” kind).
Keep it clean. CA glues are very susceptible to ruined bonds from dirt and oil. Prior to gluing, clean surfaces with isopropyl alcohol.
Don’t use too much. Applying too much CA glue is far worse than not using enough. Try a few drops on the bonded surface only.
Keep bonded joints away from heat and sunlight. Otherwise, the bond will become weak, and it may even spontaneously come apart.
Don’t use with natural fibers. CA glues can produce a reaction when in contact with wood or cotton. Don’t wear cotton gloves when using CA glue.
Check the date. Cyanoacrylate glue has a relatively short shelf life. Toss product that’s more than a year old. Keep the unused portion in a cool, dry place.
Don’t get any glue on your skin, or you could wind up cementing your fingers together. If you have an accident, acetone is a good solvent for CA glues. And for heaven’s sake, keep this stuff away from your face! Seek medical help immediately if any CA glue gets in your eyes.
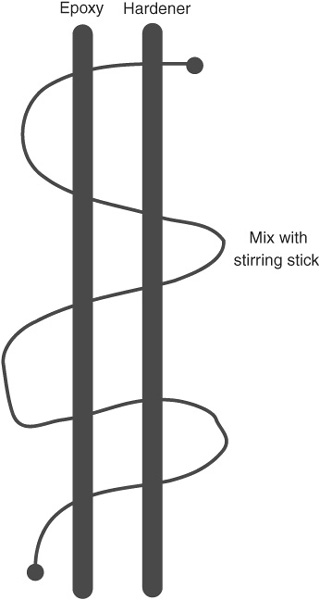
Figure 13-10 Always be sure to thoroughly mix the two parts of the epoxy before applying it to the surfaces to be bonded. After spreading equal amounts of both liquids onto an index card, use a toothpick to stir for 30 seconds.
USING HOT-MELT GLUE
Hot-melt glue comes in stick form (at least the kind we’re interested in) and is heated by a special gun-shaped applicator. Depending on the type of glue, melting temperatures range from 250° to 400°F. As it turns out, hot-melt glue isn’t glue at all, but plastic. Adhesion occurs when the molecules of the plastic contract and harden.
The main benefit of hot-melt glue is that it sets quickly—in about a minute—yet yields a strong bond. While using the gun is easy, the following method helps ensure the strongest bonds. The main drawback is that the bond may not be permanent, especially when using consumer-grade glue sticks. Avoid using hot melt in high-stress situations or when the bond may be subjected to sharp impacts.
1. While the glue gun is heating up, prepare the surfaces to be bonded. Surfaces must be clean and dry.
2. If the surfaces are smooth, rough up one or both with 100–150 grit sandpaper.
3. Clean the tip of the gun with a paper towel, as needed. Careful! The tip and any liquefied glue can be quite hot.
4. Test the glue application on a paper towel. The glue should come out without delay.
5. When you’re sure the gun is ready, apply a bead of hot melt to one surface to be joined. Do not overapply—less is more. If you need to apply glue to a large surface area, use a zigzag or spiral pattern to spread out the glue. Avoid applying the bead closer than about 1/4″ from the edge of the surface to be joined.
6. As quickly as possible (within five seconds, no more), bring the opposite surface into contact and apply pressure to spread the glue. If you can, immediately upon initial contact gently rotate the joint 5° to 10°, then realign as needed. This helps to spread the glue.
If any excess glue oozes out from the joint, wipe it up promptly with a paper towel. Don’t try to remove it with your bare fingers … the glue is still very hot!
CLAMPING AND TAPING GLUED JOINTS
It takes time (minutes or even hours) before glue has set to the point where it holds the pieces together on its own. For very quick bonds—on the order of a minute or two—it’s acceptable to manually hold the pieces until they are set. Longer setting times may require clamping or taping. This ensures:
![]() Adequate pressure to “seal” the bond. The pressure of the clamp promotes full integration of the adhesive into the material. This applies mostly to porous materials, but it also affects some nonporous (e.g., plastics, metals) materials as well.
Adequate pressure to “seal” the bond. The pressure of the clamp promotes full integration of the adhesive into the material. This applies mostly to porous materials, but it also affects some nonporous (e.g., plastics, metals) materials as well.
![]() No movement until the joint is set. If movement occurs, the adhesion may be greatly weakened.
No movement until the joint is set. If movement occurs, the adhesion may be greatly weakened.
Woodworking clamps, like those in Figure 13-11, are adequate for larger parts. But for smaller pieces, taping the joint is the most effective. After applying adhesive and mating the joint, tape is applied to keep the joint together. Masking tape works well in most situations, but if you need something stronger, white bandage tape can also be used. It’s available in widths of 1/2″ and wider.
USING JOINT REINFORCEMENTS
Critical to the strength of any bond is the way the pieces are aligned and positioned. The weakest are “butted” joints (no jokes please), where two materials are bonded end to end. The reason: There is little surface area for the joint. As a rule, the larger the surface area, the more material the adhesive can join to, and therefore the stronger the bond.
For a stronger joint, you will want to apply any of a variety of reinforcements that increase the surface area of the bond. Joint types and reinforcement techniques are explained below (see Figure 13-12).
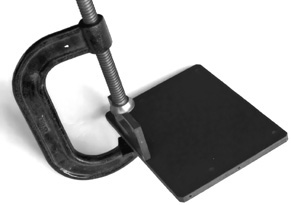
Figure 13-11 Clamping may be necessary to hold parts together while the adhesive sets and cures.
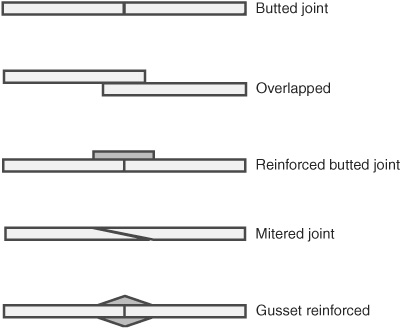
Figure 13-12 Use a joint reinforcement to add strength to bonded pieces. The weakest is the simple butted joint. Overlap or add reinforcing pieces to make the joint stronger.
Table 13-1 Selecting an Adhesive

Butted joint. The typical butted joint provides minimal surface area for a strong bond and is the weakest of all. Avoid it when you can.
Overlapped. Overlap the pieces themselves, instead of butting them end to end. This is not always feasible, but it is a quick-and-easy method when the option is available. You can readily adjust the amount of overlap as needed.
Reinforced butted joint. Overlap an extra piece of material along the seam of the joint. Use the widest overlap piece you can, in order to increase the surface area. Apply adhesive to this extra piece, and clamp or tape until set. You can also reinforce with small fasteners.
Mitered. Increase the surface area of the join by mitering the ends. This is most practical with materials that are 1/4″ or thicker. The technique is particularly helpful when joining wood.
Gusset reinforced. Use gusset pieces on the top and/or bottom.
IN SUMMARY: SELECTING A GOOD GLUE
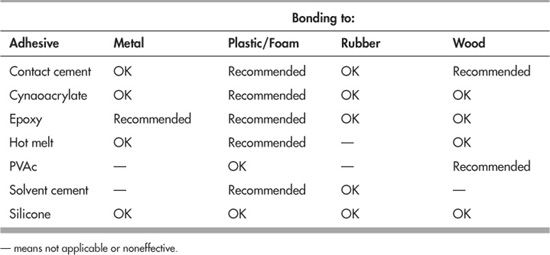
With so many types of adhesives to choose from, it can be hard to select the right one. Table 13-1 summarizes the most common adhesive families, along with their pros and cons, and the bonds they are best used for. Table 13-2 provides various bonding recommendations for each major adhesive family.
Table 13-2 Recommended Adhesives, by Bonding Material