
Report Wizard is an easy way to develop reports in Dynamics 365 CE. It provides an option to create a report by following multi-screen steps.
To create a report we can navigate, we can take the following steps:
- Navigate to Reports and click on the New button.
- Enter Make And Model Report under Report name and click on the Report Wizard button.
- Keep the New report option as the default and click on the Next button.
- Set up the entity information as follows and click on Next:

- Keep the report filtering option as it is and click on the Next button.
- Set up reporting by following the numbered steps shown in this screenshot:

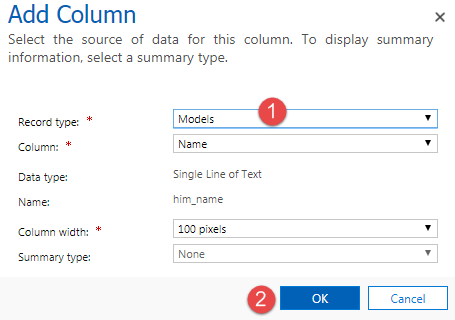
- Click on Click here to add the column and set this column as the Models entity, as shown in the following image:
Once we have added the required column, we can perform other tasks from the Common Tasks section, such as sorting based on the primary entity field. Click on the Next button:

- Set the Format Report option to Table. We can also select both the table and chart options as well.
- Click on the Next button and review the report summary. Finally, click on the Finish button.
- Click on the Run Report button from the report toolbar and you should get a report like the following:

Once the report is finished, we can select it and can click on the Edit button to change the report if required. This is how we can use the Report Wizard to develop reporting using the Dynamics 365 CE application. Although the Report Wizard is a good option for generating a report for business users, customers, and admins, the Report Wizard has the following limitations:
- We can only use a first-level related entity when designing our report.
- We don't have many options for customizing our report's layout; for example, we can't use headers or footers in reports generated using the Report Wizard.
- We can't use any custom controls such as shapes or images.
- We can't use expressions to perform calculations.
- We can't add additional rows or columns.
We can overcome all of these mentioned limitations by developing custom reports in Visual Studio. So, let's discuss how we can create a report in Visual Studio for our Dynamics 365 CE online organization.