
Sometimes, we need to develop complex reports, for example, reports that involve more than one related entity or where we need to use expressions (we can use expressions in reports to define the content of SSRS controls) to validate the value of a field. These types of reports are not possible to develop using the Report Wizard, so we use Visual Studio to develop them. In order to write custom reports in Visual Studio, we need to make sure SQL Data Tools is installed with the Report Authoring Extension for Dynamics 365 CE. The Report Authoring Extension is needed for writing FetchXML reports.
We can use the following steps to write a report using Visual Studio; here, we are using Visual Studio 2012 SQL Data Tools:
- Start SQL Server Data Tools for Visual Studio 2012 and follow the steps shown in the following screenshot to create the project:

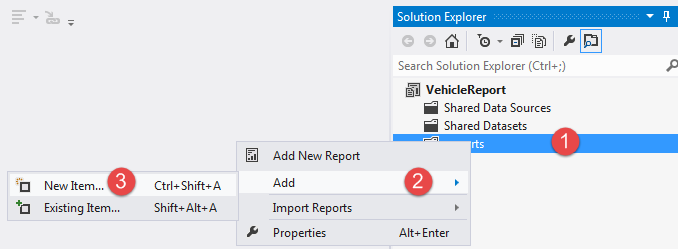
- Once the project is created, we can right-click on the Reports folder under Solution Explorer to Add a new report, as follows:
- Right-click on Data Sources from Report Data and select Add Data Source.
- If we want to connect to Dynamics 365 CE Online, we can use the following connection details:

Here, you can see that, under Connection string, we have provided the organization URL only. Currently, we only have one organization in our tenant but, if you have multiple organizations, then you need to mention the organization name after the URL, as follows:
https://himbapauto.crm8.dynamics.com;HIMBAPAutoDev;
In the preceding connection string, we are connecting to our HIMBAP Auto Dev organization only.
- Next, click on Credentials and enter your Dynamics 365 CE credentials, which you use to connect with your Dynamics 365 CE organization:

- If you are working in a Dynamics 365 CE on-premises environment, you can set up a connection with your Dynamics 365 CE on-premises by clicking on the Edit... button to set up a connection string:

- Once we have our data source created, we need to set up a dataset where we will connect to our entity. To create a dataset, we need to add a FetchXML query. As mentioned earlier, we can get FetchXML from ADVANCED FIND or we can create it using XrmToolBox.
- Open ADVANCED FIND, select an entity, add the required field, and then click on the Download Fetch XML button:
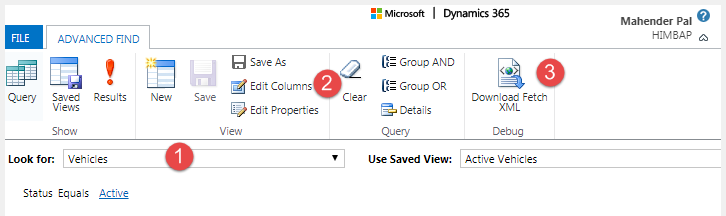
This will download the FetchXML query for this view. We can open the downloaded file and copy the query for use in the dataset.
- Go to our report project, right-click on Datasets and select Add Data Set. After that, we configure it by following the steps shown in the screenshot:

- After clicking on the OK button, it will connect to Dynamics 365 CE and will show all the fields of this entity, which we can use in the Report Designer area, as follows:

- Let's first add a table to display the entity information. Click on the Toolbox view form on the left-hand side and drag a table control over the Report Designer. Click on the first column in the data row and then let's select him_vehiclename to display under it:

- We can add more columns to the table by taking the following steps:

We can remove or hide columns using the Delete Columns and Column Visibility... options. We can also increase the column width by simply expanding the column width up to the required width.
- Let's add the following fields and change their labels as follows:
| Display name | Logical name |
| Vehicle | [him_vehiclename] |
| Vehicle Number | [him_vehiclenumber] |
| Make | [him_make] |
| Model | [him_model] |
| Category | [him_vehiclecategory] |
| Type | [him_vehicletype] |
We can select the field and use formatting toolbars to format columns based on our requirements.
- Click on the Preview button. You should be able to see all the vehicle data in your report.
- Build a report project so that you can upload it to Dynamics 365 CE.
Now our simple report is ready. Let's take a look at how to deploy our report to Dynamics 365 CE.