
The following monochrome conversion method comes from Russell Brown, Adobe’s very own Creative Director.[142] This method uses two stacked Hue/Saturation adjustment layers.
Figure 10-14 shows our source image, which is part of a colored cow that we photographed at the New York Cow Parade in the year 2000. These are the steps involved in Russell’s conversion:
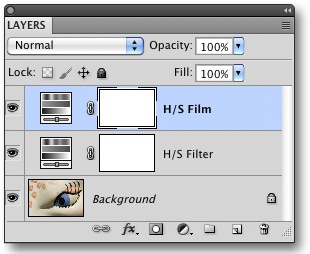
Create two new Hue/Saturation adjustment layers and name the lower one H/S Filter. Don’t make changes to any slider settings yet.
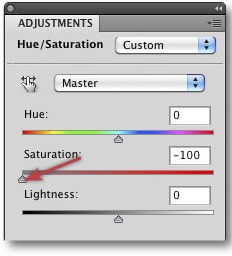
Name the second layer H/S Film and decolor it by shifting the saturation slider completely to the left (Figure 10-16). This creates the monochrome image in Figure 10-18.
Select Color Layer Blend mode for the H/S Filter layer (Figure 10-17).
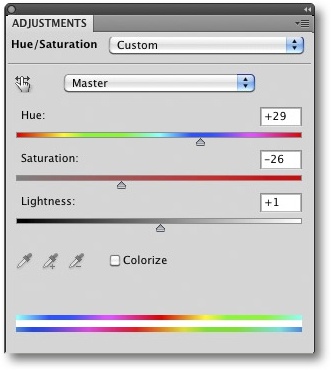
This is where the actual fine-tuning for the conversion begins. Set the H/S Filter layer to Master mode. This then implicitly applies all changes in Hue, Saturation, and Lightness to our monochrome conversion.
This is where Russell’s trick comes into play. You can adjust Hue, Saturation, and Lightness for the individual color channels on the filter layer (Figure 10-19 and Figure 10-20). It’s definitely worth experimenting here!
Once you have achieved your desired black-and-white look, you can flatten the layers to save disk space (Layer ▸ Flatten Image). You can also convert your still RGB image to grayscale using Image ▸ Mode ▸ Grayscale), although we never do this. Keeping your image in RGB mode allows you to tone your image subtly later.
Figure 10-21 shows our finished black-and-white image.


If you want to apply the same filter values to other images, you can save them using the Save Hue/Saturation Preset in the Hue/Saturation dialog. Give your preset a meaningful name, so that you can find it easily and apply it using Load Hue/Saturation Preset.
The basic steps can be recorded as a Photoshop Action. Again, the fact that you are working with layers means that you can undo and adjust all of your steps. The Action simply creates the appropriate layers, sets layer modes, and makes the first round of basic adjustments.