
When an image needs to be converted from one color space to another the image is transformed from its source color space (device color space or working color space) to that of the output device (or virtual destination color space). In most cases, the gamut of the source and the destination are different, so color mapping has to take place. This transformation is performed by the color management module (also called the color management engine).
The main challenge consists of deciding what to do with the colors in the source space that are not present in the destination space. Because there are several ways to handle this problem, the ICC has defined four different ways of mapping, called intents or rendering intents:
Perceptual (also called Photographic): If the gamut of the source space is wider than that of the destination space, all colors are compressed to fit into the destination space (Figure 3-12). If the gamut of the source space is smaller than the destination space, i.e., all colors in the source are present in the destination space, a one-to-one mapping takes place and all colors keep their original appearance.
When mapping from a wider to a smaller space, perceptual mapping usually shifts colors to lighter, less saturated colors while preserving the overall look of the original image (i.e., all colors keep their relative color distances). If the white points of the two color spaces are different, white point mapping takes place. Perceptual and Relative colorimetric mapping are the two intents used when converting photographs.
Relative colorimetric: When mapping from a broad color space to a smaller color space, a color in the source space that is not present in the destination space is mapped to the closest available color in the destination space (Figure 3-13).
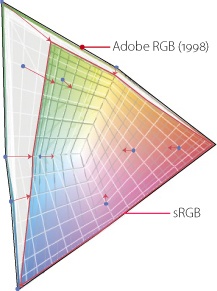
This type of mapping makes it possible to map two different colors from the source space to the same edge color in the destination space. This may result in color clipping or banding. The white point of the source space is mapped to the white point of the destination space (if they differ), and all colors are adapted relative to the destination white point. Here, the white point is the color temperature of white in the corresponding color space. Adobe RGB (1998) has its white point at 6,500 K, while eciRGB has its white point at 5,000 K.

Relative colorimetric intent is useful when editing digital photos and should be used when the source and destination spaces have a similar gamut with lots of overlap. It is also useful if most of the colors in your image have identical colors in the destination space. In this case, most colors remain unmodified when transformed. This intent is also used when image colors are transformed for display on a monitor.
Absolute Colorimetric: Similar to the relative colorimetric intent, this intent maps colors present in both spaces 1:1. Colors that are out of gamut (i.e., source colors not present in the destination space) are mapped to the border of the destination space. This type of mapping is particularly useful when using your output device to simulate the behavior of another device; for example, for soft proofing. In this case, the monitor simulates the white color of the paper.
Saturation: This intent attempts to map out-of-gamut colors to colors in the destination space that have the same level of saturation, even if a color has to be shifted significantly. This intent is useful when converting logos and colored diagrams from larger to smaller color spaces. It is of no practical use in a photographic context, as it discards hue and lightness information and doesn’t preserve color realism. Some third-party profiling software packages adapt this intent to perform color mapping that retains saturation without noticeable color shifts. This version of the intent can sometimes be used for photographic purposes.
Note
![]() Some profiling packages and the profiles included with them use the Saturation intent to create a modified version of the Perceptual intent, which results in less radical color shifts than the regular Perceptual intent.
Some profiling packages and the profiles included with them use the Saturation intent to create a modified version of the Perceptual intent, which results in less radical color shifts than the regular Perceptual intent.
If an image has the wrong (or no) embedded color profile, you will have to assign it a profile manually. You can do this in Photoshop using the Edit ▸ Assign Profile command. This determines which color space is used as a reference when interpreting the colors in the image.
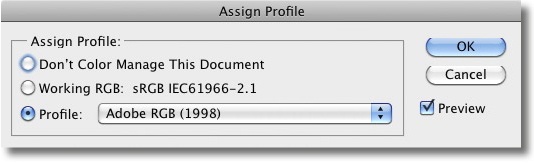
If you don’t know where the profile-less image comes from, you can use the various entries in the Profile drop-down list and the image preview to check which color space looks best before clicking OK to apply it. Here, only the color space information is embedded in the image file – which changes the way the colors in the image are interpreted but does not alter the image data itself.
It is another, quite serious matter if you convert an image from one color space to another (Edit ▸ Convert to Profile). In this case, the image data is resampled and the new profile is embedded in the image data. If the image doesn’t have a profile at all, the resampling takes place from the current working color space (selected in Photoshop preferences) into the new color space.
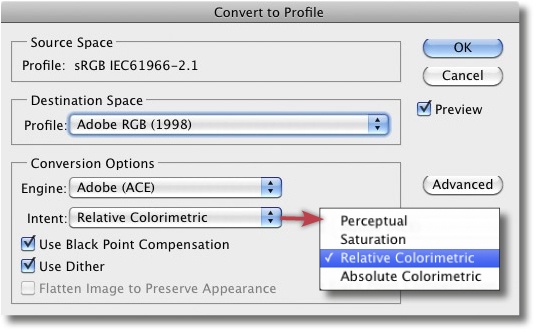
Figure 3-15. The Convert to Profile dialog. The Intent and various other options must be set when colors are converted for use in a new color space.
As well as the target color space, you must select the intent you want to use. This will usually be Relative Colorimetric if you are working with digital photos, as this causes the minimum amount of change in the image colors when the source and target color spaces are relatively similar. If the target color space is smaller than the source space (typical when converting images to CMYK), and if your image has highly saturated colors, Perceptual is usually the better choice of intent.
You can also select which engine you want to use for the conversion. We almost always use Adobe (ACE), as it works equally well in Windows or Mac environments.
We recommend that you check the Use Black Point Compensation option, as this automatically adjusts the black point to suit the target color space.
The Use Dither option is only available for 8-bit images and attempts to simulate colors that aren’t available in the target color space. Dithering can produce better-looking colors in smaller target color spaces, but it can produce unwanted image artifacts. You will have to experiment and decide from photo to photo whether this option delivers better results.
The Flatten Image to Preserve Appearance option flattens all layers to the background, thus avoiding unpredictable changes to individual layers that can occur during conversion.[48]
Work as much as possible in the RGB color space and avoid converting color spaces if you can, as they always reduce image quality. If you convert an image from a large color space to a smaller one and then back, the larger color gamut will not be recreated – in other words, color space conversion is irreversible.