 Correcting Images Using Brush Techniques
by Uwe Steinmueller, Juergen Gulbins
The Digital Photography Workflow Handbook
Correcting Images Using Brush Techniques
by Uwe Steinmueller, Juergen Gulbins
The Digital Photography Workflow Handbook
- The Digital Photography Workflow Handbook: From Import to Output
- Foreword
- 1. Introducing the Digital Photo Workflow
- 2. The Basic Workflow
- The Five Phases of the Workflow
- Phase 1: Shooting
- Phase 2: Image Transfer and Management
- Phase 3: Image File Conversion and Optimization
- Phase 4: Output
- Phase 5: Digital Asset Management
- The Influence of Individual Tools on the Workflow
- Increasing Efficiency
- Develop Your Own Approach to the Workflow
- 3. Color Management Know-How
- Understanding Different Color Models
- Understanding Color Management
- Mapping Color Spaces
- Creating Device Profiles
- Profiling Your Monitor
- Photoshop Color Management Settings
- Printer Profiles
- Installing and Uninstalling Profiles
- Soft-Proofing and Gamut Warning
- Color Temperature and Hue
- Complementary Colors
- Working Spaces II
- 4. Image Processing Basics
- Don’t be Afraid of Photoshop
- 8-bit or 16-bit Color Depth?
- Image Size and Resolution
- Choosing a File Format
- File Information and Logs
- Image Alignment
- Simple Corrections
- The Art of Sharpening
- Color Corrections
- Selection Tools
- Retouching and Repairing Images
- Speed Up Your Workflow with Photoshop Actions
- Photoshop’s History Panel
- Additional Information and Overviews
- 5. RAW Editing and Conversion
- Some Initial Thoughts
- Important Aspects of RAW Processing
- Non-destructive Editing
- Which Processing Steps are Performed Where?
- What to Look for When Choosing a RAW Converter
- Other Features of RAW Converters
- Graphical User Interface (GUI)
- Color Management
- RAW Browser
- Preview Image Size
- Saving and Applying Image Settings
- Selective Image Corrections
- Batch Processing
- Printing from a RAW Converter
- Integration in the Workflow
- Image Browser Integration
- Multi-Core Processing
- Arguments For and Against Auto Correction
- Other Useful Features
- Adobe Camera Raw (ACR)
- ACR Preferences
- Workflow Options
- Sample of a Real World ACR Adjustments Workflow
- Synchronizing Image Adjustments
- Optimizing Dynamic Range
- Image Optimization Using Tone Curves
- Selective Tonal Corrections
- Saving and Discarding Changes
- An Overview of the ACR Interface
- ACR Image Adjustments Panel
- Effects Tab
- ACR Presets
- Batch Conversion
- Other RAW Converters
- Even More RAW Converters
- 6. All-in-One Workflow Tools
- 7. Photoshop Layers
- Layers Panel
- Your First Layer
- Using Adjustment Layers
- Making Selective Adjustments Using Layer Masks
- Flattening and Merging Layers
- Smart Cropping
- Removing Moiré Effects
- Auto Color Correction for Better Contrast
- Blending Layers Using Layer Styles
- Dodge and Burn Using Layers
- Loading Image Files into a Stack and Aligning Layers
- Smart Objects and Smart Filters
- Organizing Layers
- Other Aspects of Working with Layers
- Getting a “Layer Feeling” without Using Layers
- Selective Adjustment Using U Point Control Points
- More Tips for Working with Layers
- 8. Advanced Photoshop Techniques
- Correcting Saturation Selectively
- Some Tricks for Improving Saturation and Contrast
- Correcting Perspective Distortion
- Correcting Lens Errors
- Correcting Color Casts in Shadows
- Using Masks to Increase Luminance
- Correcting Images Using Brush Techniques
- Advanced Sharpening Using Photoshop Layers
- Adding Digital Sunshine to Your Photos
- Brush Off Noise
- Enhancing Midtone Contrast
- Enhancing Local Contrast
- Content-Aware Fill
- Fine-Tuning After Upsizing or Downsizing Images
- 9. Multishot Techniques
- Common Steps in a Multishot Workflow
- Increase Your Angle of View Using Stitching Techniques
- Maximizing Depth of Field Using Focus Stacking
- Increasing Dynamic Range Using HDRI Techniques
- 10. Turning Color into Black-and-White
- From Color to Black-and-White
- Black-and-White Conversion Using the Channel Mixer
- Enhanced Black-and-White Conversion
- Black-and-White à la Russell Brown
- Black-and-White Conversion Using the Black & White Command
- Black-and-White Conversion Using Photoshop Plug-ins
- Black-and-White Conversion Using a RAW Editor
- Colorizing Images
- 11. Printing and Image Presentation
- Publishing Images and Image Data
- Printing Images on Paper
- Printing on Photo Paper
- Printing Using Inkjet Printers
- The Print Workflow
- Printing Your Image
- Specialty Printing Software and RIPs
- Creating Contact Sheets
- Printed Frames
- Publishing Images on the Web
- Creating Digital Slideshows
- Other Ways to Present Your Images
- 12. Useful Photoshop Plug-ins
- 13. Data Management and Backup
- Managing Your Image Library
- Data Security
- A. Resources
- Index
- About the Authors
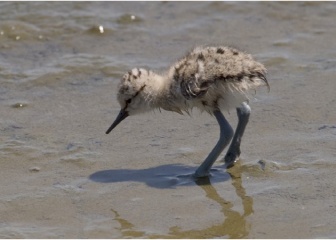
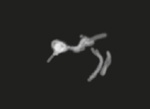
In this example, the avocet chick’s eye and part of its head are in shadow and need to be brightened (Figure 8-66).
First, we create a new Curves adjustment layer and brighten the whole image using the curve shown in Figure 8-67. The result in Figure 8-68 is obviously too bright, but we can fix that as follows:
We select the white layer mask from our new layer and invert it to black using
 (Figure 8-69).


The black mask prevents the adjustment layer from being brightened, so we work selectively on the mask using a soft brush and the following settings:
Painting color white
Opacity set to 15%
Hardness set to between 0% and 10%.
We make a few soft brush strokes over the dark part of the chick’s face and the darker parts of its body and legs using 15% opacity. You will need to experiment with different opacity values to get a feel for the way this effect works.
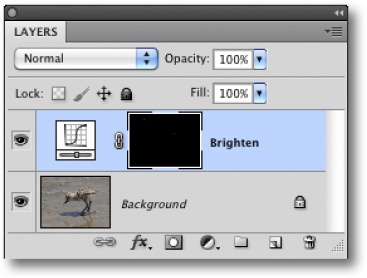
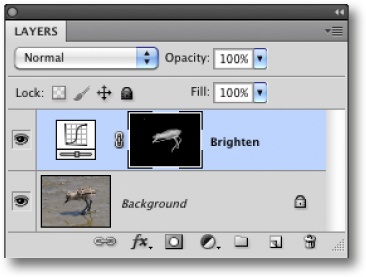
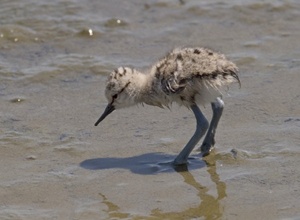
Figure 8-70. The chick’s head and parts of its body are now brighter. The corresponding Layers panel is shown above.
A look at the layer mask itself (![]() -click the layer mask thumbnail) reveals the secret of this technique (Figure 8-71) – the brightening effect is only applied where the mask is white.
-click the layer mask thumbnail) reveals the secret of this technique (Figure 8-71) – the brightening effect is only applied where the mask is white.
This is a great multipurpose technique for applying selective adjustments to various types of layers, for example:
A layer containing a sharpened version of an image
A layer containing a reduced-noise version of the image
Hue/Saturation adjustment layers
Curves adjustment layers
We already demonstrated a variant of this method in Blending Layers Using Layer Styles, where we used Overlay blend mode while applying selective adjustments.
-
No Comment