
Many images appear more punchy if improvements are made to local contrast (also known as microcontrast). Most contemporary RAW editors have microcontrast tools built in. ACR and Lightroom use the Clarity setting in the Basic adjustments panel to adjust microcontrast, and the effect this produces is very different from that produced by conventional contrast tools.
You can achieve similar effects in Photoshop by using the Unsharp Mask filter with a low Amount setting (between 20 and 40) and a large Radius value (between 30 and 60).
Note
![]() This technique can cause unwanted alterations to saturation. You can avoid these by applying USM sharpening to a separate layer and setting its blend mode to Luminosity.
This technique can cause unwanted alterations to saturation. You can avoid these by applying USM sharpening to a separate layer and setting its blend mode to Luminosity.
Figure 8-126 shows an example of this technique. You will need to adjust the Amount and Radius settings according to the size and resolution of the image you are working on. As usual, if you apply this type of correction on an adjustment layer, you can regulate its strength by adjusting layer opacity.
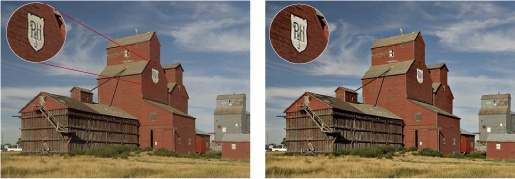
Figure 8-126. The original image is on the left. The version on the right was corrected using USM: Amount =30, Radius = 34, and Threshold = 0.
Applying the technique described above repeatedly, using decreasing Amount values and increasing Radius values, can produce astonishingly good sharpening effects. We learned this trick in Lee Varis’ book Skin [26]. You can even use this technique (known as Octave Sharpening) to save images that initially appear to be irreparably out-of-focus.
The technique involves duplicating the image you want to sharpen four times on consecutive layers. You then set these layers’ Opacity to decreasing values between 100% and 13% and sharpen them using the Unsharp Mask with the values shown in Figure 8-127. To avoid unwanted color shifts, set the blend mode to Luminosity for all layers.
Grouping the four sharpening layers in a layer group allows you to control the strength of the overall effect by adjusting the Opacity consistently for the whole group. You can also use a layer mask on the group to exclude areas you don’t want to sharpen.
![Octave Sharpening, as practiced by Lee Varis [26]](http://imgdetail.ebookreading.net/design/8/9781933952710/9781933952710__the-digital-photography__9781933952710__httpatomoreillycomsourcerockynookimages751766.png.jpg)
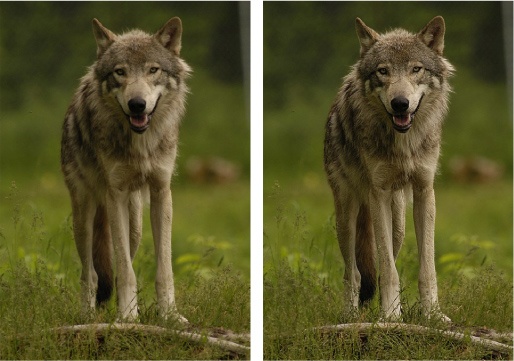
Figure 8-128. The unsharp original is on the left, and the corrected version using Octave Sharpening is on the right.
In the example in Figure 8-128, we want to exclude the background from being sharpened. Without the help of the group mask, the noise in the blurred background would become too pronounced.
We create our mask by making a Color Range selection on the active background layer (Select ▸ Color Range) using the Quick Selection tool ![]() (available from CS3 onwards). With this selection active, we select the Octave Sharpening layer group and click the mask button
(available from CS3 onwards). With this selection active, we select the Octave Sharpening layer group and click the mask button ![]() at the bottom of the Layers panel. We can now fine-tune the resulting mask (if necessary) using a brush.
at the bottom of the Layers panel. We can now fine-tune the resulting mask (if necessary) using a brush.
This sharpening technique can lead to halo effects at pronounced edges – here, for example, at the top of the wolf’s ear (Figure 8-128). Because of this, we use a small, soft brush to adjust the mask so that it slightly impinges on the outline of the wolf (Figure 8-129). In order to make this very fine adjustment, we select the group layer mask, activate Quick Mask mode (by ![]() -clicking the mask), and zoom right in.
-clicking the mask), and zoom right in.
Specialized plug-ins are the best tools for enhancing microcontrast. We use either Akvis Enhancer [55] or our favorite – Uwe’s own DOP_Easy_DPlus_DetailResolver script, which we use nowadays on most of our images.
Note
![]() The DOP_EasyD_Plus_DetailResolver script was developed by Uwe Steinmüller (co-author of this book) and is available at his website [67].
The DOP_EasyD_Plus_DetailResolver script was developed by Uwe Steinmüller (co-author of this book) and is available at his website [67].
This script not only enhances microcontrast, but also includes an option for improving shadow detail. The script has a settings dialog but no preview window, so you have to make a few attempts with different settings before you get a feel for the effects it produces in different situations. You can save settings as presets; the script remembers the last settings you made and suggests using them as a starting point the next time you run it. The script also automatically creates a combination layer and names it after the currently active adjustment settings.
As when sharpening creatively, you should protect the areas you want to leave untouched with a layer mask when using Uwe’s script.
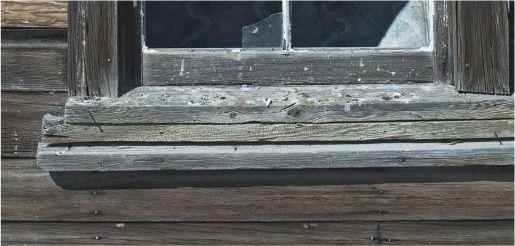
Images that contain fine textures such as grass, leaves, or wood grain benefit most from the use of the script. The same is true for textiles and portraits in which hair plays a dominant role, although, you will need to mask the face in order to avoid emphasizing your subject’s pores. The script positively accents eyes and eyelashes.
Once installed, the script can be found under File ▸ Scripts ▸ DOP EasyD Plus DetailResolver.
After you have performed your other corrections, you can apply the script simply by selecting the uppermost layer, selecting your parameters, and clicking OK. Then all you have to do is wait while the script works its magic.
The following is a short description of the script’s sliders and their effects (Figure 8-130):
- Detail+
determines the strength of the applied microcontrast enhancement. The default value (5) is suitable for most situations. Setting this value too high can cause shadow noise (recommended values: 5–12).
- Light Halo
suppresses the halo effects that are sometimes caused by higher Detail+ and Definition values. It does this by emphasizing the bright side of an edge less than the darker side. This is useful in images that contain fine, dark structures, such as tree branches photographed against the sky. (Halos are color and highlighted smears that can appear at high-contrast edges after some image corrections (especially sharpening) have been applied.)
- Definition
is similar to the Detail+ parameter. Higher values increase the effect but can make the relief textures appear less three-dimensional.
- Shadow Brighter
does exactly what it says. A zero value has virtually no effect, while higher values increase shadow detail (but run the risk of increasing shadow noise).
- Noise Mask
creates a mask designed to suppress additional noise. We recommend that you always activate this option.
- Clipping-
helps to avoid highlight and shadow clipping during sharpening. We recommend keeping this option activated. This option is especially useful if you plan to print your results.
- Shadow wide
extends the range of shadow tones that are brightened in a similar way to Photoshop’s Shadows/Highlights command. Do not use with noisy images.

The script is most effective when used subtly, with relatively low Detail+, Definition values, and Shadow wide option. Inspect your image carefully (using a high zoom factor) for edge halos and shadow noise artifacts after running the script. You can reduce unwanted effects by reducing the opacity of your adjustment layer, or simply discard the new layer and run the script again using different parameters.

We applied DOP_EasyD_Plus_DetailResolver with its default settings to the left-hand image in Figure 8-132 and produced the right-hand image as a result. Figure 8-133 and Figure 8-134 show the script’s effect in detail. The new layer generated by the script is automatically named using abbreviations of the names of the applied parameters (Figure 8-131).
This script is not only a standard element of our daily workflow, but also very suitable for use with monochrome RGB images. For this type of work, be sure to mask any soft grayscale transitions before applying it.
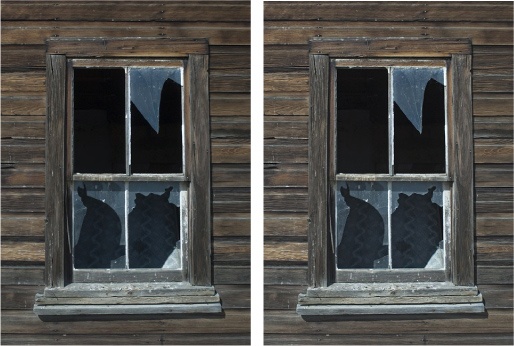
Figure 8-132. The original image is on the left. The image on the right is the result of applying DOP_EasyD_ Plus_ DetailResolver using its default settings.
Note
![]() You will only need to apply about half the usual dose of creative or output sharpening to your images once you have applied the script!
You will only need to apply about half the usual dose of creative or output sharpening to your images once you have applied the script!
Sharpening in its various forms is an art, from compensatory or creative sharpening using a RAW editor, to output sharpening for export or printing, or the microcontrast enhancements described above. Sharpening requires experience, intuition, and the use of specialized tools. The optimum settings will take into account the image subject and composition, the output format and materials (matte or glossy paper), output type (monitor or print), the intended use, and, of course, your own personal taste.
There is no substitute for experience, so don’t be afraid to experiment. When it comes to printing, you should test print some or all of your image on your chosen paper at the planned size. Inspect your printed output carefully once it has dried thoroughly.
Apart from compensatory RAW sharpening (or automatic in-camera JPEG sharpening), sharpening should be your last image optimization step, as most other optimization tools change the detail or contrast parameters that are affected most by sharpening processes.

As we have already mentioned, the best sharpening results are always achieved if applied selectively using brushes, masks, or selections – anything else would be too easy!
Avoid unnecessary or repeated sharpening. Every sharpening step increases contrast, but at the price of lost detail and tonal nuance. Sharpening can emphasize existing artifacts and even produce new ones.