
Adobe’s prompt answer to Aperture was the release of the first Beta version of Lightroom for Windows and OS X in early 2006. At the time of writing, we are working with Lightroom 3.
Just like Aperture, Lightroom combines a downloader, a browser, a RAW converter, an image editor, and an image management database in a single program. The core of the RAW converter and editor is the same module that can be found in Adobe Camera Raw, but with a new interface. Lightroom also includes print, Web gallery and slideshow output.
In order to function as efficiently as possible, Lightroom requires a high-performance CPU, as much memory as possible, and fast-access hard disks. We recommend that you use the largest monitor you can afford. Lightroom supports dual monitor setups and can display image preview, zoom, or thumbnail views on a second screen.
Lightroom attempts to keep its interface simple and directly oriented towards a professional photo workflow – its five main modules are called Library, Develop, Slideshow, Print and Web (Figure 6-19). Library is the browser and image management module, Develop is used for image processing and optimization, and Slideshow, Print and Web are designed for producing specific types of output. You can, however, also export files, thus creating another form of output. You can switch between modules either by clicking the tabs directly or by using keyboard shortcuts. Each mode has its own panels and tabs, and many of the features are similar to the ones available in Aperture.
Like Aperture (and unlike Bridge), Lightroom has its own database called the Catalog. This contains metadata and other image management information. Lightroom stores thumbnails and preview images in a separate file (containing all preview images) in the same location as the catalog and also creates a separate folder containing uncompressed backup copies of the catalog.[98] The image files themselves are located in the computer’s file system according to settings made by the user during import. The structure of the user’s folders is mirrored in the Lightroom browser (Figure 6-20). Images have to be imported into Lightroom before they can be processed.
Lightroom supports a wider range of RAW formats than Aperture and also supports non-destructive processing of DNG, PSD, TIFF, and JPEG formats.
Processing, searching, and image management are only possible within a single catalog, but it is relatively simple to create and switch between multiple catalogs. When you switch catalogs Lightroom is first terminated and then restarted with the new catalog open. You can create new subfolders within a catalog that are equivalent to conventional, physical folders. This means that an image file can only be stored in one folder.
Lightroom’s logical folders are called collections, and are very similar to Aperture’s albums. Collections only contain references to image file locations, making it possible for one image to reside in multiple collections. Deleting an image from a collection has no effect on the original image or its location. Collections can be static or smart. Smart Collections contain images that fulfill specific search criteria – for example, all images that include the keyword portrait in their metadata. Collections can contain additional static and smart subcollections.

Figure 6-20. Lightroom’s Library module, showing the filmstrip, Navigator panel, Histogram pane, and Keyword List panel
Folder or collection views can be further refined using additional filters and search criteria.
Lightroom is designed to fit in with a photographer’s workflow and supports the following major workflow phases:
Image import, renaming, rating, keywording, and management
Image optimization
Image presentation (slideshow, Web gallery, or print)
Lightroom doesn’t have the same direct export and printing facility that Aperture or Adobe Photoshop Elements do, and it has no built-in photo book functionality. You can, however, export and resample your images in the conventional way, allowing you to send your images to others or to process them using other applications.
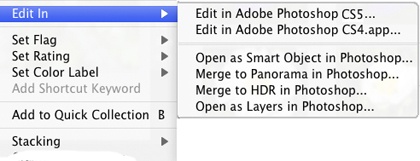
You can set up other applications as external image editors in the program’s Preferences dialog. These then appear in the Photo ▸ Edit In command. Image handover to Photoshop is very effective and includes options for passing images directly to panorama, HDRI, layers, or Smart Object dialogs (Figure 6-21).
There are five basic options for importing images into Lightroom:
Direct import from a camera or card reader
Import from an existing folder (with or without copying the images to a new location)
Import from a Hot Folder
Import via Tethered Capture
Import of images and metadata from another Lightroom catalog.[99] Here, you can also determine whether referenced image files should also be imported, and if so, to which location.
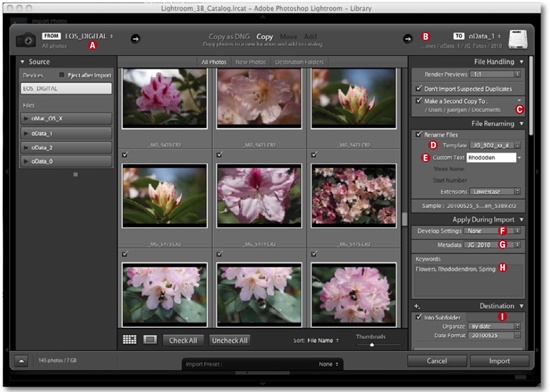
Lightroom 3 can now import and play HD videos. The source file type A is selected on the left in the import dialog (Figure 6-22), copy parameters are selected in the center, and other details (including the new location) are selected on the right at B.
Note
![]() Using the automatic renaming, IPTC data, and backup functions during image import will increase your workflow efficiency.
Using the automatic renaming, IPTC data, and backup functions during image import will increase your workflow efficiency.
When we are importing new images from a memory card, we have Lightroom save them to our predefined location and automatically rename them using the parameters defined at D according to the criteria we listed in From the Camera to the Computer. The variable part of each filename is entered in field E. We also make automatic backup copies at the remote location defined at C. These copies have the same filenames as the renamed files.
You can select a Development Preset for automatic application during import at F – usually, we don’t use this feature, though it can be handy. We often use the metadata preset feature G (presets can be created in the Lightroom editor), and we usually also add IPTC copyright data. We add some universal keywords for the entire shoot at H. Here, we have used the Destination panel to have the imported images automatically stored in a subfolder named after the date entered at I.
Lightroom automatically generates thumbnails and multiple preview images in various sizes (according to the size of the original image) during import.[100] During long import processes, Lightroom uses the title bar to indicate that a background process in progress.
The import dialog is generally very easy to use and runs glitch-free in the background.
Lightroom’s Library module has four viewing modes:
 Loupe View automatically scales the active image to the window size or displays a 100% view. You can toggle between these two views by clicking the Navigator preview window.
 Compare View displays two (or more) images next to each other for comparison purposes.
 Survey View displays multiple images selected in the filmstrip.
You can show and hide all panels and the filmstrip by clicking on the triangle button ![]() at the edge of the panel frame. Hidden panels are automatically switched to auto show mode. Moving your mouse over the window’s frame temporarily shows the appropriate panel or filmstrip.
at the edge of the panel frame. Hidden panels are automatically switched to auto show mode. Moving your mouse over the window’s frame temporarily shows the appropriate panel or filmstrip.
After importing a new set of images, you typically start by viewing and rating your images and setting a reject flag for any images you want to trash. You can view all rejected images for a final check before deleting them using Photo ▸ Delete Rejected Photos. Here, you can decide whether to delete your rejected images from just the catalog or physically from your hard disk. Lightroom also allows you to color code your images – we use this function to indicate various image processing stages.
There are various keyboard shortcuts available in viewing mode. Double-clicking an image in Loupe mode zooms into the active image and an additional click on the preview image shows a 100% view (you can also select other zoom factors). If the zoom factor makes the preview image larger than the preview window, you can shift the displayed detail using either the Hand tool or by moving the detail frame in the preview window with your mouse. Lightroom’s loupe cannot be directly moved over the active image like Aperture’s can.
Note
![]() Quite a number of operations that you intend to apply to several images (e.g., assigning metadata to images) can only be done using the Grid View in Library mode.
Quite a number of operations that you intend to apply to several images (e.g., assigning metadata to images) can only be done using the Grid View in Library mode.
IPTC data can be entered in a number of ways for single or multiple image selections. You can build keyword hierarchies and add keywords to selected images by using the Painter tool ![]() or by typing or clicking in the Keyword List panel. Here too, you can display your images according to multiple selected criteria.
or by typing or clicking in the Keyword List panel. Here too, you can display your images according to multiple selected criteria.
Lightroom offers four basic ways to make corrections to your images:
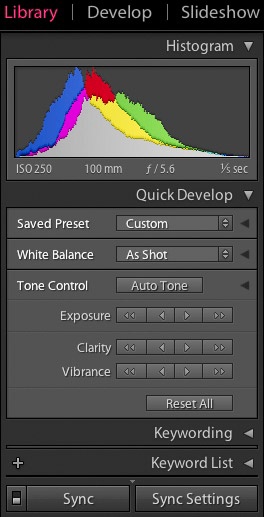
The Quick Develop panel in the Library module (Figure 6-23). These tools have simple up/down buttons instead of sliders and can be applied simultaneously to multiple selections. Corrections can also be applied to other images using Copy & Paste or the Sync button in the Quick Develop panel.
The White Balance pull-down menu includes various color temperature presets, and the Saved Preset menu includes a number of pre-defined overall image corrections.
You can enter metadata in Library view using the Keywording, Keyword List, and Metadata panels.
Lightroom automatically displays EXIF shooting data beneath the histogram in Library view.
The highly specialized and detailed correction tools included in the Develop module. We will go into more detail on these later.
An automatically generated copy of an image in an external program (such as Photoshop)
Develop Presets during image import or presets from the Presets panel in Develop mode. Presets are collections of adjustments that are either saved by the user or supplied with the program.
Lightroom offers a number of ways to make corrections to your images. Most of them are the same as those available in Adobe Camera Raw, but they are presented using a different user interface. ACR’s horizontally arranged tabs are grouped vertically in panels in Lightroom, while the tools from the ACR toolbar can be found beneath the Lightroom histogram (Figure 6-24). Lightroom’s panels can be expanded or collapsed by clicking the panel title. The real time histogram can display the individual color channels or combinations of R+G+B (white), R+G (yellow), G+B (cyan), and R+B (magenta). EXIF ISO value, aperture, focal length, and exposure details are displayed beneath the histogram if they are available.
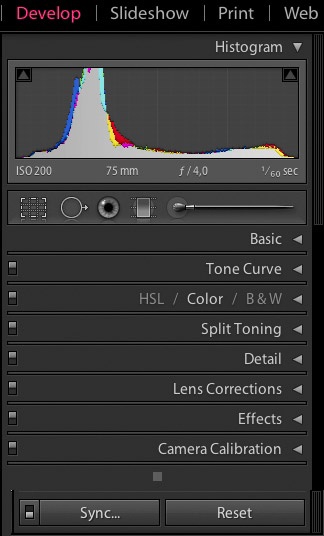
The two triangular icons at top left and right of the histogram window preview highlight and shadow clipping and are the same as those found in ACR. You can perform some basic image corrections directly in the histogram window by shifting the curve’s ends with your mouse. This way, you can quickly adjust the black and white points or expand or compress the shadow and highlight zones within your image.
We have already introduced the various correction tools in the Adobe Camera Raw section, so we will stick to short descriptions here. Clicking a ![]() icon expands or collapses the individual correction panels. You can set the panels to automatically collapse other panels when you expand a new one.
icon expands or collapses the individual correction panels. You can set the panels to automatically collapse other panels when you expand a new one.
The ![]() button allows you to temporarily deactivate a correction, and pressing the
button allows you to temporarily deactivate a correction, and pressing the ![]() key sets a correction to its default values.
key sets a correction to its default values.
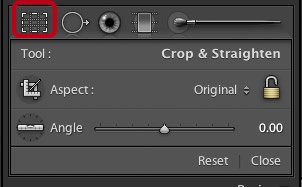
The ![]() button in the tool strip starts the (non-destructive) Crop & Straighten tool. The cropping aspect can be set to original or custom sizes. To straighten an image, click the Angle icon
button in the tool strip starts the (non-destructive) Crop & Straighten tool. The cropping aspect can be set to original or custom sizes. To straighten an image, click the Angle icon ![]() and use the level to draw a vertical or horizontal reference line through your image. Lightroom then crops the image to fit your reference line. This is an elegant solution for a task that we perform regularly.
and use the level to draw a vertical or horizontal reference line through your image. Lightroom then crops the image to fit your reference line. This is an elegant solution for a task that we perform regularly.
Basic •. This panel includes all the basic correction tools in a single, compact panel (Figure 6-26). Here, you can find White Balance sliders and presets (in pull-down menu A), the Exposure slider (for setting the white point), the Blacks slider (for setting the black point), and the Recovery and Fill Light sliders for eliminating burned-out highlights and muddy shadows in RAW images.

The Clarity slider is used to adjust local contrast and Vibrance helps adjust saturation while protecting highly saturated colors (such as skin tones). We never use the Saturation slider because Vibrance is simply more effective.
Pressing the ![]() key while moving the Exposure, Recovery, or Blacks sliders displays potential clipping using colored masks (as previously described for ACR). This highly practical function is also available in a number of Photoshop correction tools.
key while moving the Exposure, Recovery, or Blacks sliders displays potential clipping using colored masks (as previously described for ACR). This highly practical function is also available in a number of Photoshop correction tools.

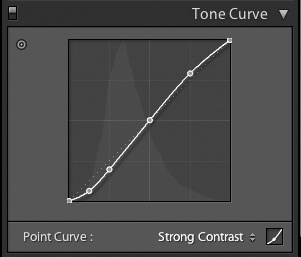
Tone Curve •. Lightroom’s Tone Curve panel includes two types of curve (Figure 6-27) that function additively. The parametric curve is adjusted using the four sliders beneath the curve display. The three triangular icons at B indicate the borders between shadow, midtone, and highlight image areas and can be shifted manually.
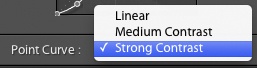
The pull-down menu for the point curve C contains three fixed options. However, clicking the ![]() icon displays a freely editable curve like those in ACR and Photoshop (Figure 6-28). Clicking the
icon displays a freely editable curve like those in ACR and Photoshop (Figure 6-28). Clicking the ![]() icon again returns you to the parametric curve view.
icon again returns you to the parametric curve view.
The Targeted Adjustment button A ![]() allows you to select an image area for correction with your mouse. This automatically generates a point on the curve that you can move up or down to brighten or darken the selected color. This is a more intuitive way to make color corrections than using sliders.
allows you to select an image area for correction with your mouse. This automatically generates a point on the curve that you can move up or down to brighten or darken the selected color. This is a more intuitive way to make color corrections than using sliders.
HSL/Color/B & W •. This panel includes selective color adjustment tools. There are eight sliders available (Figure 6-29). You must select one of the main Hue, Saturation, or Luminance sub-tabs before you can make further adjustments. (See the description of the HSB color model in Grayscale Mode.) Selecting All activates 24 sliders for adjusting eight tones each for the three base parameters (Hue, Saturation, and Luminance in one panel). The Targeted Adjustment button A is also available here, and we use it to make most of our adjustments. (See the description of adjustments made using Adobe Camera Raw in Figure 5-45.)
The B & W option displays an RGB grayscale image and a channel mixer that is very similar to the Photoshop Black & White adjustment (see the ACR description for black-and-white conversion in Black-and-White Conversion Using Photoshop Plug-ins). You can also create a cross-processing effect in your grayscale image using the Split Toning tool.
Instead of converting a master image to grayscale, we create a virtual copy of our original using ![]() or the Photo ▸ Create Virtual Copy command and convert that instead. Clicking the Color button converts the grayscale image back to color. You can decide whether to make this conversion using individual image analysis or the default values in the Lightroom Preferences dialog. The resulting image can then be fine-tuned using the available sliders or targeted adjustment.
or the Photo ▸ Create Virtual Copy command and convert that instead. Clicking the Color button converts the grayscale image back to color. You can decide whether to make this conversion using individual image analysis or the default values in the Lightroom Preferences dialog. The resulting image can then be fine-tuned using the available sliders or targeted adjustment.
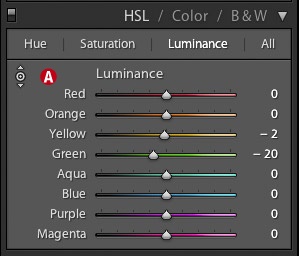
Figure 6-29. You can use the HSL/Color/B & W panel to make fine tonal adjustments to the entire image.
This HSL panel is a powerful collection of tools, and we make frequent use of it when fine-tuning our images in Lightroom. As when you are making other corrections, keep an eye on potential clipping by using the histogram.


Figure 6-31. The corrected skin tone, produced by reducing red saturation and shifting the hue setting.
Split Toning •. Split Toning allows you to correct hue and saturation separately for highlights and shadows. Its main use is for toning black-and-white RGB images (Figure 6-32).
If you attempt to apply Split Toning to an imported true grayscale image, Lightroom will automatically convert the image to RGB mode before applying adjustments.

Split Toning can also be used to reduce blue casts in shadow areas and to add a cooler tone to highlights. The Balance control adjusts the border between shadow and highlight areas.

You have to adjust the Saturation slider first, as a zero value produces no effect at all. We start by setting Saturation to about 10% before we adjust Hue and then finally fine-tune Saturation. Holding down the ![]() key temporarily applies full saturation, allowing you to better see which areas will be affected. Clicking the color field A starts a color picker, where you can select your desired tone instead of using the sliders.
key temporarily applies full saturation, allowing you to better see which areas will be affected. Clicking the color field A starts a color picker, where you can select your desired tone instead of using the sliders.
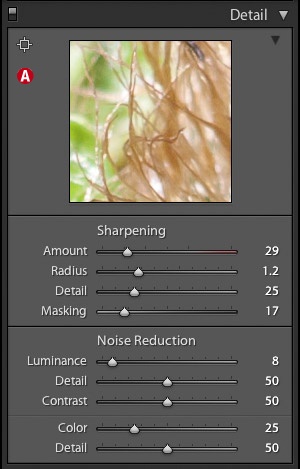
Detail •. This panel contains Sharpening and Noise Reduction controls (Figure 6-34). We have already described sharpening techniques in the section dealing with Adobe Camera Raw.
The preview is automatically set to 100% (i.e., 1:1), and pressing the ![]() button at A allows you to select an image detail using your mouse.
button at A allows you to select an image detail using your mouse.
In Photoshop, we would here correct chromatic aberrations (which is seldom necessary) and vignetting effects. In this case, we use a low sharpening value (about 10%), set Detail to almost zero, and sharpen properly later using Photoshop. The Lightroom Amount slider reacts differently than the one in the Photoshop USM filter. The Detail slider enhances the sharpening effect and should be used sparingly. If you want to protect soft transitions from oversharpening, increase the Masking value; pressing the ![]() key then displays the masked areas.
key then displays the masked areas.
Pressing the ![]() key while shifting the Amount slider converts the preview to grayscale, also helping you to judge the effect of your adjustment.
key while shifting the Amount slider converts the preview to grayscale, also helping you to judge the effect of your adjustment.
In addition to compensatory sharpening, you can also sharpen selectively using the Adjustment Brush ![]() . Additional sharpening is also possible during the printing and export processes.
. Additional sharpening is also possible during the printing and export processes.
The Noise Reduction tool has been greatly improved in Lightroom 3 and now allows you to adjust Luminance, Noise, and Color Noise separately.
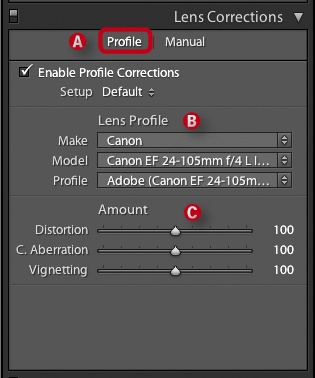
Lens Correction •. This is where you can correct vignetting effects, chromatic aberrations, and lens distortion – either automatically using profiles (in Lightroom 3) or manually (Figure 6-35). There is a description of profile-based correction in Correcting Lens Errors Using Photoshop. Once you have enabled a profile using the button A, Lightroom displays the characteristics of the selected profile (B). You can then use the sliders (C) to fine-tune the corrections made by the profile or to make your own, manual adjustments.
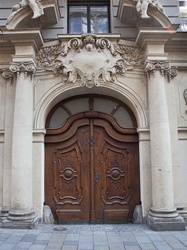
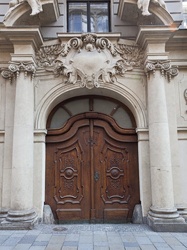
Figure 6-36 shows a door photographed using a zoom lens set to its wide-angle 24mm focal length. The resulting image displays marked barrel distortion. Automatic, profile-based lens correction produced the image shown in Figure 6-37.
The corrected image still displays some perspective distortion. We corrected this using the Manual tab in the Lens Corrections panel (Figure 6-38).
This tab includes sliders for adjusting distortion vertically and horizontally. The Scale slider is used to readjust the image size to compensate for changes made by profile-based or manual lens corrections. Scaling here is non-destructive, but it can cause a loss of image quality when the image is converted to JPEG or resampled for export. As in ACR, we make our basic corrections using the sliders and fine-tune the results using the mouse and the ![]() keys. The settings shown in Figure 6-38 result in the image shown in Figure 6-39.
keys. The settings shown in Figure 6-38 result in the image shown in Figure 6-39.
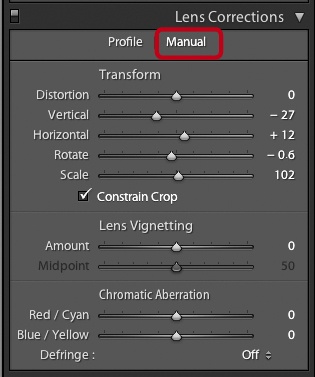

In Lightroom 3, the Manual tab also includes controls for manual vignetting correction, chromatic aberration correction, and defringing. If you want to use vignetting creatively as a stylistic tool, use the Post-crop Vignetting tool in the Lightroom 3 Effects panel.
We discussed correcting chromatic aberrations and fringing in the Adobe Camera Raw section. If we want to hand over images to Photoshop (or other applications) for fine-tuning or merging, we always correct any vignetting or chromatic aberrations first using Lightroom or ACR. The results are always better than those we can achieve later using other programs – especially those that do not work profile-based.

Figure 6-40. Wide-angle and zoom lenses set to wide focal lengths often produce visible chromatic aberrations, as shown in the upper detail. The lower detail shows reduced aberrations using Lightroom’s correction tools.
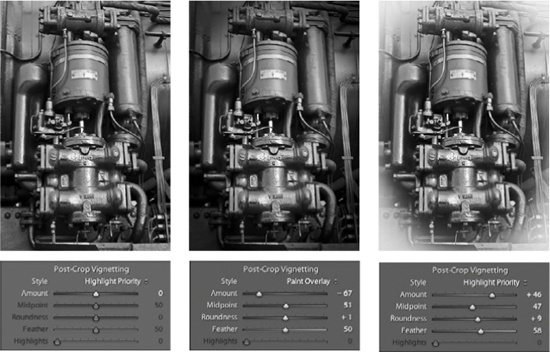
Effects •. This panel was introduced in Lightroom 3 and allows you to apply three different styles of vignettes to already adjusted and cropped images: Highlight Priority, Color Priority, and Paint Overlay. You can fine-tune the effects of the individual styles using the Roundness and Feather sliders.


This panel also includes the Grain effect for simulating analog film grain in your images. This can help to reduce the overly “perfect” look of some digital images, but it is only really effective if applied to low-noise images shot using low ISO values. Grain effects cannot be applied selectively using the Adjustment Brush. (You don’t want to add artificial grain to digital grain produced by the camera sensor.)
Camera Calibration •. This panel allows you to make small color corrections specific to a particular camera and based on the three primary color channels. These can then be saved as a kind of camera profile (actually, a camera development preset) that can then be applied every time you are working on an image shot using that camera. (Starting with Lightroom 3, a better way is to generate your own camera profile.) If you want to correct individual images, you are better off using the HSL tools. The Camera Calibration tool also contains preset profiles (under the Profiles menu) that reproduce the JPEG look of the camera maker’s output.
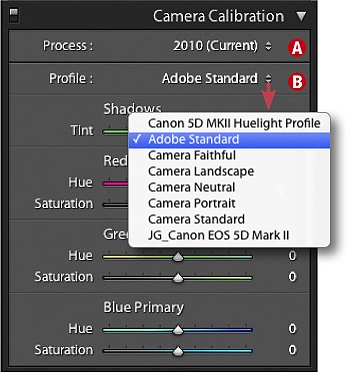

Figure 6-44. The Process menu offers two options for RAW processing: and an older 2003 version and a newer 2010 version.
If you have created and installed your own DCP/DNG profile using Adobe’s DNG Profile Editor [31], this will also appear in the panel’s Profile pull-down list B (Figure 6-43). Creating these camera profiles requires patience, care, and a good deal of color management know-how. You can find more information on the subject in the ACR section in Figure 5-92. The X-Rite ColorChecker Passport is also a great aid (a profiling target) for generating camera profiles (Figure 12-17).
The RAW interpretation (demosaicing) in Lightroom 3 and ACR 6 has been greatly improved, making it possible to achieve even finer details then in previous versions. This means that images you import from Lightroom 2 can appear slightly different in Lightroom 3. For this reason, Lightroom 3 allows you to choose between the old 2003 and new 2010 processes in menu A when developing your images. You can also switch multiple images selected in the filmstrip to the new process. The new, 2010 process usually produces better results.
The tool strip located beneath the histogram contains four selective correction tools: Spot Removal ![]() , Red Eye Correction
, Red Eye Correction ![]() , Graduated Filter
, Graduated Filter ![]() , and Adjustment Brush
, and Adjustment Brush ![]() . The Crop & Straighten tool
. The Crop & Straighten tool ![]() is also located in this tool strip. These are all tools that we already know from Adobe Camera Raw, but they are more intuitive in their Lightroom versions.
is also located in this tool strip. These are all tools that we already know from Adobe Camera Raw, but they are more intuitive in their Lightroom versions.
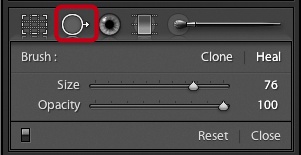
The Spot Removal tool ![]() has similar effects to the Photoshop Clone Stamp and Healing Brush tools, here activated using the Clone and Heal options (Figure 6-46). To clone, move your mouse to the area you want to correct, then move the mouse (with the mouse button held down) to the area you want to use as your repair source. Brush size and opacity are adjustable. The Heal method uses the same technique to apply the color and texture of the source area to the target area.
has similar effects to the Photoshop Clone Stamp and Healing Brush tools, here activated using the Clone and Heal options (Figure 6-46). To clone, move your mouse to the area you want to correct, then move the mouse (with the mouse button held down) to the area you want to use as your repair source. Brush size and opacity are adjustable. The Heal method uses the same technique to apply the color and texture of the source area to the target area.
Lightroom’s Red-Eye Correction tool ![]() is the same as most others. It requires you to draw a circle or an ellipse around the subject’s eye and then adjust the pupil size and darkness value for the corrected area. This tool does not work for the yellow-eye effect sometimes found in animal portraits.
is the same as most others. It requires you to draw a circle or an ellipse around the subject’s eye and then adjust the pupil size and darkness value for the corrected area. This tool does not work for the yellow-eye effect sometimes found in animal portraits.
Use of the Graduated Filter ![]() and Adjustment Brush
and Adjustment Brush ![]() tools is the same as with the ACR versions, but also includes a pull-down menu of preset effects A that you can customize to include your own presets (Figure 6-47). As well as dodging and burning selected images areas, the tool allows you to enhance or subdue image colors using positive or negative saturation values. You can also use negative Clarity and Sharpness values to deliberately de-focus selected areas and, conversely, positive values to sharpen creatively. You can use the New button to set a new correction and combine multiple brush effects in a single image.
tools is the same as with the ACR versions, but also includes a pull-down menu of preset effects A that you can customize to include your own presets (Figure 6-47). As well as dodging and burning selected images areas, the tool allows you to enhance or subdue image colors using positive or negative saturation values. You can also use negative Clarity and Sharpness values to deliberately de-focus selected areas and, conversely, positive values to sharpen creatively. You can use the New button to set a new correction and combine multiple brush effects in a single image.
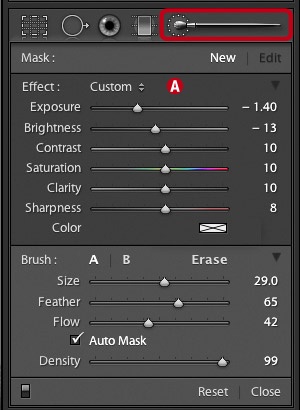
Unfortunately, the keyboard shortcuts for adjusting brush hardness, size, and opacity are different in Lightroom, ACR, and Photoshop. In Lightroom, you can adjust the brush size using the mouse scroll wheel. Pressing the ![]() key allows you to adjust the Feather setting with the scroll wheel, and pressing the
key allows you to adjust the Feather setting with the scroll wheel, and pressing the ![]() key turns the brush temporarily into an eraser.
key turns the brush temporarily into an eraser.
In all modules except Library, Lightroom’s Navigator panel includes a Presets panel with a preview image window (Figure 6-48). The available presets are appropriate to the currently active module and can be applied to the current image with a simple click on list entries. Moving the mouse over a list entry (without clicking) shows its effect in real time in the preview window.
You can save your current correction settings to the presets list by clicking the “+” button at the top of the panel (Figure 6-48). In the Develop module, the Save Develop Preset dialog allows you to choose which of the currently active corrections are to be included in the new preset. The list can be arranged hierarchically to help manage large numbers of presets.
If you copy Lightroom settings to the clipboard (using ![]() ), the same dialog appears but without the Preset Name field. If you then select images and press
), the same dialog appears but without the Preset Name field. If you then select images and press ![]() , the settings on the clipboard will be applied to the selected image(s). Clicking the Sync button opens the same dialog, allowing you to select the settings you want to synchronize. This is useful if you want to apply the settings from a reference image to a group of similarly exposed images that you select before applying the preset. The Reset button sets the active image back to its original state.
, the settings on the clipboard will be applied to the selected image(s). Clicking the Sync button opens the same dialog, allowing you to select the settings you want to synchronize. This is useful if you want to apply the settings from a reference image to a group of similarly exposed images that you select before applying the preset. The Reset button sets the active image back to its original state.
Lightroom offers built-in Slideshow, Web, and Print output modules. The program also allows you to hand over images to other applications for processing (using the Photo ▸ Edit in command) and to export images. Images have to be selected before you output them.
A menu in the Slideshow, Web, and Print modules (shown in Figure 6-49) allows you to decide which of the currently selected images to output. Selected Photos is the default option.

We recommend that you move your images to a new, static collection if you want to print multiple images or create a Web gallery. You can then use the new collection to sort your images before making your output settings.
Once you have selected your slideshow images in the filmstrip or the grid view, the filmstrip remains active so that you can add further images to the sequence. Lightroom slideshows include a wide range of frame, background, drop shadow, duration, transparency, and transition settings (Figure 6-50).
The Preview panel includes a Template Browser with a choice of predefined slide formats that include EXIF metadata, slide captions, star ratings, etc. Here, too, you can define and save your own templates.
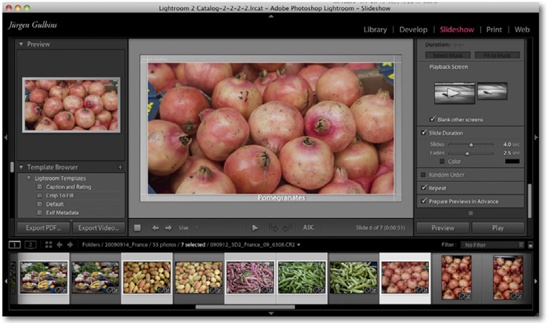
Figure 6-50. Lightroom Slideshow module. The right-hand panel shows only a few of the many available options.
Pressing the Play button at bottom right plays a preview of your finished slideshow in the Lightroom preview window or the slideshow itself in full-screen mode. You can also export your slideshow in PDF format or (in Lightroom 3) as a MP4 video file at resolutions right up to 1080p HD.
Lightroom’s built-in settings allow you to create attractive slideshows but, if you want to create high-end presentations with special transition, camera pan, and music effects, we recommend that you export your images and prepare them using a specialized slideshow application.
Lightroom has a number of art print settings that are not yet available in Photoshop, including custom margins, multiple image printing, and signatures. Figure 6-51 and Figure 6-52 show some of the settings available in the print module. The module includes Page Setup and other settings that are usually found in the operating system print settings or the printer driver itself.

You can also apply print sharpening, which is added on top of the sharpening done in the Detail tab at the development stage. The three sharpening options are None, Glossy, and Matte (Figure 6-51). Sharpening for matte media is stronger than for glossy media.
You can opt to leave color management to Lightroom or your printer driver. Before printer profiles are offered in the Profile menu, you must select which profiles to include in the list. For this, use the Other item in the Profile menu. Lightroom will then show a list of all profiles installed in the system. Checkmark all the profiles you intend to include in the menu list.
Lightroom’s own color management offers Perceptual or Relative Colorimetric rendering intents and a choice of color profiles. Used under Mac OS X, Lightroom can even print in 16-bit mode, allowing for much finer color transitions and gradients.
The Print dialog also includes options for outputting to JPEG or (on a Mac) to PDF. Again, this module includes a Template Browser with a choice of print presets sorted as pre-defined or user-defined.
Lightroom’s general print quality is good, but we nevertheless use RIPs for special print jobs (Specialty Printing Software and RIPs).
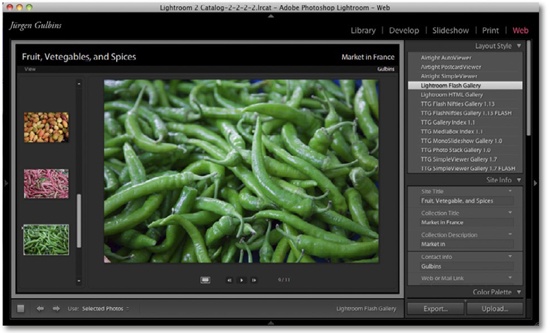
Using the Web module, Lightroom allows you to build Flash-based or HTML/CSS-based Web galleries using a range of pre-defined templates (Figure 6-53). There are also many free and commercial (mostly Flash-based) templates available on the Internet.
In order to speed up preview refresh times, we recommend that you work with just a few selected images until you finalize your design and layout. Once you are finished, you can include all the images you want to display.
We usually activate the Selected Photos option in the View menu (at the bottom of the main window) to achieve this goal.

Figure 6-52. The settings available in the Lightroom Print module include just about everything we could wish for.
The same is true in the Slideshow and Print modules. By default, all the images in your current view are used to build the Web gallery. This can take a long time, if your view contains lots of images.
If the options in your selected Web gallery preset are not good enough for your taste, you can also edit the definition files. However, this is not easy without detailed foreknowledge. The available templates generally have very flexible color, image size, and text settings. The range of settings available varies from template to template.
You can find a number of Web gallery templates on the Internet and on Adobe’s site at www.adobe.com/cfusion/exchange/.
The template browser generates a real time gallery preview in the main preview window in the center of the Web module screen. You can also export your Web gallery locally and preview it in your preferred Web browser. You can then use Lightroom (or any other FTP tool) to upload your gallery to the Web.
You can export selected images either by using the Export command in the context menu or File ▸ Export. The Export dialog is quite complex (Figure 6-54) but is simple to use once you are familiar with its basic elements. The most important of these are the location A, the filenames B, and the file settings C (such as file format and compression). Additionally, you can select image size D and sharpening options E, as well as metadata options F.
Lightroom 3 also includes a very useful watermarking functionality G, with options for setting text, type, shadow, positioning, and alignment. You can save your watermark settings as a preset for later use with other images.
The Post-Processing option is particularly interesting (Figure 6-54). Here, you can choose between a number of pre-defined actions[101] that you can apply to your images once they have been exported, such as opening them in Photoshop. As an example: for our book projects, we have created a Photoshop Droplet that automatically converts our exported images to CMYK format.
LR2/Mogrify and other Lightroom plug-ins are available at: www.photographers-toolbox.com
You can enhance the Export dialog using plug-ins that can (among other things) automatically upload images to Flickr and other Web photo portals. (LR2/Mogrify, written by Timothy Armes, is definitely worth a look. Its options include watermarking functionality that goes beyond the simple features included in Lightroom.) You can save post-processing steps as presets that then appear in the list of options in the Export dialog and in the export dialog’s flyout menu. Lightroom’s export functionality is powerful and easily extendable.

A prerequisite for effective image management is a robust and efficient database that stores metadata, preview thumbnails, and other settings. While Bridge uses a single cache file to store image settings (aside from the XMP sidecar files), Aperture and Lightroom both use real databases. Lightroom database files are called catalogs and have to be stored on a local hard disk (Lightroom 3 does nor support network drives for catalogs).

The image files themselves are stored separately from the catalog in user-defined folders. These may reside on network drives – though this can slow down file access. You can create and switch between multiple catalogs, although a catalog switch always restarts Lightroom. You can only search and work in the currently active catalog.
We use the folder structure that we explained in From the Camera to the Computer to store our images. Figure 6-55 shows a detail of Juergen’s image catalog. In addition to the physical folders that Lightroom displays in the Folders panel, Lightroom also includes options for creating various virtual containers. These are simple lists of references to file locations without any additional layout parameters, like those included in Aperture’s Books, Albums, and Light Tables. These containers are called Collections and are either static or Smart. The basic characteristics and capabilities of collections, also used in Lightroom, are described in Views.
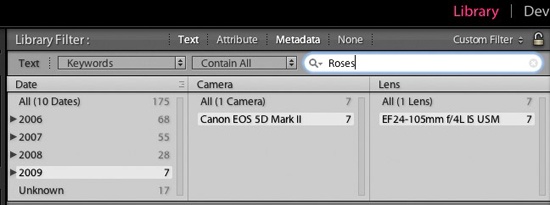
Lightroom uses the Filter to conduct image searches. Once you have selected the images you wish to search through (using the ![]() and
and ![]() keys in the Navigator panel) you can press
keys in the Navigator panel) you can press ![]() to activate the Filter dialog in the main preview window. Searching is easiest in Grid view, and the results are displayed together with the images that meet your selected criteria. You can further refine your filter criteria using the drop-down menus located beneath the Filter title bar. The default filter is based on star ratings, image flags, and color codes. Preset filters can also be applied when searching. You can save search results as a preset or a Smart Collection. With a little practice, using the Filter becomes simple and intuitive.
to activate the Filter dialog in the main preview window. Searching is easiest in Grid view, and the results are displayed together with the images that meet your selected criteria. You can further refine your filter criteria using the drop-down menus located beneath the Filter title bar. The default filter is based on star ratings, image flags, and color codes. Preset filters can also be applied when searching. You can save search results as a preset or a Smart Collection. With a little practice, using the Filter becomes simple and intuitive.
Lightroom has a number of built-in keyboard shortcuts, but unfortunately no editor for defining your own. There are an increasing number of Lightroom plug-ins available, e.g., from DxO and Nik Software, as well as from individual authors like Jeffery Friedl [74] and Timothy Armes [38]. Like Aperture and Bridge, Lightroom allows you to group images into stacks in order to clean up your filmstrip and matrix view.
Starting with Lightroom 3, you can handle CMYK and L*a*b* files in your catalog and also download and play HD video files – all nice additions to Lightroom. We would like to see built-in soft proofing functionality (still not available in Lightroom 3) and more selective correction tools (including grain).
Note
![]() A good place to start looking for Lightroom extensions is: www.adobe.com/cfusion/exchange/
A good place to start looking for Lightroom extensions is: www.adobe.com/cfusion/exchange/
Lightroom 3.0 also supports tethered shooting for a number of Canon and Nikon cameras.
Lightroom 2 and higher run as 32-bit or 64-bit applications (64-bit, naturally, only on a 64-bit system). Image processing on 64-bit systems is noticeably faster.
In its current 3.0 version, Lightroom is a highly functional tool that we both use (under Windows and Mac OS X) for image import, basic image processing, and image management. We also use Photoshop, Photomatix [77] for HDR merging, Autopano Pro [57] for panoramas, Helicon Focus [76] for focus stacking, and other tools in conjunction with Lightroom. Additionally, we also use other RAW converters, such as Capture One.
Lightroom is one of the faster all-in-ones available and only slows down if we try to apply too many selective corrections at once. It is our favorite tool for creating slideshows and Web galleries, and we often print directly from Lightroom. We almost always use Photoshop, with its enormous range of specialized plug-ins, to fine-tune our images.
[98] Subsequently manually compressing these backup files reduces them to about one quarter of their original size.
[99] Use the File ▸ Import From Catalog... command to import images from another Lightroom catalog.
[100] Generating preview images uses a lot of disk space and processing power. These processes are, however, background processes, making it possible to continue to process images that are already imported.
[101] These can include scripts or Photoshop Droplets that are stored in a pre-defined folder.