
Digital imaging technology allows us to employ photographic techniques that were either prohibitively expensive or simply too complicated for use with analog equipment – for example multishot techniques, which use multiple source images to produce a single, finished picture. There are various things you need to look out for while shooting that make merging your source images easier, or even possible in the first place.
Panoramas are the most popular way to use multiple images to photograph everyday scenes.
High Dynamic Range (HDR) images merge multiple images shot using different exposure values to form a single image with increased dynamic range. HDR images often must be “tone mapped” in order to be satisfactorily displayed or printed.
The third major multishot technique involves shooting multiple images using different focus settings. These can then be merged using appropriate software to form an image with increased depth of field. This technique is called “Focus Stacking”.
You can also use multishot techniques to produce images that have greater resolution than your camera can actually capture in a single shot, or to reduce image noise at high ISO values by averaging the tonal values of multiple source images. The last two techniques are described in detail in our book on multishot techniques [18].
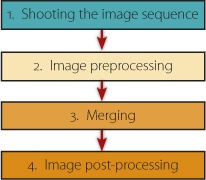
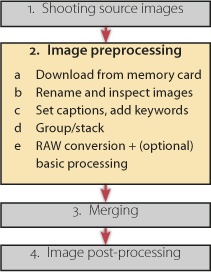
Although each individual technique described in this book has its own workflow, there are a number of commonalities between them that we would like to touch on at this point. The typical workflow for all of these multishot techniques consists of four phases that are represented in Figure 9-1:
Shooting the image sequence
Image preprocessing
Merging the images into one
Post-processing (optimizing) the merged image
Each of these phases may consist of several steps that form their own sub-workflow. The following paragraphs will discuss each major step individually.
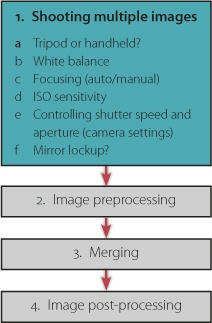
The first phase in the process offers a number of opportunities to make decisions which will later allow you to achieve optimum results. While technical aspects (such as the camera’s shutter speed and aperture settings) differ from camera to camera, other aspects of basic technique are generally the same for all multishot techniques. You can assume, for instance, that for all of the techniques we describe, the use of a tripod will improve your results – even if it is possible to shoot Super-Resolution, HDRI, and panorama sequences without one. It’s difficult to shoot focus stacking sequences without a tripod and basically impossible to shoot macro photos hand-held.
While shooting photos for use with all of these techniques, it is best to use a preset white balance setting. This is less important if you are shooting in RAW format, because RAW allows you to adjust the white balance later when converting your images into other formats. In processing the RAW files, you can adjust the color temperature without sacrificing image quality.
It is important to note that when a camera is set to automatically meter the color temperature of a shot, it embeds the resulting information directly into the image data (with RAW files, in the EXIF data). Later, when you process your images using a RAW converter, you have to remember to set them all to the same color temperature (unless you’re using the same program to both convert and merge your images).
It’s also crucial to all multishot techniques that the focal distance remains consistent throughout the image sequence[125] – and you can only be sure that this is the case if you focus manually. If your subject is sufficiently far away, and there are no objects in the foreground to confuse the camera, you can sometimes use autofocus to shoot panoramic or HDRI sequences. It is also important to retain a constant ISO speed setting throughout each sequence. We recommend using a preset ISO setting and not the Auto ISO feature built into many newer cameras.
Table 9-1. Recommended Settings for Various Multishot Techniques
Super-Resolution | Focus Stacking | Panorama | HDRI | |
|---|---|---|---|---|
Shutter speed | variable | fixed | fixed | variable |
Aperture | fixed | fixed | fixed | fixed |
Camera exposure program | manual or Av bracketing[a] | manual or Av | manual | Av bracketing[125] |
ISO speed | fixed | fixed | fixed | fixed |
Subject distance | fixed | manual | fixed | fixed |
Focal length | fixed | fixed | fixed | fixed |
White balance | fixed | fixed | fixed | fixed |
Tripod | optional | always | preferable | preferable |
[a] Using bracketing varies one of the camera’s shooting parameters during a sequence of shots. Av bracketing varies the shutter speed for a fixed aperture, according to your AEB (Auto Exposure Bracketing) settings. | ||||
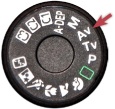
Manual exposure settings are usually the best choice when shooting for multishot processes. There are, of course, exceptions, such as shooting for HDRI, or using Av bracketing to vary the shutter speed automatically. Av bracketing can also be used to shoot images for super-resolution applications. Av mode (or “A” mode, as some camera manufacturers call it) can also be used for a super-resolution shoot.
When taking shots that require slow shutter speeds, it is necessary to use a tripod. Mirror lockup, a useful tool built into many DSLR cameras, prevents motion blur caused by the mirror’s movement. Mirror lockup is not suitable for high-speed bracketing sequences, but some cameras allow mirror lockup for entire bracketing sequences, and you should use this feature if your camera has it.
The first few steps of a multishot workflow are no different from the steps involved in our overall workflow (From the Camera to the Computer). We download our images, rename them, tag them with basic metadata, inspect them, and delete the images we don’t want to keep. We then add more metadata to the remaining images, either individually or by sequence.
We usually create stacks for our sequences in Bridge or our all-in-one program with the most eye-catching image on top. This helps us to keep a clear overview of our image stock and helps us to find individual sequences more easily.
Due to the usually short time intervals between individual shots in super-resolution, HDRI, and panorama sequences, grouping images is usually quite simple. However, we sometimes have to group focus-stacking sequences manually.

Figure 9-5. A sequence of three panorama source images. On the left are the images shown as an unfolded stack, and on the right the collapsed stack (this is a screenshot of an Adobe Lightroom stack). The number indicates how many images are in the stack.
For panoramic and focus stacking shoots, you will often find yourself working with a variable number of shots rather than fixed group sizes. It is common practice to take a shot of your hand between sequences (Figure 9-6). This creates a simple partition which can be deleted later. An empty, black frame can also serve the same purpose.
This practice works well for most other techniques but is impractical for bracketing sequences.

Figure 9-6. Sequence shot for a panorama. The image on the far right indicates the end of the sequence.
We have found that manually recording the image numbers in the image description can help when organizing our photos. For example, this technique can be applied to all images in a single panorama or a stack, like the example in Figure 9-7.
We also give our photos a keyword that describes the type of sequence; e.g., HDR, Pano, FS (focus stacking), or SR (super-resolution).
How you go about preparing images for merging depends on which format your camera uses to save images, and which formats your application supports. If your program can import RAW images directly, you won’t have much initial processing to do. However, if you shoot in RAW and your image processing program only supports TIFF or JPEG, then you need to convert the RAW data (to either TIFF, JPEG, or DNG) before further processing can take place.
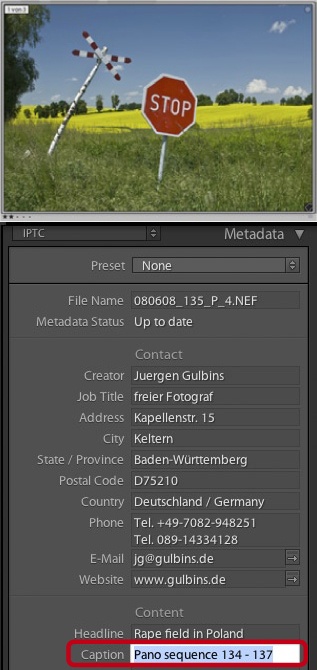
Figure 9-7. Image thumbnail showing part of the IPTC data. We included the image numbers from the HDRI sequence in the caption (shown here in Adobe Lightroom).
The standard process for converting RAW files involves converting all the images in a sequence using the same basic settings. The most important settings to consider when converting are white balance, aberration correction, and vignetting. It can also be helpful to adjust the exposure slightly at this point (but not for HDR images). For example, if the horizon is slanted in a panorama sequence, it would make sense to correct this now. Most merging applications, however, only support the merging of images with identical pixel dimensions. So, if you decide to straighten and crop your RAW files before merging, make sure that all the files have the same pixel size. For most multishot techniques, it is usually better to crop and straighten your images after they have been merged.
When converting sequences of RAW images to TIFF or JPEG, start by optimizing the reference shot, and subsequently apply the same changes (where appropriate) to the rest of the sequence. Such settings usually include white balance, cropping, noise reduction, and slight sharpening.[126] It is usually better to make corrections to panoramas in general, to lighting or color saturation, and to contrast after the photos have been merged.
Your reference shot should be the one which is most similar to your desired result. In an HDRI sequence, this will be the one with normal (medium) exposure values. For a panorama, it will be the center shot in the sequence, whereas for a focus stacking sequence, it will be the shot with the central element of your subject in sharp focus.
The method for transferring the settings used for the reference shot to the other images in a sequence varies according to which RAW converter you are using. With some converters – Adobe Camera Raw or Adobe Lightroom, for example – you simply select the remaining images and click the Synchronize button. In the dialog boxes that follow, you can select which aspects of the reference shot should be transferred (Figure 9-8). Make sure the color temperature and image size (crop) are transferred – most merging applications require all images in a sequence to have the same pixel dimensions.
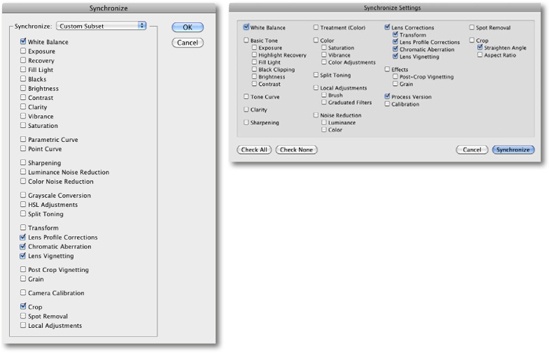
Figure 9-8. The dialog boxes for synchronizing RAW conversion settings in Lightroom 3 (above) or Camera Raw (left). Here, you can choose which settings to transfer to other currently selected images in the sequence.
Everything we have said about optimizing RAW data using a converter also applies when optimizing JPEGs or TIFFs in an image editor, although transferring settings to multiple images can be more difficult.[127] For TIFF and JPEG files, we recommend holding off image optimization until all the shots have been merged into a single image. Only make corrections that are absolutely necessary, such as removing dust spots, chromatic aberration, or vignetting, before merging your images.
If you perform these adjustments using adjustment layers in Photoshop, it is possible to apply the same changes to other images by dragging the adjustment layers from the layer panel of your reference image to other open images. Simply select the applicable adjustment layers, hold down the ![]() or
or ![]() key, and drag the layer entry in the layer panel to the image you want to modify. Unfortunately, this doesn’t work with most filters.
key, and drag the layer entry in the layer panel to the image you want to modify. Unfortunately, this doesn’t work with most filters.
This phase varies greatly depending on which multishot technique you are applying. You will find detailed descriptions in the individual sections relating to each technique (Increase Your Angle of View Using Stitching Techniques through Increasing Dynamic Range Using HDRI Techniques).
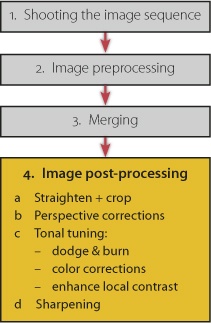
As a rule, merged images need to be further optimized after the merge has taken place. This phase usually includes cropping, either in order to remove the parts of the final image that are poorly defined, or to aid overall composition. Some of the programs described here – especially those used for focus stacking – automatically crop the images in a sequence to include only the areas that are present in all the images used. It is usually necessary to select the areas to be cropped by hand when stitching panoramas.
If you are cropping to enhance the composition and general feel of your image, other factors, such as personal taste and the intended use of the image, will influence your decisions. When shooting photos for multishot sequences, it is always important to shoot a larger area than you wish to appear in your final image. That way you can compensate for potential shifts and distortions, and for any cropping you do while post-processing.
Depending on the technique you are using, a number of different anomalies can occur. These can include rounding errors caused by compression, expansion, rotation or distortion, and blurring caused by the averaging of highlight values. Most optimization scenarios require a local contrast improvement (Enhancing Local Contrast) and a final sharpening of your image. It might also be necessary to burn or dodge some parts of the final image. You will find descriptions of the necessary techniques in Correcting Images Using Brush Techniques. You should also correct lens distortion and some types of perspective distortions before you increase contrast or sharpen your images.
Note
![]() Lens distortion can be corrected before merging in some RAW editors, or later using the Photoshop Lens Correction filter (Correcting Lens Errors).
Lens distortion can be corrected before merging in some RAW editors, or later using the Photoshop Lens Correction filter (Correcting Lens Errors).
[125] This is, of course, not the case when shooting for focus stacking.
[126] At this stage you should only sharpen the image slightly, if at all. If your merging program automatically sharpens the image (as do PhotoAcute and most focus stacking programs) then it is better to leave sharpness unchanged.
[127] Some applications (such as Apple Aperture, Adobe Lightroom, Nikon Capture, or LightZone) allow you to apply the same procedure that is used for RAW files.