

Nowadays, digital darkrooms have almost completely replaced traditional, chemical-based darkrooms with their enlargers and manual masking techniques. Even photographers who still shoot on analog stock often scan their negatives and process them digitally. Digital post-processing offers distinct advantages when it comes to getting the optimum out of your images. Although digital techniques often imitate traditional processing techniques, they make a degree of perfection possible that would be extremely difficult to achieve in an analog darkroom.
This chapter deals with basic processing techniques that are important to the discussions that follow, regardless of whether you shoot in RAW or other digital formats. These formats are also an integral part of the grassroots knowledge we will be discussing. This chapter is based on a number of Photoshop techniques that we use regularly as part of our own workflow. These techniques are largely independent of any individual workflow structures, unless you prefer to use one of the all-in-one workflow tools that we will describe later.
If you work with RAW images, you will perform some of the steps described in this chapter using your RAW editor or an all-in-one program, but our descriptions will nevertheless assist your learning process. If you work with JPEG or TIFF images, the following will be a part of your everyday processing workflow.
We know how it feels when you open Photoshop for the first time. Mastering Photoshop can take a very long time, but you will get better with practice, and it is not necessary to know all the available tricks and shortcuts to work effectively. Here, we will address some fundamental techniques that are useful to digital photographers. We will progress step by step from simple to more advanced techniques.
We will approach Photoshop like a beginner, but we will nevertheless assume that you have already looked at the first few tutorials included with the program and that you are familiar with the basic user interface and the simplest tools.
Most of the Photoshop examples in this book are based on the CS5 version of the program. Although the overall concept hasn’t changed, the interface in the CS4/CS5 version is very different from that in CS3. Not only the base colors, but also the general compactness and the ability to work non-modally (or semi-modally) with Layers are new. A Modal program structure means that you have to close one tool before opening another. Non-modal functionality makes it possible to create a new layer (described in Using Adjustment Layers) without first having to close the currently active dialog. This makes the workflow smoother and allows you to jump back and forth easily between correction steps without having to painstakingly save and record each step first.
Most of the screenshots in this book were created using Photoshop CS5 in Mac OS X, but the Windows versions are not significantly different. We sometimes use screenshots from older program versions for the sake of clarity.

One of the first steps in every workflow is to rotate images that were shot in portrait format. This can be done using an image browser, a RAW editor or Photoshop itself.
The Photoshop command is Image ▸ Image Rotation. The tool allows you to rotate an image at 90 degrees, 180 degrees, or a user-defined angle. We usually rotate our images using an image browser or our RAW editor.
Some newer cameras use a gyroscopic sensor to automatically detect whether an image was shot in portrait or landscape format. We don’t use this function because we always rotate the camera deliberately, which confuses the sensor. This type of functionality can, however, be useful if you take a lot of portrait photos.
The Photoshop title bar includes a lot of useful information.
A typical Photoshop title bar
Our example shows:
The filename (20090523_hummingbird_0136.tif)
The current scaling factor (66.7%)
The name of the active layer (Background)
Color mode (RGB)
Color depth (16 bit per color channel)
The “*” indicates that the ICC profile of the image deviates from the default Photoshop working color space (see Photoshop Color Management Settings).
As of CS4, Photoshop displays each image with its own tab, making it easier to jump between images. If your monitor is large enough, it is often better to display each image in its own separate window. You can arrange them however you like by clicking on the tabs and dragging the windows around the desktop.
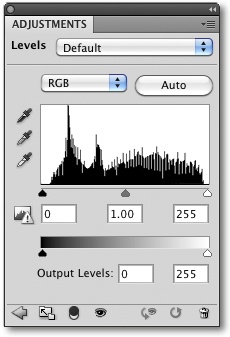
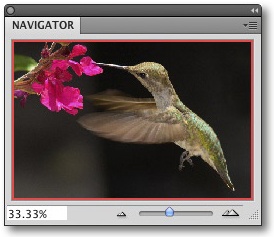
You can change magnification using the Navigator panel (Window ▸ Navigator) or the Zoom menu, activated with a right click. You can also enter a magnification value manually in the status bar of the active window. Yet another method is using the following keystrokes:
You can also use the scroll wheel on your mouse or ![]() and
and ![]() (
(![]() and
and ![]() for Mac) to zoom in and out. Configuration for this is done in Photoshop’s Preferences in the General section using the Zoom with Scroll Wheel option.
for Mac) to zoom in and out. Configuration for this is done in Photoshop’s Preferences in the General section using the Zoom with Scroll Wheel option.
The ![]() key toggles between the three main screen display modes:
key toggles between the three main screen display modes:
Standard mode: Photoshop displays all available tool bars, menus and image windows.
Full screen mode with menu bar: Photoshop uses the entire monitor to display just the active image and the menu bar.
Full screen mode: This mode displays just the active image without any additional menus.
You can switch to Full Screen mode using View ▸ ScreenMode ▸ Full Screen Mode.
Some panels can still cover parts of the active image in full screen mode, but you can toggle these on and off using the ![]() key.
key.
A second monitor is very useful if you plan to work regularly with Photoshop (or other DTP tools). This way, you can use your main (usually larger) monitor to view the active image and your second monitor to display the tool panels and program windows you use most frequently.