
One example of a third-party selective correction tool is the Viveza Photoshop plug-in manufactured by Nik Software [75]. This program is based on the U Point technology used by Nikon in its Capture NX RAW editor, and by Nik in its own Color Efex, Silver Efex, and Nik Sharpener Pro tools. The program’s name is the Spanish word for “liveliness”. Viveza is available for Windows and Mac. It is compatible with Photoshop CS2 and higher, as well as with Photoshop Elements 4 and higher.

The modus operandi of the Control Points software is much more difficult to describe than to use. Basically, it allows the user to make intuitive, selective corrections to various aspects of precisely defined parts of an image. The effects are similar to those you can achieve using Photoshop selections and layer masks.
After applying control points within the image frame, you then use the individual sliders to change various aspects of the pixels around that point. The effect is applied to the entire image but drops off in a circular pattern with increasing distance from the control point. While Photoshop adjustment layers can only be used to influence a single aspect of an image’s appearance, a single control point can be used to adjust a wide range of parameters.
The basic adjustment sliders are always visible when a control point is activated, and an extended range of adjustments can be shown in expanded mode (Figure 7-96 and Figure 7-97). Figure 7-97 lists the effects of the various sliders.
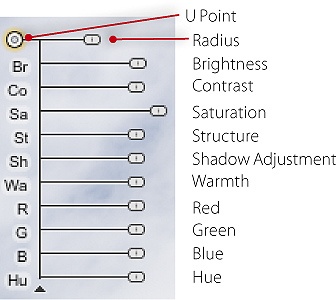
A freshly-placed control point registers the color and tonality of the pixels surrounding it. The pixels nearest the control point are those most strongly influenced by it. A control point works in a similar way to Photoshop Hue/Saturation adjustments but is much more flexible. A control point’s default settings make no changes to an image.
The radius slider is used to regulate the extent of a control point’s effect, and you can set multiple control points with different parameters that influence each other’s impact. There is an example of control point use in Figure 7-98 to help you visualize its functionality.
Like all filters, Viveza applies its effects to a single pixel layer. If you have already performed other layer-based adjustments on an image, you will have to merge those layers (using ![]() or
or ![]() ) to a single layer before setting control points.[117]
) to a single layer before setting control points.[117]
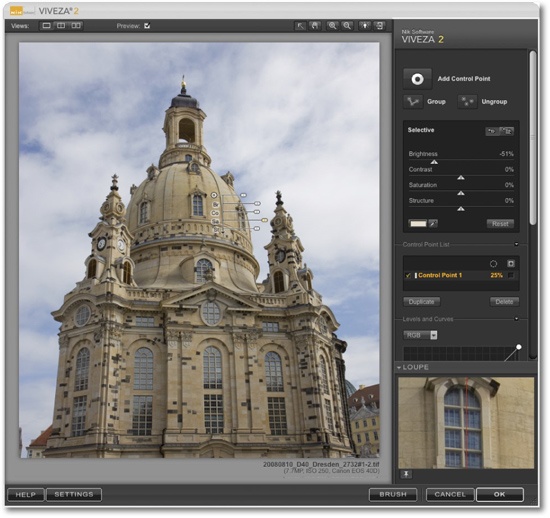
Once installed, Viveza can be found under Filter ▸ Nik Software ▸ Viveza. The plug-in includes a preview window that can be switched to full-screen mode, making it simple to judge the effects you produce (Figure 7-98).
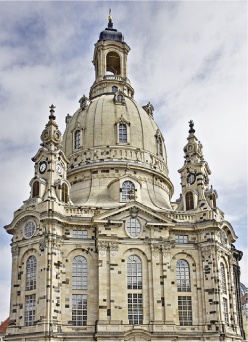
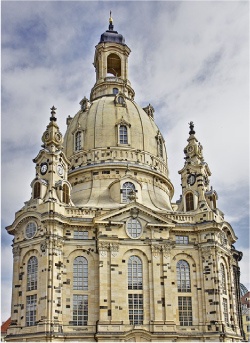
We will use an image of the Church of Our Lady in Dresden, Germany as an example. We want to intensify the color of the sandstone that appears slightly dull due to the lack of sunshine. To do this, we set a control point on the dome of the tower and increase saturation.[118] The Navigator Loupe at bottom right displays an enlarged before/after detail of the preview image.
The ![]() icons at top left change the display mode from single preview to split or side-by-side, while the other buttons at the top of the frame allow you to zoom, select, and pan within the image or alter the background color.
icons at top left change the display mode from single preview to split or side-by-side, while the other buttons at the top of the frame allow you to zoom, select, and pan within the image or alter the background color.
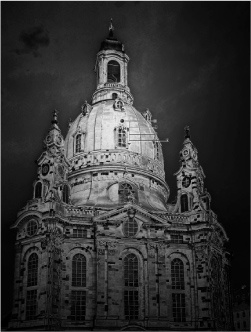
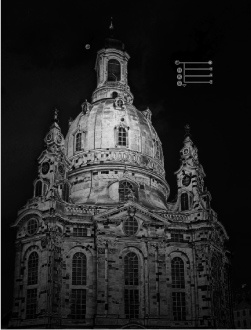
Figure 7-100. Two additional control points reduce the effect of the initial control point on the sky.
You can delete or deactivate individual control points using ![]() in the list on the right of the window. Clicking on the empty box at the right of the control point entry displays a selection mask that previews the effect. Clicking the
in the list on the right of the window. Clicking on the empty box at the right of the control point entry displays a selection mask that previews the effect. Clicking the ![]() button at the top of the list displays a selection mask that shows the effects of all control points for the current image. Figure 7-99 demonstrates the mask for the first control point in the list and clearly shows how the point’s effect diminishes with distance from the place it is applied. Viveza doesn’t actually create a mask, but instead displays a pixel-based visualization of the point’s effects.
button at the top of the list displays a selection mask that shows the effects of all control points for the current image. Figure 7-99 demonstrates the mask for the first control point in the list and clearly shows how the point’s effect diminishes with distance from the place it is applied. Viveza doesn’t actually create a mask, but instead displays a pixel-based visualization of the point’s effects.
Note
![]() As long as the Viveza window remains open, you can select, move, delete and copy control points either using
As long as the Viveza window remains open, you can select, move, delete and copy control points either using ![]() +drag or by clicking the Duplicate button.
+drag or by clicking the Duplicate button.
If you want to restrict the effect locally, reduce the radius. Increasing the radius increases the range of the effect, although it’s still only applied to the color at the control point’s location. We can reduce the effect of the initial control point on the sky by setting two additional control points to the left and right of the tower.[119] These not only limit the saturation in the yellow of the tower, but also darken the sky. This also slightly darkens the sky reflected in the church windows. Two duplicate control points set slightly lower further darken the sky.
As already mentioned, it is much more difficult to describe working with Viveza than it is to actually use it. Viveza is flexible and intuitive, and allows you to fine-tune individual colors using the individual RGB or Warmth sliders. The plug-in also includes a Brush tool for making finer corrections (although it’s is unfortunately not compatible with Smart Objects or Smart Filters). The Brush tool uses a conventional Photoshop layer mask to apply its effects, but control points are so effective it is seldom necessary to use it.
[117] If you are working with CS3 (or later) you can convert this object into a Smart Object using the Layer ▸ Smart Objects ▸ Convert to Smart Object command. The effect can then be reloaded and adjusted without having to start again.
[118] This slider can also be used to reduce saturation.
[119] See the selection display in Figure 7-100.