
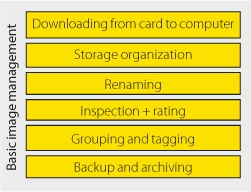
Here, we are going to address part of chapter 2’s second phase (P2) step of image data transfer and organization. This will help us to clarify the background and incentives behind some of the topics that we will be discussing later in this chapter.
Transferring the data from a full memory card to your computer after a long session often uses a large amount of disk space, especially if you convert some of your images to 16-bit TIFF format. You will quickly learn to think in gigabytes (GB) or terabytes (TB). Our network already has more than 6,000 GB (6 TB) of disk space attached to it in various forms. Such large amounts of data require serious organization if we are to be able to find specific images, and if we want to avoid duplicating data and retain an overview of the current versions of the images we have. A good basic setup includes a 300 GB hard disk in your notebook and 750 GB – 2 TB in your desktop. You will also need a similar amount of disk space on external drives for your backups.[15]
Most modern digital cameras have either a USB or a FireWire interface. Wireless interfaces are either optional or expensive (or both). Many systems automatically download images as soon as a camera or a card in a card reader are attached to a computer. We don’t use this option because we use multiple memory cards, and because most cameras don’t make very effective card readers. Direct downloads also quickly exhaust your camera’s batteries. We use a card reader attached to one of our laptops or workstations to download the day’s images to a new, dated folder. We use several different cameras, so we try to name our image files in such a way that they are all easily attributable to a particular camera, even if we are using more than one camera of the same type.
A note about our use of the term “RAW”: The term “RAW” (in capitals) refers to images shot in one of the many available RAW formats, whereas the term “raw” refers to unprocessed image data in any format (RAW, JPEG, or TIFF).
At this point it is important to keep control of how your saved images are organized and how you name your individual image files.
Make sure you know where to find your new images and where they are to be stored if the download location is not their final destination. Original images and processed versions of the same image don’t always end up being stored in the same place.
Make sure you organize your images clearly and simply so that you can always quickly find any originals or copies.
Your personal system should be compatible with your image management software.
All images and additional data should be backed up regularly and should be easy to reproduce should a system failure occur.
Make sure that your image files and your backups are easily identifiable.
The way you order your images is fundamental to the way you store all of your future work. The two most obvious ways to sort images are either chronologically or according to individual topics or jobs. We recommend the chronological approach. Images sorted by topic quickly become unmanageable.
Note
![]() Our tip: only arrange your images according to themes in virtual folders or collections based on image metadata and not on the location of the original image file.
Our tip: only arrange your images according to themes in virtual folders or collections based on image metadata and not on the location of the original image file.
Filenames should be chosen according to the following rules:
A filename should only occur once in your entire database (apart from backups, of course).
A filename should give some clues as to its contents (date, image type, subject, or job number).
A filename should be short and must be compatible with your database and/or image management software. Don’t use special characters. We recommend that you use the following guidelines when naming your files:
Maximum 31-character length (plus a 3-character file extension separated from the filename by a dot). Remember that filenames often get longer (for example, with the addition of a version number).
The only special characters should be underscores, hyphens, and the dot that separates the extension from the filename.[16]
Don’t use unusual language-based characters (such as é, ë, or â). Although most modern systems can decipher these types of characters, they still often cause problems, especially if you change systems or programs.
The file extension should make it obvious what type of file it is describing. References to the processing steps you used or other characteristics of a file can be included in the filename itself.[17]
You can apply most of these criteria to your folder names, too – especially avoiding folder names that are too long or use special characters. It is important to consider what information is really relevant and what is better to leave out when naming files and folders.
Figure 1-24 illustrates the system we use for naming files and folders. This system is chronological and is built on two or three levels. We use one folder for each year, and the folder’s name always includes the year. The year folders contain subfolders organized according to shoots. If we use only one camera, all the images from a shoot are stored in a single subfolder. If we use multiple cameras for a shoot, the images from each camera are stored in a separate subfolder.
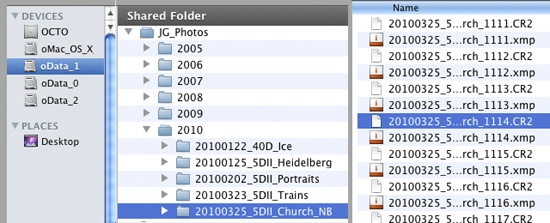
2010: All source images shot with all of our cameras in the year 2010 are stored here in appropriate subfolders.
20100325_5DII_Church_NB: This folder contains the images we shot at the church in Niebelsbach on March 25, 2010.
The individual image files are named as follows:
Date_Camera_#_Shoot_image#:
The date format is jjjjmmdd,[18] to make sorting easier
5DII stands for the Canon 5D Mark II camera
Options “_01”, “_02”, ..., are used if we shot and saved images using more than one memory card (not shown in Figure 1-24).
The name of the shoot or the broad subject (here “church”) or a customer or job number.
The image number that the image receives on the memory card (usually between 0000 and 9999)
We rename all of the downloaded images according to these rules immediately after downloading. Ideally, the renaming process takes place during downloading.
If you have more than one camera of a particular type, you still need to uniquely identify each image. Once it has reached 9999, the camera starts numbering again at 0000. The jjjjmmdd suffix nevertheless allows you to create unique filenames.
We save the images we process in Photoshop as TIFF files. These files contain the original Date_Camera_Shoot_mmm data in their filenames and also receive an additional sequential number and possibly a code that identifies the processing involved, for example:
Original: | 20100325_5DII_Church_1114.CR2 |
Processed image: | 20100325_5DII_Church_1114#02BW.tif |
This way, we can always find the original image based on the information contained in the name of the processed image[19]. Lightroom automatically saves a RAW image and its derivatives as a stack.
Once we have downloaded our images to a hard disk, we rename them according to the system we have just described and thereby ensure that every image is uniquely named. We use the Adobe Bridge Photo Downloader or the (even better) Lightroom Import tools, both of which are capable of renaming files during download and which can also be programmed to save a backup copy of each (already renamed) file to a separate location. You can also use these tools to apply metadata to files, which, in the case of RAW images, is saved in a separate XMP file.
Note
![]() This step is only necessary if you haven’t already renamed your files during the download process. This section demonstrates the system, regardless of when it is applied.
This step is only necessary if you haven’t already renamed your files during the download process. This section demonstrates the system, regardless of when it is applied.
The Bridge Downloader is opened using the File ▸ Get Photos from command, and the dialog in Figure 1-25 then appears. Select the image source A, the target folder B, and, optionally, the backup location C.
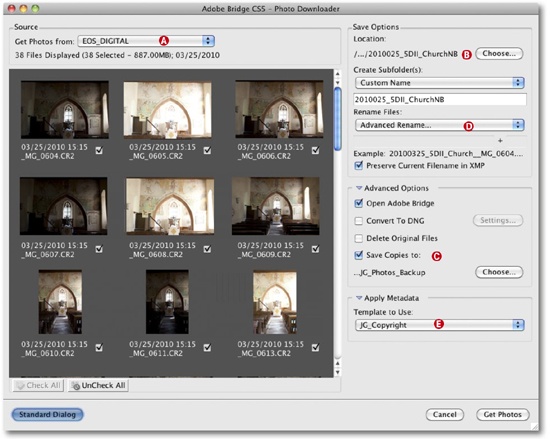
You can then use the Rename menu D to define your renaming system. The settings shown in Figure 1-25 produce images named using the system we described above.
The Bridge downloader also includes an option E for applying an IPTC metadata template to the images you are downloading. The menu E also includes an option for creating or editing the template before you apply it.
Once you have downloaded your images, you should back them up immediately to either a separate hard disk, a DVD, or a Blu-ray disc. The Bridge and Lightroom import tools both have an automatic backup option that we always use if possible. Once you have backed up your images, you can delete them from the memory card or, preferably, format your memory card using the camera’s built-in format command. We don’t recommend that you format memory cards using your computer!
We can’t repeat it often enough. Always backup your image files:
As soon as possible, i.e., during or immediately after download.
Additionally to DVD, Blu-ray, or an external hard disk. Don’t back up your files to the same hard disk as your originals and don’t back them up to a partition on the same disk.
Make multiple DVD backup copies using different brands of disc. If a disc from a particular batch or manufacturer is defective, the chances are that other similar discs will also be defective.
Store your backup copies in different locations. This way, you minimize the risk of a total loss of your images due to fire, water damage or theft.
Note
![]() There are also tools available (such as Apple’s Time Machine) that constantly check your system for new or updated files and automatically back them up to an external storage location. This an effective backup method, but it is not sufficiently safe on its own. You can find more information on backup and data security in Data Security.
There are also tools available (such as Apple’s Time Machine) that constantly check your system for new or updated files and automatically back them up to an external storage location. This an effective backup method, but it is not sufficiently safe on its own. You can find more information on backup and data security in Data Security.
Once you have saved your originals and backup copies of your images, you can at last start work in the digital darkroom.
Note
![]() If the file system on your memory card should become corrupted, don’t panic![20] There are a range of recovery programs available (such as Photo-Rescue) that are generally capable of reconstructing and saving your files.
If the file system on your memory card should become corrupted, don’t panic![20] There are a range of recovery programs available (such as Photo-Rescue) that are generally capable of reconstructing and saving your files.
The source image that is now saved on your computer is also sometimes referred to as a digital negative. We recommend that you save a copy of this file in its current, renamed form (be it RAW, TIFF, or JPEG). This file contains all the available image data without any loss due to processing and including all the metadata recorded by the camera. You will often need to refer back to your original file, for example if:
You have improved your technique and want to have another try at perfecting a particular image.
Better RAW editors hit the market. We have seen radical improvements in image processing software in recent years, and we expect these to continue.
Your processed images become lost or damaged due to disk failure, virus action, or accidental deletion.
A source image is a type of latent image, and the processing steps you make are equivalent to your own special analog darkroom development formula. The major difference between analog and digital images is that you can develop the same negative (i.e., the RAW image) multiple times. If you use JPEG or TIFF files as your source, you should be working exclusively with copies of the originals. RAW editing software doesn’t alter the RAW file itself, but instead saves the changes you make as a separate data set or file.
[15] Nowadays, external drives are connected to computers via FireWire, USB 2.0, eSATA, or high-speed NAS systems.
[16] It is safest to use dots exclusively for separating the filename and the file extension.
[17] For example, “BW” for a black-and-white conversion
[18] The standard international date format is jjjj for the year, mm for the month, and dd for the day. If you need to save space or characters, you can also use a two-digit number for the year.
[19] We will call all processed and converted RAW images “processed images” or “derivative images”.
[20] This can easily happen if your camera battery dies while it is writing a file, or if you open the memory card door of your camera too soon.