
The basic rule of thumb when processing images is, “Correct major errors first and minor errors later”. One of the first major corrections we perform is aligning the dominant vertical or horizontal lines in an image.
You should, of course, take care to photograph the horizon so that it appears horizontal, but you will nevertheless need to make corrections every now and again. Make this your first step, as it nearly always involves a subsequent crop.
You can rotate your image in one of three ways:
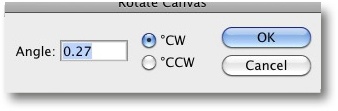
Use Image ▸ Image Rotation ▸ Arbitrary. Judging the correct degree of rotation can be tricky, but you can first drag the Ruler tool (
 ) along a line or edge to measure its angle precisely. The Image ▸ Image Rotation ▸ Arbitrary dialog then displays the angle Photoshop has determined (Figure 4-13). Clicking OK straightens your image perfectly.
Select the entire image using
 and then use Edit ▸ Free Transform (
 or
or  for a Mac) to rotate it.
You can also drag guidelines out of the rulers at the edges of the active image by using your mouse.[62] The rulers are activated using
 (Mac:
(Mac:  ). Now reduce the image so that it is surrounded by blank space on the canvas.
Then activate Free Transform. You can now rotate the image freely using the handles at the corners. You have to confirm any changes you make by double-clicking within the image area or by pressing the
 key, so don’t be afraid to experiment first.
You can also enter a degree value for your rotation manually in the Transform options bar (Figure 4-14).
Once you have rotated your image, either crop the resulting empty borders or fill them in using the Clone Stamp tool.
This process combines rotation with use of the Crop tool
 , which you can also use to correct perspective distortion in one (fairly complex) step. These are the necessary steps applied to the image in Figure 4-15:
4a
Select the Crop tool
and crop your image to leave plenty of space around the cropping marquee without actually applying the crop. Now check the Perspective box in the Crop options bar.4b
Move the corners of the cropping marquee while pressing the
 key to form a rectangle (Figure 4-16). This doesn’t have to cover the entire area of the image you want to keep, but it serves to define the perspective parameters that you will apply later.
4c
Now drag the edges of the rectangle (without pressing the
key) to their final cropping positions. They will automatically move parallel to their previous positions (Figure 4-17).4d
Pressing
applies the crop and simultaneous perspective correction. The result is shown in Figure 4-18. Here, the slight grade of the street makes the image look a little tilted, although it no longer is.


If your results aren’t perfect, undo the rotation and try again using different parameters. Rotating the processed image repeatedly (without undoing your previous attempt) compounds rounding errors and introduces unwanted artifacts into the image.