
As we have already mentioned, a printer may not be able to reproduce all the colors in an image accurately if it has a smaller gamut than the image. All color management can do is help the printer create as accurate an impression of the original image as possible. If you check your image on a monitor before printing (“soft-proofing”), the image will be implicitly converted to the printer’s color space for viewing using the printer’s ICC profile. This will help you to avoid producing costly and disappointing test prints, a step that is especially important for large-scale commercial print runs. No one wants to produce a print run of 2,000 books with poor quality photos. To proof accurately, your proofing device has to be able to produce all the colors that your output device can produce – and this is not always the case if you are proofing a modern inkjet printer on a monitor.
To set up soft-proofing in Photoshop, select View ▸ Proof Setup ▸ Custom. The dialog in Figure 3-32 will appear.
Select the profile of the printer you want to simulate (A) and make sure you select the correct printer profile,[57] paper type, ink type, and printer settings. Leave Preserve RGB Numbers (B) unchecked. Select the rendering intent (C) you will be using later for printing or profile conversion (Mapping Color Spaces). This will be either Perceptual or Relative Colorimetric if you are printing photos.
Activate Black Point Compensation D and Simulate Paper Color E (see Figure 3-32). The latter will also automatically activate Simulate Black Ink F.

If you want to soft-proof regularly, save your proofing settings and give them a name that includes the simulated printer, the paper, and printer settings.
To activate soft-proofing, select View ▸ Proof Colors (or press ![]() ). This keystroke toggles proofing on and off. Leave it switched off while you are optimizing your images.
). This keystroke toggles proofing on and off. Leave it switched off while you are optimizing your images.
After setting up soft-proofing, you can also activate Gamut Warning (View ▸ Gamut Warning or ![]() ).
).
With Gamut Warning active, Photoshop will mark all areas in your image that use colors that are out-of-gamut for your target color space. The default warning color is gray (Figure 3-33), but this is easily overlooked, so we recommend setting the warning color to a loud, saturated magenta that doesn’t usually occur in photos.
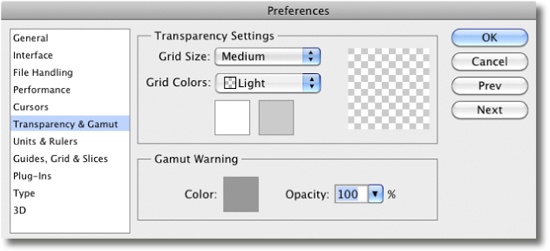
To set a new gamut warning color, select Edit ▸ Preferences ▸ Transparency & Gamut. Click on the Color field to display the color picker (Figure 3-34).
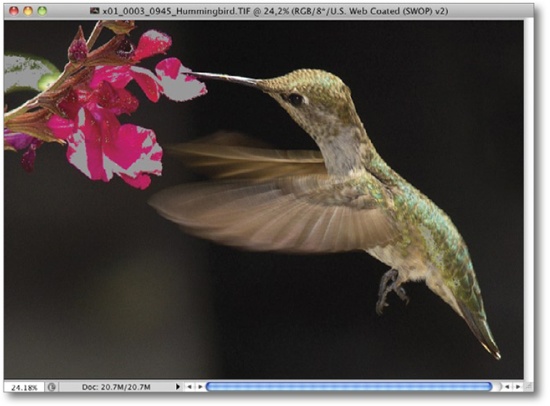
Figure 3-33. Image displayed with Gamut warning active. ![]() is set up as the warning color and “U.S. Web Coated (SWOP) V2” as the destination profile.
is set up as the warning color and “U.S. Web Coated (SWOP) V2” as the destination profile.
If you don’t use a custom proof setup in Photoshop and activate Gamut Warning or Proof Colors, your Working Spaces CMYK setting is used as default (Figure 3-24).
You can toggle Gamut Warning on and off using either ![]() or the View menu.
or the View menu.
Gamut Warning helps you determine which colors in your image will not be reproduced accurately and will have to be remapped. This usually involves mapping highly saturated colors to less saturated ones. It may also help to modify these colors to fit better into the destination color space (usually the printer’s gamut). Decreasing saturation is more accurate if done manually than if you use automatic gamut mapping, which is controlled by the selected rendering intent (Mapping Color Spaces).
Even if Gamut Warning is not active, the Color Picker will warn you if you select a color that is out of gamut for your target device by displaying a triangle ![]() icon beside the selected color (Figure 3-35, A). If you then click in the field B, the selected color will be replaced by a color that is as close as possible to the original, but that still fits into the destination color space.
icon beside the selected color (Figure 3-35, A). If you then click in the field B, the selected color will be replaced by a color that is as close as possible to the original, but that still fits into the destination color space.

In Photoshop CS4/CS5, you can activate soft proofing and Gamut Warning for the preview image in the print dialog (Figure 11-13). *If you let Photoshop handle color management, it will apply the rendering intent selected in the print dialog. The printer profile selected in the print dialog will be used as the output profile.