As you gain experience with your own workflow, you will find that there are certain sequences of Photoshop steps that you perform time and time again. In order to automate repeated tasks, Photoshop includes the Actions panel that allows you to record and save sequences of steps.
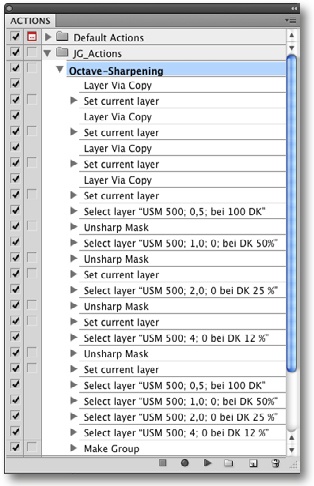
You can save multiple actions in sets that cover certain aspects of your work (you could, for example, have a set called frames, for your picture frame actions). The Actions panel in Figure 4-72 shows the open action set JG_Actions with the Octave-Sharpening action selected.
An action consists of multiple Photoshop steps (such as making a selection or creating a layer), which are recorded using the buttons at the bottom of the Actions panel. The Actions panel can be found under Window ▸ Actions. ![]()
These buttons have the following functions:
Stops recording. You can restart recording by clicking the | |
Starts recording. The button changes to red during recording: | |
Plays the selected action. The individual steps in the action are then performed in the order they were recorded. | |
Creates a new action set. Actions can only be saved to sets before you start recording. Action files have a “.atn” file extension. You have to explicitly save each set once it has been created or changed (Saving and Loading Action Sets). | |
Creates a new action (as part of an action set) and starts recording (and saving) steps immediately. | |
Deletes the selected action or the selected step within an action. |
Open an image and create a new action set using the ![]() button at the bottom of the Actions panel. A set is a folder for actions which helps you to preserve an overview of the different types of actions you record. Always give your action sets descriptive names.
button at the bottom of the Actions panel. A set is a folder for actions which helps you to preserve an overview of the different types of actions you record. Always give your action sets descriptive names.

Select your action set in the Actions panel and start recording by clicking the ![]() button. Photoshop then asks for a name for your action (Figure 4-74). Make sure that the name describes the action accurately. This saves time later when you are searching for the appropriate action for a particular task. Recording then starts, and the recording button will turn red:
button. Photoshop then asks for a name for your action (Figure 4-74). Make sure that the name describes the action accurately. This saves time later when you are searching for the appropriate action for a particular task. Recording then starts, and the recording button will turn red: ![]() .
.
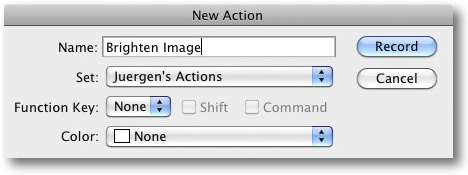
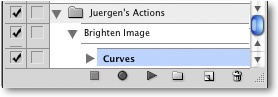
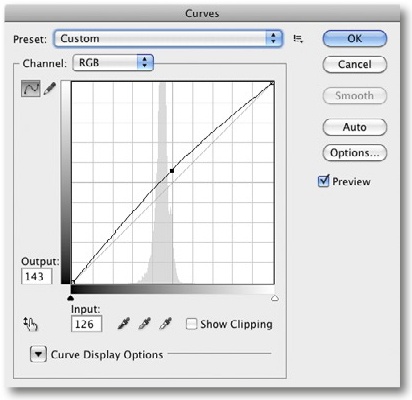
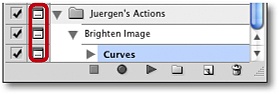
In our example, we will record the action “Brighten Image” using a Curves operation (Figure 4-74 and Figure 4-75). Once we are done, we stop recording with a click on the ![]() button. The Actions panel now looks like this:
button. The Actions panel now looks like this:
The new action can now be applied to other images by first opening and selecting the image, then selecting the appropriate action and finally clicking the ![]() button.
button.
What do we do if the values in our recorded curve are just the starting point for a detailed correction and we need to adjust the parameters we have recorded?
All we have to do is click on the small square next to the Curves entry ![]() . The
. The ![]() icon now appears and to the side of any parent entries. The next time we run the action, the Curves dialog will open automatically. You can then make appropriate changes and save them by clicking OK.
icon now appears and to the side of any parent entries. The next time we run the action, the Curves dialog will open automatically. You can then make appropriate changes and save them by clicking OK.
Action sets are only useful if you save them for later use. You can do this via the arrow icon at top right in the Actions panel ![]() . It is best to name the file the same as your action set. The resulting file will have a “.atn” file extension and will be saved by default to the .../Photoshop/Presets/Actions folder. You can save them to other locations too.
. It is best to name the file the same as your action set. The resulting file will have a “.atn” file extension and will be saved by default to the .../Photoshop/Presets/Actions folder. You can save them to other locations too.
Saved actions and action sets can be used later on any computer. There is a wide range of free and commercial action sets available on the Internet (and on our web page).
Load actions using: ![]() ▸ Load Actions. This is also where the Save Actions command is located.
▸ Load Actions. This is also where the Save Actions command is located.
Since you will surely adjust and perfect your actions over time, it is often useful to save older versions separately under their own names, e.g., Uwe’s Sharpening V1.2.
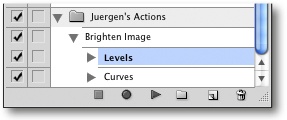
If you want to extend an action later, use the following steps:
Move your mouse over the Actions panel to the position within the action where you want to insert a new step
Click
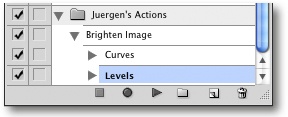
 to start recording the additional steps. In our example, it’s a simple Levels command.
Stop recording by clicking the
 button. Our extended “Brighten Image” action now looks like Figure 4-77.
You can reorder the steps within an action using drag-and-drop. Individual steps can be deleted by selecting them and dragging them to the trash ![]() .
.
If you want to change the settings for an individual step, double-click the step to open the appropriate dialog. Change the settings and click OK to confirm your changes. This automatically runs the changed step, which you can undo using ![]() . You can also reset the step using the History panel, which is described below.
. You can also reset the step using the History panel, which is described below.
You can assign actions you use regularly to function keys (F-keys),[71] and you can also use scripts written in a number of scripting languages to perform even more complex sequences of steps and actions. However, detail on the subject of scripts would go beyond the scope of this book.