
There are many ways to publish your work on the Internet, ranging from simple website generation software to complex database applications. Our own portfolio site at www.colors-by-nature.com is just one example of a possible approach to website design.
The Photoshop Web Photo Gallery[169] tool was discontinued in CS4. This type of tool belongs firmly in the image selection and management part of the workflow, and most image management tools – such as Expression Media or the all-in-one tools introduced in Chapter 6 – nowadays include web gallery functionality. Gallery functionality can also be found (with different degrees of sophistication) in various image browsers. The basic steps involved in creating a Web gallery are:
Image selection and ordering
Image conversion to a suitable export format (usually JPEG). sRGB is the best target color space for use on the Web.
Image scaling to a suitable prescribed size. In addition to the image itself, most Web galleries publish a thumbnail copy of each image for browsing purposes.
Web gallery design. You generally have to choose between HTML-CSS (Cascading Style Sheet) and Flash-based solutions. Whichever you use, make sure that your website supports interactive navigation. Some Flash-based solutions provide slideshow functionality.
Adding copyright and individual image information. Some programs allow automatic EXIF or IPTC data transfer.
Previewing your finished website and uploading the results.
Web gallery generation using Adobe Bridge (CS4 or CS5) functions as follows:
Select your images and turn them into a Collection. This way, Bridge only displays your selected images.
Switch to the Output workspace (Figure 11-53). Here, you can choose between PDF or WEB GALLERY output C.
Sort your images in the Filmstrip using your mouse. Drag the top edge of the Filmstrip higher to make it easier to see all the thumbnails.
Select the images you want to appear in your gallery in the Filmstrip. We recommend that you stick to four or five images for your first test run. Now click Refresh Preview (Figure 11-53).
Select a template in the drop-down menu D. The meanings of the template names are not always obvious, so try out several to see which you prefer. Clicking Refresh Preview once again displays the look of the template you have selected. Use the Style menu E to fine-tune the look of your layout. Different templates offer different Style variations.
The Bridge preview window gives you a first impression of how your gallery will look, but clicking Preview in Browser generates a genuine Web preview in your default Web browser, which you can then test.

Note
![]() If your collection includes RAW images, Adobe Camera Raw automatically converts them to JPEG, using either the default ACR settings or the settings stored in the image’s sidecar file.
If your collection includes RAW images, Adobe Camera Raw automatically converts them to JPEG, using either the default ACR settings or the settings stored in the image’s sidecar file.
You can now concentrate on the details of your layout. The available settings depend on the type of gallery and the Style settings you have selected.
The Site Info panel is where you enter the gallery title as well as name, caption, copyright and other information for each individual image.
Use the Color Palette panel* to set the background, title, menu, and thumbnail colors in your gallery.
The settings in the Appearance panel[170] determine the size of the thumbnail and preview images, as well as the transitions used in the Web slideshow (if you use a template that supports a Web slide show).
The Create Gallery panel[171] is used to set the local and Web locations (including the URL and the password) for your finished gallery. You can also upload your gallery later via FTP.
You can now select your images from the Filmstrip and create your gallery. This can take some time, depending on the size and resolution of your source images.
As always, you will need to practice a little until you get used to applying the available options and settings; but basically, Bridge offers a very simple way to produce great Web galleries.
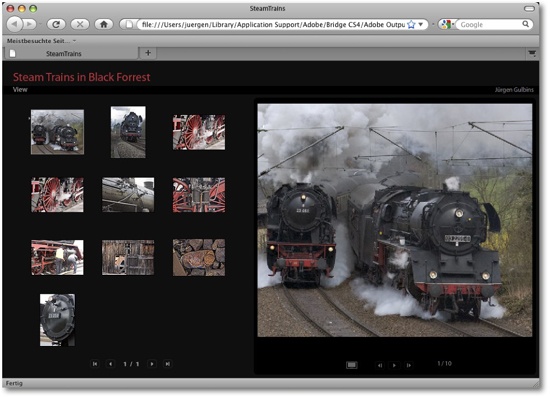
Figure 11-54 shows a gallery we created using the Bridge Standard layout and the Medium Thumbnail Style. We modified the title to appear in red.
Web gallery creation using Lightroom or Apple Aperture functions in virtually the same way as described here, but with wider-ranging layout and customization options, including custom type sizes and styles. There are many free and commercial (mostly Flash-based) gallery layouts available for Lightroom on the Web.
[169] Found in Cs3 under File ▸ Automate ▸ Web Photo Gallery. You can also download the filter separately from the Adobe website and install it in CS4.
[170] Shown when so scroll down the right scroll bar G in Figure 11-53
[171] Shown when so scroll down the right scroll bar G in Figure 11-53