
As stated earlier, an accurate monitor profile is the basis for an accurate color-managed workflow. You can either calibrate your monitor by eye or by using specialized hardware.
When profiling your monitor, leave it switched on for at least 30 minutes before starting calibration. To perform the calibration, follow the instructions provided with your choice of tool. Note that room lightning, the color of your walls and desktop, and even your clothing can influence calibration results.
Note
![]() Before starting to calibrate and profile your monitor, make sure you set the display color depth to at least 24 bits.
Before starting to calibrate and profile your monitor, make sure you set the display color depth to at least 24 bits.
Photoshop for Windows includes the Adobe Gamma utility for calibrating monitors. Mac OS X includes a similar utility called ColorSync Calibrator. Both utilize the user’s eyes for color measurement – which is better than nothing, but not as good as hardware-based calibration.
Although calibrating your monitor by eye is better than no calibration at all, you should use a hardware-based solution (i.e., a spectrophotometer or a colorimeter) if accuracy and precision are important to you. There are several reasonably priced packages currently available for between $90 and $270.[50] We use and recommend X-Rite Eye-One Display 2 or Spyder3Elite.
The entire calibration and profiling process takes about 10 minutes, and once you have made a good initial calibration, the next calibration will be much faster.
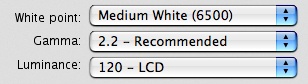
We recommend using the following values when calibrating and profiling a monitor:
White point: | 6500 K (D65) |
Gamma: | 2.2 |
Luminance: | 120–140 cd/m2 |
We recommend these values even for pre-press work (where a white point of 5,000 K is standard) and if you work on a Mac (see also side note).
Note
![]() A luminance of 120–140 cd/m2 may imply that you have to turn your monitor brightness down to about 15% of maximum. This is perfectly acceptable and also helps to prevent eye fatigue. If you work in pre-press and your profile kit allows, use a white point between 5600 and 6000 Kelvin as recommended by the Swiss UGRA: http://www.ugra.ch
A luminance of 120–140 cd/m2 may imply that you have to turn your monitor brightness down to about 15% of maximum. This is perfectly acceptable and also helps to prevent eye fatigue. If you work in pre-press and your profile kit allows, use a white point between 5600 and 6000 Kelvin as recommended by the Swiss UGRA: http://www.ugra.ch
The Eye-One Display 2 package from X-Rite ([52]) includes the Eye-One Match software for calibrating and profiling monitors, as well as a sensor (colorimeter). It supports Mac and Windows and allows you to calibrate CRTs as well as LCDs and notebook displays. These are the necessary steps for calibrating your monitor:
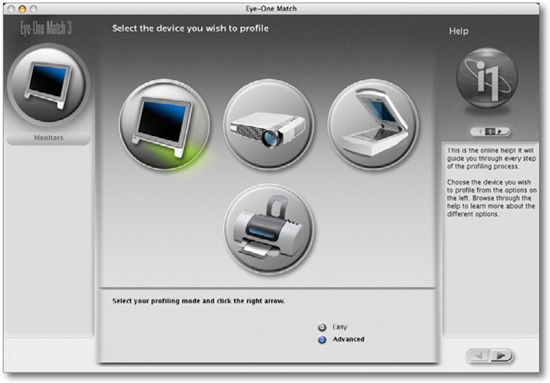
Launch Eye-One Match (EOM) and select the monitor from the list of devices you can profile. We recommend using Advanced mode.
Select the type of monitor you intend to calibrate (CRT, LCD, or notebook), then Click
 to continue.
The first task is to calibrate the sensor (not your monitor). Follow the instructions given on the screen. (Help also provides additional information.)
Select your target calibration settings. We recommend the values shown in Figure 3-18. Click
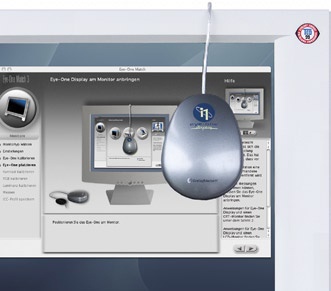
to proceed to the next step.Attach the sensor to your monitor using either the suction-cup (if calibrating a CRT) or by attaching the lead weights provided to the sensor cable and letting them dangle at the rear of your monitor. If you are calibrating an LCD, you may have to tilt the monitor back to ensure that the sensor lies flat on the screen.
Begin calibration using the your monitor’s controls (if available). Skip this step if you are calibrating a notebook or LCD without controls and continue with step 9.
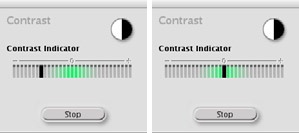
Set contrast to maximum and then slowly reduce it until the indicator lies within the green area and close to 0. The software will guide you through these steps.
If possible, place your on-screen display (OSD) menu off-center so that it doesn’t interfere with the Eye-One Match window.
Press Start to begin measuring contrast, then Stop and
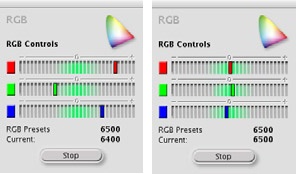
to begin calibrating the RGB controls. This step will set the control dials so that the monitor’s white point is close to the intended color temperature (6500 K or 5000 K).You can set your monitor’s white point to 6500 K by using the on-screen displays or the monitor’s RGB controls (if available). All three colored bars should lie within the green area for optimum calibration. The Eye-One Match window provides useful visual feedback during the process (Figure 3-21).
If you are using the monitor’s three RGB controls to adjust the white point, and if setting one of the individual color sliders to maximum still doesn’t produce satisfactory results, you can reduce the values of the other two sliders to help get the color balance right.
Next, set luminance using your monitor’s brightness controls. A luminance of 100–140 cd/m2 is recommended for LCD monitors. If you are calibrating a notebook display, you may have to reduce the value to 100–120 cd/m2. You will probably also have to select 100 cd/m2 for dimmer CRT monitors.
Calibration is now complete. Eye-One Match will start the actual characterization, displaying a number of color patches and measuring their values. This process lasts about 10 minutes and requires no user input.
Once characterization is finished, Eye-One Match will display the values used and a diagram of the resulting color space (Figure 3-23).


The software will prompt you for a profile name. Choose a name that reflects the tool used, the brand of monitor, and the calibration values. For example, if you are using EOM to calibrate an NEC 2180 monitor with determined values, your profile could be called “EOM-NEC2180-D65-G2.2.”. You may also want to include the date.
Eye-One Match will save the ICC profile to an appropriate folder and will immediately make it the default monitor profile. If you have Adobe Gamma installed in Windows, you should move Adobe Gamma from the startup folder to keep it from interfering with the new monitor profile when Windows starts up.
Once you have completed these profiling steps, do not change any monitor settings without re-calibrating. We recommend that you re-calibrate and re-profile LCD monitors about every four weeks. If you are using a CRT monitor, every second week is preferable.