
Selection tools are some of the most heavily used during image processing, especially when it comes to applying corrections to selected images areas. Accurate selection is a real art and can be quite time-consuming. Here, we will describe the most important selection methods and a few of the tools available for assisting the process.
Photoshop offers many ways to select image areas that go way beyond just including or excluding parts of an image. It is even possible to partially affect pixels in a selection – the corrections you then make are only applied to a predetermined degree.
A selection is really a grayscale mask with the following characteristics:[69]
What is all this good for? “Hard” edges in a selection produce abrupt, visible transitions within an image – a situation we want to avoid. Partial selection allows us to produce much softer, less visible transitions from our modified image area to our unmodified image area.
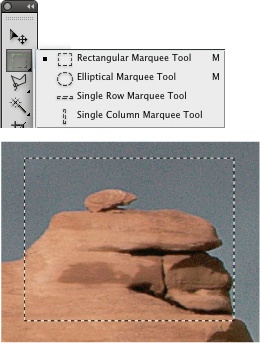
You can use the Marquee tools to select rectangles, squares, circles, and ellipses, as well as single rows or columns of pixels. The Marquee tools are often used to select image areas for cropping, copying, deleting, or selective processing.
If you want to select the entire image area for copying, it is often faster to use ![]() (Mac:
(Mac: ![]() ) instead of using the mouse to create the appropriate frame. You can just as easily deselect your selection using
) instead of using the mouse to create the appropriate frame. You can just as easily deselect your selection using ![]() (Mac:
(Mac: ![]() ) or reverse it using
) or reverse it using ![]() (Mac:
(Mac: ![]() ).
).
It is often useful to create a compound selection from multiple areas of an image. All you have to do to automatically combine selections is press the shift ![]() key between individual selections.
key between individual selections.
You can also “subtract” a new selection from an existing one using the ![]() (
(![]() ) key.
) key.
Pressing ![]() (Mac:
(Mac: ![]() ) creates the intersected selection and you can use
) creates the intersected selection and you can use ![]() to invert it (i.e., select everything that was not included in the previous selection).
to invert it (i.e., select everything that was not included in the previous selection).
The combined selection described above can also be further combined with selections made using the other tools described below.
Add: | |
Subtract: | |
Intersect: | |
Invert: | |
Deselect: | |
Soft/hard edge: | |
Select All: | |
You can give a selection a hard or a soft edge and you can round its corners using the options listed in the options bar. We will use the Lasso tool as an example.
You will use selection tools so often that you will automatically learn the necessary keystrokes. The tables in the margin on this page are designed to help you, too. The ![]() icons in the tool bar have the same effects as the listed keystrokes.
icons in the tool bar have the same effects as the listed keystrokes.
The Lasso tool is more flexible than the Rectangular Marquee tool and can be used to select almost any shape. You can then give your selection a soft edge to smooth the transitions between selections and the rest of an image. The Feather option is found in the Lasso options bar. You can close the shape you form with the Lasso by using a double click, by pressing Return ![]() , or simply by closing the shape with the Lasso line itself. The Lasso requires a little more dexterity than the Rectangular Marquee, but it’s a simpler way to select complex or asymmetric shapes. Working with the Lasso is easier if you use a graphics tablet instead of a mouse. The Lasso tool has three basic variants:
, or simply by closing the shape with the Lasso line itself. The Lasso requires a little more dexterity than the Rectangular Marquee, but it’s a simpler way to select complex or asymmetric shapes. Working with the Lasso is easier if you use a graphics tablet instead of a mouse. The Lasso tool has three basic variants:

![]() Normal Lasso • The form follows your mouse movements closely, making it simple to draw fine lines and shapes while holding down the mouse button.
Normal Lasso • The form follows your mouse movements closely, making it simple to draw fine lines and shapes while holding down the mouse button.
![]() Polygonal Lasso • Mouse clicks define the corners of a polygon. This is a very quick way to mirror straight edges in an image.
Polygonal Lasso • Mouse clicks define the corners of a polygon. This is a very quick way to mirror straight edges in an image.
![]() Magnetic Lasso • This version functions the same way as the normal Lasso, but it has an additional built-in functionality that automatically looks for areas of contrast and color transitions near the cursor position, and leads the mouse accordingly. To change direction, click to create a corner and move on. Clicking while pressing the shift
Magnetic Lasso • This version functions the same way as the normal Lasso, but it has an additional built-in functionality that automatically looks for areas of contrast and color transitions near the cursor position, and leads the mouse accordingly. To change direction, click to create a corner and move on. Clicking while pressing the shift ![]() key draws a straight line between the last corner and the current cursor position.
key draws a straight line between the last corner and the current cursor position.
You can select the width of the soft edge in the Lasso options bar. The Anti-alias option rounds off the transitions between the selection and the rest of the image when using normal or polygonal Lassos. All Lassos include the Refine Edge button that opens the dialog shown in Figure 4-52. Here, you can adjust not only the width of your soft edge, but also round your edge and adjust its radius and contrast, as well as expanding or contracting the entire selection.

The ![]() icons at the bottom of the CS4 dialog allow you to select various views of your selection: e.g., as a mask within the image, or as a free-standing selection with the rest of the image faded out. Try them all out. CS5 has its own View menu to perform the same function. Use the zoom tool
icons at the bottom of the CS4 dialog allow you to select various views of your selection: e.g., as a mask within the image, or as a free-standing selection with the rest of the image faded out. Try them all out. CS5 has its own View menu to perform the same function. Use the zoom tool ![]() help check your selection. More details on this dialog can be found in Understanding Layer Masks.
help check your selection. More details on this dialog can be found in Understanding Layer Masks.
The Refine Edge function is also available with the Rectangular and Elliptical Marquee tools.
![]() The Magic Wand is another useful selection tool. Here, all pixels of a similar color that are near the cursor are selected when the wand is clicked. The degree of similarity between the selected pixels is determined by the Tolerance parameter in the options bar. The higher the Tolerance value, the more the color of the selected pixels can vary from that of the pixel you have clicked.
The Magic Wand is another useful selection tool. Here, all pixels of a similar color that are near the cursor are selected when the wand is clicked. The degree of similarity between the selected pixels is determined by the Tolerance parameter in the options bar. The higher the Tolerance value, the more the color of the selected pixels can vary from that of the pixel you have clicked.
It’s usually better to work with a low tolerance value and to expand your selection by making multiple small selections while keeping the shift key pressed. This way, you can accurately select all similarly colored areas. If you deactivate the Contiguous option, all areas of similar color in the entire image are selected. You can reset your selection using ![]() if you need to start again using a different Tolerance value.
if you need to start again using a different Tolerance value.

We will address the Sample All Layers option in Your First Layer, as it only applies to corrections based on multiple image layers.
![]() This tool is a further development of the Magic Wand introduced with Photoshop CS3. It works as if it were a selection brush that automatically finds the edges of the selected area. Selected areas can be subtracted or added using the same
This tool is a further development of the Magic Wand introduced with Photoshop CS3. It works as if it were a selection brush that automatically finds the edges of the selected area. Selected areas can be subtracted or added using the same ![]() and
and ![]() keys as the other selection tools. This is often the quickest tool to use for color gradients and soft transitions. The choices in the options bar are self-explanatory.
keys as the other selection tools. This is often the quickest tool to use for color gradients and soft transitions. The choices in the options bar are self-explanatory.
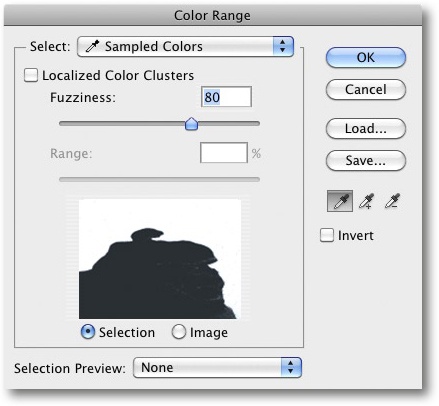
We often use the Eyedropper ![]() tool under Select ▸ Color Range to sample a color in the original image, and the Fuzziness slider to determine the degree of color precision.
tool under Select ▸ Color Range to sample a color in the original image, and the Fuzziness slider to determine the degree of color precision.
We then use the Eyedropper ![]() to add or
to add or ![]() to subtract additional selections. We will explain Localized Color Clusters (only available since CS4) in Understanding Layer Masks.
to subtract additional selections. We will explain Localized Color Clusters (only available since CS4) in Understanding Layer Masks.
The dialog previews the selected area in the form of a grayscale mask preview. The Selection Preview drop-down menu offers various ways to preview your selection in the original image. We use either None (no marking in the original) or Quick Mask, which marks the selection with the active mask color. The default color is a strong pink tone, but this can be changed in the Photoshop Preferences dialog.
If you save your selection in an alpha channel and want to retain it for future use, you must use a file format that supports Alpha Channels (see Table 4-1).
Here too, you can save your parameter settings and re-use them on other images later.
As already mentioned, many selections can be fine-tuned using the Feather option either in the tool’s options bar (Figure 4-56) or by using the Select ▸ Refine Edge function. Depending on the image resolution and the nature of the selection, an edge width of two to four pixels is often sufficient to produce a soft edge effect. We have been known to use values as large as 100 or 150 pixels. The greater the image resolution, the higher this value can be.

It is often easier to select the area you don’t want to process or copy and then invert your selection. Most selection tools allow you to do this using Select ▸ Inverse or ![]() (Mac:
(Mac: ![]() ).
).
You can also use selection tools to create a border around your image. First, select the entire image using ![]() and then select your border using Select ▸ Modify ▸ Border. You can select the width of your border before deleting it and filling the space left over with the color or pattern of your choice using the Paint Bucket
and then select your border using Select ▸ Modify ▸ Border. You can select the width of your border before deleting it and filling the space left over with the color or pattern of your choice using the Paint Bucket ![]() tool. This command is useful for creating multi-color, two-dimensional passepartouts for print purposes.
tool. This command is useful for creating multi-color, two-dimensional passepartouts for print purposes.

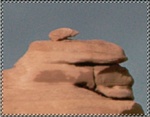
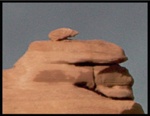
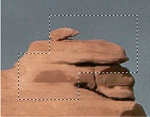
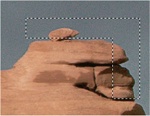
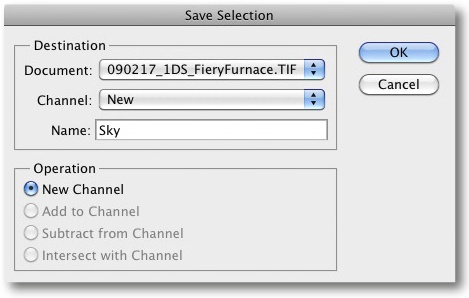
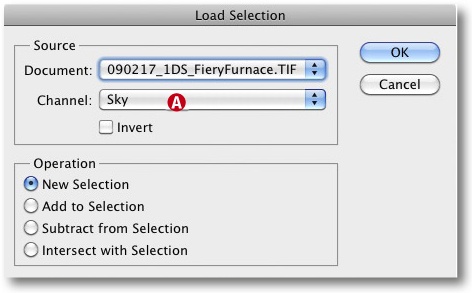
Making a complex, optimized selection can take time. It is possible that you will want to use the same selection in the future, e.g., to test a different effect on the same image area. In our example, first we wanted to reduce noise, then brighten the sky and make corrections to the rock formation (the inverted selection).
Photoshop allows you to save selections (use Select ▸ Save Selection) as part of the image data in a so-called Alpha Channel. This is usable in all future Photoshop sessions, provided your file format supports channels (e.g., TIFF or PSD; see Table 4-1). You can also save your selection in a separate file.
Saved selections are basically grayscale masks and are thus available in the Channels panel. You can also load the selection via Select ▸ Load Selection and apply it or invert it. You can use the Channel drop-down menu in the Load Selection dialog (Figure 4-60) to specify how your selection should be combined with existing selections or channels.
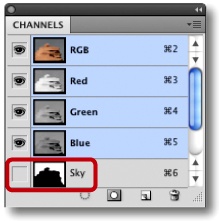
You can also load a selection using Window ▸ Channels. Select the desired channel and click on the ![]() icon at the bottom of the Channels panel to activate your selection.
icon at the bottom of the Channels panel to activate your selection.
By default, Photoshop embeds the selection in the active image, but can also save it as a separate file, which avoids having to open other (possibly large) image files in order to access a saved selection.