
Introduced in late 2005 and now available in version 3, Aperture is Apple’s “Professional Photography Application”.[91] Aperture combines a downloader, a browser, a RAW converter, an image editor, and image management functionality. The program also includes print, slideshow, Web gallery, and photo book production tools.
Aperture requires a fast CPU and a powerful graphics card to work properly. We recommend that you use either a large monitor or a dual monitor setup (Aperture has comprehensive dual monitor support).
Note
![]() A current IT trend uses the computing power of graphics cards to support CPUs when performing complex image processing operations. Adobe has followed this trend since the introduction of Photoshop CS4 and Lightroom 2. These days, a powerful graphics card is a must-have.
A current IT trend uses the computing power of graphics cards to support CPUs when performing complex image processing operations. Adobe has followed this trend since the introduction of Photoshop CS4 and Lightroom 2. These days, a powerful graphics card is a must-have.
Like all Apple software, Aperture has a clear, intuitive user interface and a few innovations of its own, making it necessary to spend some time getting used to its handling. The 700-page online manual is a great help while you are learning the program.
Aperture supports JPEG, JPEG 2000, TIFF (with certain layer and alpha channel restrictions), PSD, GIF, PNG, and a wide range of RAW formats including all the formats also supported by iPhoto and Apple Preview.[92] Adobe Lightroom and Bibble support even more RAW formats, but Apple is constantly expanding its range with regular program updates. With Aperture, RAW encoding occurs in the operating system, not in the application itself.
Like Lightroom 3, Aperture 3 can not only import RGB mode files, but also CMYK images and HD video files. The editing of CMYK files, however, is done in RGB mode (the same way Lightroom does).
Along with a high degree of integration, Aperture also offers a range of useful image management tools and views called Libraries, Projects, Folders (not the same as operating system folders), Albums, and Stacks. Unlike conventional image browsers, Aperture requires you to import images into a separate Aperture library, even if they are already stored elsewhere in your computer’s file system. They are then sorted into individual projects. You can store your actual image files in the library itself (where they can be directly accessed by other applications) or in your computer’s file system. If your images are stored in your everyday file system, your library will contain a reference to each file’s location but not the file itself.
Note
![]() If your Aperture Library should become corrupted, you can rebuild it by pressing
If your Aperture Library should become corrupted, you can rebuild it by pressing ![]() while the application is starting.
while the application is starting.
Library •. This is the Aperture database (or repository) that contains all management data relevant to your stock of images. All projects, folders, albums, masters, versions, and (optionally) image files are initially stored in a single library. The library is the core of the Aperture environment and is similar to the catalogs used by other image management programs. It is possible to create and switch between multiple libraries, although you can only search for images in the currently active library.

Figure 6-1. Aperture’s main window in Browser mode. The Library inspector pane is on the left, and the Adjustments pane in the Inspector HUD (Heads-Up Display, a separate, free flowing panel) is on the right. You can add other HUDs at any time. The loupe is used to magnify image details.
A library is treated as a single, large Mac Package file by the Macintosh Finder, and the individual elements of a library (projects, albums, folders etc.) can be viewed only by using Aperture. With a little ingenuity, you can also create libraries that are larger than a single hard disk or partition.
Project •. A project is a container for image information and (optionally) image files. An image must be imported into a project before it can be processed using Aperture. Such imported images are treated as “master” images and are themselves never modified.
You can download images directly from your camera, from a card reader, from conventional file folders, or from iPhoto albums.
Aperture also allows you to configure an external image processing program or plug-in (such as Photoshop or Nik Silver Efex Pro). If this is the case, Aperture hands over a TIFF or PSD copy of the image version or master. The resulting image is then stored as a new version. You can configure your chosen external editor in the Export section of the Preferences dialog (Aperture ▸ Preferences).
Folder •. Folders are used to enhance the structure of the images that belong to a project, and they can also contain images from other projects without copying them. Folders can also contain subfolders.
![]() Album • An Album is a collection of images with a specific purpose, such as a presentation. There are three types of albums: Standard (static) Albums
Album • An Album is a collection of images with a specific purpose, such as a presentation. There are three types of albums: Standard (static) Albums ![]() , Smart Albums
, Smart Albums ![]() (the results of a search made using specific criteria), and Light Table Albums (
(the results of a search made using specific criteria), and Light Table Albums (![]() ) that can be used to view images as you would on a traditional light table (even overlapped).
) that can be used to view images as you would on a traditional light table (even overlapped).
You can also scale images on the light table, which can be larger than your monitor – if this is the case, you have to scroll to view images outside the current monitor image. Books, Web Journals, Slideshows, and Web Pages are other special album types.
Vault •. This is where backup copies of libraries are kept. A vault has to be stored on a single disk or partition, and it can be automatically synchronized with the current library and all the projects contained within it. Vault files can then be burned to DVD for backup, restore, or transfer purposes.
Stack •. A stack is used to group (usually similar) images for subsequent selection of one or more favorites. If you close a stack, only the top image is visible, and the button indicates how many images are contained in the stack. Closed stacks help keep large projects clear and manageable.

Figure 6-2. An open stack. When a stack is closed, only the leftmost image is displayed. This thumbnail also contains a button indicating the number of images in the stack.
Stacks have an order and a top image (called the pick). You can use keyboard shortcuts to change the order of the images in a stack. The images in an open stack are displayed from left to right (i.e., from top to bottom), as shown in Figure 6-2. You can add or delete images in a stack at any time.
Aperture can be set up to automatically generate stacks – arranged according to a preset shooting interval – during image import. Multiple versions of a single image can also be stored in a stack.
Aperture classes your original image as a master image. Like most other RAW editors, Aperture performs image corrections non-destructively and saves modifications in the form of a separate parameter file.[93] The same is true for JPEG, TIFF, and all the other supported file formats. This makes it easier to save multiple versions of a single image and also saves disk space. Aperture saves corrections to its other supported image formats (JPEG, TIFF, PSD, PNG, and GIF) this way, too.
Aperture’s workflow is organized with professional photographers in mind. We recommend that you use your own file structure rather than importing your images into the Aperture library when you create a new project. Aperture’s import browser allows you to determine the location of your imported images, automatically rename your images, and create stacks. (You can individually configure the interval between images that causes a stack to be created.) You can also add general metadata to your images during import, and you can even adjust the recorded time zone if necessary. Aperture 3 allows you to import video files and automatically create backups during the import process.
Note
![]() Aperture automatically creates a library in the user’s Home folder (in the ~/Pictures/subfolder) when it is started for the first time.
Aperture automatically creates a library in the user’s Home folder (in the ~/Pictures/subfolder) when it is started for the first time.
You can then view your images and group similar ones into stacks. You can rate your images with up to five stars and also flag them as Rejected if necessary. This overall concept is virtually identical to that found in most other image browsers and all-in-one tools. Rating stars can be applied using buttons or keyboard shortcuts.
HUD = “Heads-Up Display” is a separate, free flowing panel.
You can add hierarchical lists of keywords and drag keyword entries from the keyword HUD to selected images. There are various window configurations available for viewing your images (preview image plus filmstrip, thumbnail view, single image, image comparison, full-resolution, etc.) that you can select using your keyboard.

Figure 6-3. The Aperture import browser. A large window is necessary in order to preserve an overview of all the available settings.

You can display two or more images for direct comparison and use the loupe to get a close-up view of image details. A practical addition is that the loupe size and zoom factor can be individually configured.
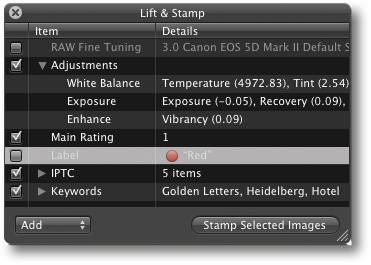
You can add IPTC data to your image in the metadata inspector pane, and you can choose between various types of metadata using the tabs at the bottom of the pane. Metadata (individual IPTC fields and general image correction data) can be copied to and from single or multiple images using the Lift ![]() and Stamp tools
and Stamp tools ![]() (Figure 6-5). You can also use the Lift & Stamp HUD to copy keywords and apply them to other images.
(Figure 6-5). You can also use the Lift & Stamp HUD to copy keywords and apply them to other images.
Aperture includes RAW conversion and image editing functionality. The loupe and multiple image view features make it simple to copy corrections from an edited reference image to other similarly exposed images using the Lift ![]() and Stamp
and Stamp ![]() tools. Images optimized in this way can also be individually fine-tuned later.
tools. Images optimized in this way can also be individually fine-tuned later.

Figure 6-6. Adjustments panel with the histogram and the seven basic adjustment panes – here, all are collapsed.
The histogram can be switched between luminance and individual or RGB color channel displays. The EXIF exposure data and the Exposure, Enhance, and Highlights & Shadows adjustment tools are located beneath the histogram display (Figure 6-6).

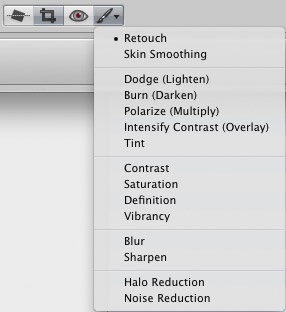
Most of Aperture’s adjustment controls are located in the Adjustments pane, where you can find seven basic adjustment types (Figure 6-6). You can add further adjustments to the list using the drop-down menu B in the adjustments inspector, or using user-configurable keyboard shortcuts (Figure 6-7). You can also delete unwanted entries from the list by selecting them and pressing ![]() . Some tools are located in the tool strip:
. Some tools are located in the tool strip: ![]() The Quick Brushes pop-up menu found under
The Quick Brushes pop-up menu found under ![]() is used for making brushed (selective) image adjustments. Aperture includes all the major adjustment tools that we like to see, and these are all available for all of the program’s supported file formats.
is used for making brushed (selective) image adjustments. Aperture includes all the major adjustment tools that we like to see, and these are all available for all of the program’s supported file formats.
The individual tools’ sliders can be shown or hidden using the ![]() button, and you can set the inspector pane to be displayed as a high-contrast HUD (with a black background) that you can position anywhere on your desktop (including on a second monitor).
button, and you can set the inspector pane to be displayed as a high-contrast HUD (with a black background) that you can position anywhere on your desktop (including on a second monitor).
The ![]() button resets an adjustment to its default values. You can use the Adjustment Action pop-up menu
button resets an adjustment to its default values. You can use the Adjustment Action pop-up menu ![]() to choose a histogram view, remove selected adjustments, and choose whether to display color and camera information below the histogram. You can also choose the type of color values and the sample size from this pop-up menu. Click
to choose a histogram view, remove selected adjustments, and choose whether to display color and camera information below the histogram. You can also choose the type of color values and the sample size from this pop-up menu. Click ![]() to temporarily deactivate an adjustment. A second click will again enable the correction. Adjustments can be saved and reapplied using the Presets menu (Figure 6-6).
to temporarily deactivate an adjustment. A second click will again enable the correction. Adjustments can be saved and reapplied using the Presets menu (Figure 6-6).

The White Balance adjustment (Figure 6-8) includes color temperature (Temp) and Tint sliders, while Exposure has sliders for adjusting Recovery, Black Point, Brightness, and overall exposure. Curves adjustments can be applied to individual or all color channels. You can use eyedroppers to set black and white points, and you can set shadow, highlight, and midtone gray points – a function that is (as yet) not available in Adobe Camera Raw 6.1 or Lightroom 3.

You can correct burned out highlights and lost shadow detail using the Levels tool (Figure 6-9). Here, you can optimize image luminance and the individual color channels.
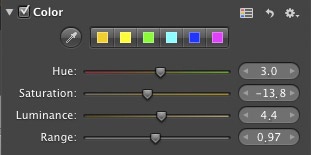
Use the eyedropper in the Color adjustment to select and optimize individual tones (Figure 6-10). Each of the six major tones has four individual sliders similar to those found in the HSL tab in ACR.
Aperture also includes basic sharpening and noise reduction controls, but these are not best-in-class. The sharpening tool has no adjustable threshold value, but it does include an edge sharpening facility. Noise reduction cannot be applied to individual color channels.
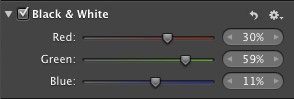
Aperture has a kind of Channel Mixer for monochrome conversions, and there are various color filters available in the Presets menu. Black-and-white RGB images can also betinted using the Color Monochrome and Sepia controls.
Aperture’s toolset is rounded out with Devignette, Moiré, and Chromatic Aberration correction tools. There are no built-in lens corrections, but these can be performed using appropriate plug-ins. Aperture also includes Crop ![]() , Straighten
, Straighten ![]() , and 90-degree Rotate
, and 90-degree Rotate ![]() tools.
tools.
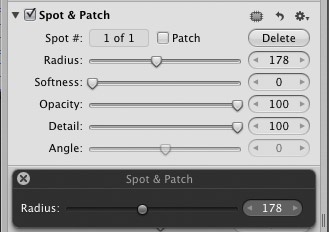
Aperture offers various approaches to making selective image adjustments. The Spot & Patch tool (used to remove spots and other flaws in a similar way to Photoshop’s Healing Brush), the retouch brush ![]() , and the Red-eye tool
, and the Red-eye tool ![]() all function non-destructively. The Stamp is useful for quickly removing small flaws caused, for example, by dust on the image sensor. You can use the Retouch brush either like Photoshop’s Clone Stamp tool to select source and target areas, or like the Healing Brush to repair small areas with similar textures.
all function non-destructively. The Stamp is useful for quickly removing small flaws caused, for example, by dust on the image sensor. You can use the Retouch brush either like Photoshop’s Clone Stamp tool to select source and target areas, or like the Healing Brush to repair small areas with similar textures.
Aperture 3 introduced other selective correction tools that function in a similar way to the Photoshop Lens Correction tool. These tools are all applied using a brush that has adjustable shape, softness, and strength.
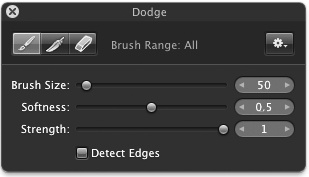
This concept is easy to learn and allows you to apply various types of local, selective adjustments selected from the Adjustments list (Figure 6-14).
Note: As with Lightroom 3, none of the currently available Aperture plug-ins is capable of performing non-destructive image adjustments.
Most functions can be undone (using the ![]() button) and redone. You can save sets of corrections for application to other images, but Aperture does not have a presets browser like the one built into Lightroom.
button) and redone. You can save sets of corrections for application to other images, but Aperture does not have a presets browser like the one built into Lightroom.
You can load images into an external application for additional editing or conversion to CMYK using the Edit with command in the context menu. Currently, only one application can be configured; we would prefer to see more.

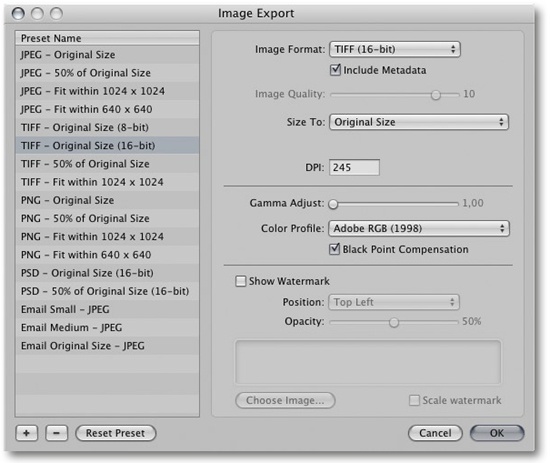
Figure 6-15. Export format and external editing applications are selected in the Export preferences dialog.
Aperture exports a copy of the selected image in a format selected in the Export preferences (File ▸ Export – see Figure 6-15). You can also select whether the original file, a copy, or just the image metadata are exported. If you export a copy, you can also select the format, file location, and naming scheme (Figure 6-16). This is also the dialog used for configuring batch conversions.
Images need to be exported for various reasons: for distribution to third parties, for printing by an external service provider, for processing in an external application, for inclusion in a slideshow, for merging into an HDR or panorama image, or for processing in a DTP application.
Remember, it is virtually impossible to access files that are stored in an Aperture library from outside Aperture, and any corrections you have made must be resampled into the image data during export so that they can be accessed by other applications. If necessary, Aperture can export entire projects.[94]
Aperture also includes slideshow, Web gallery, and print functionality. You can send your images or photo book files (created using the New ▸ Book command) to a print service directly via e-mail. Aperture includes a number of book layout presets that you can also print yourself.
Web galleries and books have their own special album types (Web Journals and Books), and we recommend that you always use these (or a regular album) for configuring complex projects. Aperture is capable of producing attractive slideshows, Web galleries, and photo books from a range of presets that you can adjust to suit your individual needs. Aperture also includes tools for uploading finished Web galleries.
Note
![]() If you want to send print jobs or photo book files directly to a print service, first make sure that your chosen provider supports the correct protocols. Otherwise, you can export your images to CD first, or transfer them to the print shop using conventional internet transfer.
If you want to send print jobs or photo book files directly to a print service, first make sure that your chosen provider supports the correct protocols. Otherwise, you can export your images to CD first, or transfer them to the print shop using conventional internet transfer.
To create a Web Journal or a Web gallery, select your images from the thumbnail view in Aperture’s main window and activate the appropriate function (found in the menu at top left: ![]() ). Images that you attach to an e-mail are automatically scaled and compressed in JPEG format. All of the output functions and layouts are highly configurable. Web Journals allow you to freely mix and layout images and text in a single document.
). Images that you attach to an e-mail are automatically scaled and compressed in JPEG format. All of the output functions and layouts are highly configurable. Web Journals allow you to freely mix and layout images and text in a single document.
Note
![]() We are happy to report that print settings can be saved as presets and reapplied to subsequent images and jobs.
We are happy to report that print settings can be saved as presets and reapplied to subsequent images and jobs.
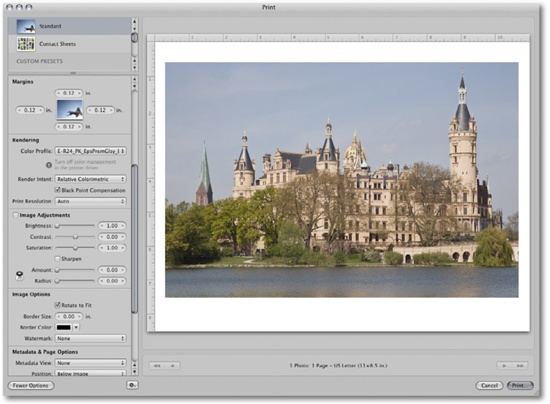
Aperture’s print dialog leaves little to be desired (Figure 6-17). You can select individual ICC profiles and rendering intents, and color management is automatically managed by Aperture (or ColorSync). You can adjust overall image brightness using a gamma value slider, and additional output sharpening is also possible. Images can be printed individually or as configurable contact sheets.
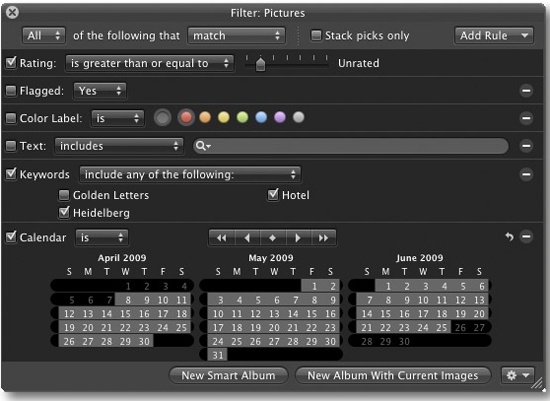
Aperture has its own Digital Asset Management (DAM) functionality built in, with highly capable search tools that are comparable with those of other quality DAM systems.[95] Aperture’s search filter works very smoothly – the filter dialog is shown in Figure 6-18 (reachable via ![]() ), complete with settings for a fairly complex search.
), complete with settings for a fairly complex search.
There are various selectable filter criteria available (Figure 6-18), but we would nevertheless like to see a broader choice. We like to be able to search for images shot with a particular lens or camera. You can also search in Aperture using Apples’s Spotlight.[96]
The results of a search are presented as a new view of the image in your library. These images can be automatically loaded into a new album or light table (or other container). Selecting the File ▸ New Smart ▸ Album command turns the new view into a dynamic view that automatically includes new images that match (or deletes images that no longer match) the selected search criteria. This is really a kind of automatic search function that automatically updates itself.
During search criteria input, only the thumbnails that match the criteria you have already typed are displayed. This view also remains locked when you close the filter dialog, which might then include fewer thumbnails than you expect. You will need to reset the search dialog to be sure that all the matching thumbnails are included in your view.
Aperture 3 introduces place names and GPS coordinates as search criteria and can display a map of existing GPS coordinates. You can even search for particular faces, and Aperture is pretty good at recognizing people once you have given a particular face a name.
Aperture includes keyboard shortcuts for most regularly used functions, and you can define your own shortcuts.[97] Very handy! It also supports tethered shooting for a number of Canon and Nikon cameras.
We would like to go into more detail on some of Aperture’s finer features (the keyboard shortcut editor, the slideshow and Web gallery settings, and the Facebook direct upload functionality, to name a few). We have hardly touched on the program’s backup systems, but space is limited in this book.
Aperture is a highly functional all-in-one photo workflow solution that is constantly being updated and improved. The application is much faster than it used to be, but still slower than we would like when processing large, high-resolution image files. Aperture 3, however, can run as a 64-bit application, making speed less of an issue.
Some of Aperture 3’s selective correction tools are easier to use and more effective than those in Lightroom 3 or Bibble 5.
The range of Aperture plug-ins is constantly expanding. Nearly all Nik Software filters, onOne Software’s FocalPoint, Tiffen’s Dfx Digital Filter Suite and DxO’s Optics Pro are all Aperture compatible. Some Aperture extensions (such as Boinx’ FotoMagico slideshow software) directly access the Aperture library. It’s a shame that Apple’s product strategy means that Aperture won’t be available for the Windows platform anytime soon.
[91] Apple also offers the simpler iPhoto photo software as part of the iLife suite.
[92] The list of RAW formats supported by Aperture can be found at: www.apple.com/aperture/specs.html
[93] Capture NX is an exception here, storing image corrections directly in the NEF image file. ACR and Lightroom do the same for DNG files. This approach has certain advantages, but it runs the risk of irretrievably damaging the original image file.
[94] If you are exporting a master, you can only define the export filename. If you export a version, you can select its format from a list of predefined or user-defined formats.
[95] Such as those included in Portfolio, Expression Media Pro, and Photoshop Elements
[96] Spotlight is the search tool built into Mac OS X.
[97] Use the Aperture ▸ Commands ▸ Customize command.