This chapter is the real core of the book. This is where we will go into more detail regarding the structure of the workflow and where we will consider what steps you will need to take to adapt the workflow to your own skills, aims, and equipment.
There is no single way to process an image, and there are various ways to perform many of the steps along the way. You will need to develop your own style, and you should periodically check to determine whether that style is still compatible with your current needs and tools.
This chapter illustrates the basic framework. The following chapters each state an aim that we will then discuss with a view to developing strategies for achieving those aims. Remember, your own personal workflow will develop with increasing experience and will change as you introduce new software, hardware and objectives into the mix.
Our cross-reference system will help you to find more detailed information on specific subjects in other chapters.
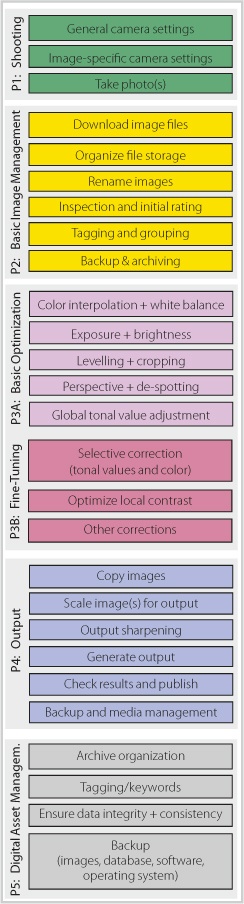
The digital photo workflow can be divided into five major phases (Figure 2-1). The transitions between phases are often flexible:
The workflow begins in the camera, before and during shooting. Composition, framing, exposure, lighting and the choice of a single or multiple exposure (for subsequent merging) all influence the type and amount of work you will have to do later. Working methodically at the shooting stage can save you a lot of unnecessary work later on.
Once you have shot your images, you will have to download and organize them. This includes naming your image files and tagging them with appropriate descriptive and technical metadata. An initial backup should also be part of this phase.
This is where we optimize our images. This can range from a quick check to hours of painstaking work, depending on the quality of the original image and its intended purpose. You will generally only perform complex optimization on a handful of images.
This phase is usually divided into two subphases: basic optimization followed by fine-tuning. Once you are happy with the general look of your image, you can perform output-specific optimization, depending on whether the image is going to be published on the Web, in a book, or as an art print. This then takes us (almost) seamlessly to the next phase.
Here is where you actually produce your output – whether you are making your own inkjet prints (not always as simple as it sounds), publishing on the Web or producing other types of output.
The finale phase, administration, is where you organize your material. We already started organizing and saving our material in phase 2, but that is not the end of the story. The new image versions and processing stages produced by the phases that followed need to be organized and saved too. Backups have to include all peripheral data and not just your image files.