
Once you start to work with layers, you won’t want to go without them when processing your images. Sometimes, however, the number of layers in an image can get out of hand. There are various Photoshop options available to help you keep your layer processes manageable:
Thumbnail size options
Layer naming (the more descriptive, the better)
Linking and grouping layers
Merging and flattening layers
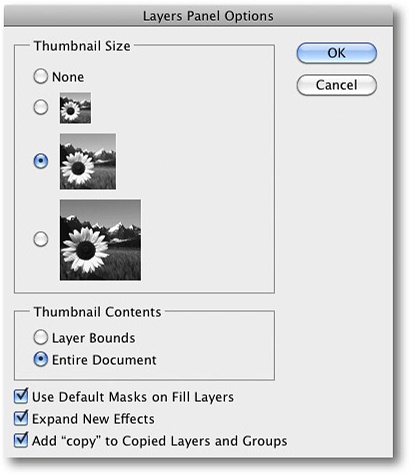
The Layers Panel Options menu at the top of the panel ![]() contains options for adjusting the layer entry thumbnail size and various other display parameters.
contains options for adjusting the layer entry thumbnail size and various other display parameters.
The more layers your image has, the smaller you need to set your thumbnails to keep an overview in the Layers panel. Figure 7-87 shows the options we usually use. You might prefer a different set.
Photoshop names new layers automatically according to a default pattern of layer types and sequential numbers. We find it useful to explicitly mention a layer’s function in its name, e.g., “Brighten” or “Increase contrast”. We sometimes even enter the filter name and the parameters we used, e.g., “USM 150/0.9/8” for a pixel layer sharpened using Unsharp Mask. This can be very useful when you are fine-tuning your images and need to adjust a layer that is way down in the stack. If you delete a layer or change its purpose, you can change its name at any time.
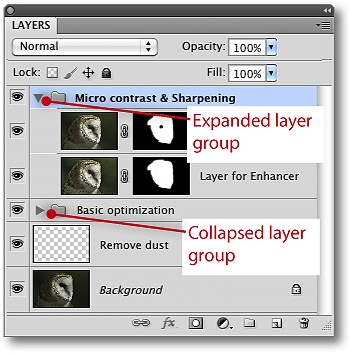
Photoshop allows you to create groups of layers that can be shown or hidden as a group. For example, if you group all processing steps associated with printing, you can hide (deactivate) the entire group if you need to prepare your image for alternative presentation (e.g., on a monitor or using a projector).
You can create a new layer group either by clicking the Create a new group button at the bottom of the layers panel (![]() ) or by selecting multiple layers (by
) or by selecting multiple layers (by ![]() -clicking their layer entries) and applying the
-clicking their layer entries) and applying the ![]() ▸ New Group from Layers command.
▸ New Group from Layers command.
Newly created layers are automatically included in the currently active layer group. Grouped layer entries are indented in the Layers panel view and can be hidden as a group by clicking the group ![]() icon. Clicking on the empty icon
icon. Clicking on the empty icon ![]() reactivates the group. You can also activate individual layers within a group.
reactivates the group. You can also activate individual layers within a group.
A group can have its own group layer mask that limits the effects of all layers in the group to the areas defined by the mask. If layers within a group have their own masks, your chosen effects will only be applied where the layer mask and the group mask intersect.
Clicking the ![]() button collapses a group in the Layers panel view and a repeat click expands the view. Groups can be deleted by dragging them to the Trash
button collapses a group in the Layers panel view and a repeat click expands the view. Groups can be deleted by dragging them to the Trash ![]() the same way as individual layers. Individual layers can be dragged from one group to any position in another group or outside a group using the mouse.
the same way as individual layers. Individual layers can be dragged from one group to any position in another group or outside a group using the mouse.
Layer groups are automatically set to the Pass Through blending mode, which means that the group has no blending properties of its own. You can, however, change this setting using the pull-down menu in the Layers panel. We recommend that you keep the default setting, as other settings can have unpredictable effects on an image.
We have already used opacity, layer masks, blending modes, and layer styles to limit the effect of image manipulations. It is also useful to be able to restrict the effect of an adjustment layer to the layer immediately beneath it, especially if the lower layer is a partial layer. As of CS4, Photoshop includes a button for doing just that ![]() at the bottom of the Adjustments panel. The following is an example of how to use it.
at the bottom of the Adjustments panel. The following is an example of how to use it.

Figure 7-89. The foreground and the background are heavily saturated due to the effect of the Hue/Saturation layer.

Figure 7-90. The Hue/Saturation effect will only be applied to the layer directly below it (Layer 1).
We cropped the foremost viola bloom in Figure 7-89 and copied it to its own layer, where we used a Hue/Saturation adjustment layer to increase color saturation. Since the increased saturation affects all lower layers, we use the ![]() button at the bottom of the Adjustments panel to clip the effect to the layer immediately beneath our adjustment layer (Figure 7-92). The uppermost layer appears indented with the
button at the bottom of the Adjustments panel to clip the effect to the layer immediately beneath our adjustment layer (Figure 7-92). The uppermost layer appears indented with the ![]() to indicate the change (Figure 7-91). A repeat click on the
to indicate the change (Figure 7-91). A repeat click on the ![]() button reverses the change.
button reverses the change.
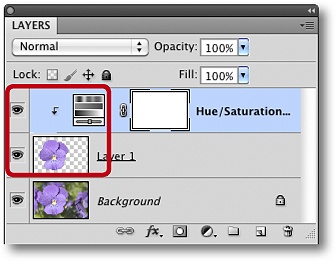
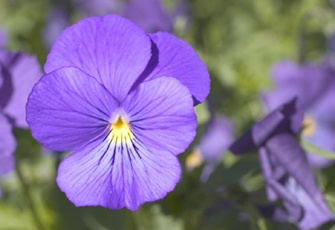
Figure 7-92. The Hue/Saturation layer only affects the next layer down, leaving the background paler.
You can achieve a similar effect by creating a layer mask from the transparent parts of the lower layer and applying it to the uppermost layer, although the final effect might not be exactly the same.
Note
![]() In order to preserve the original, non-processed image, we often begin our processing by duplicating the background layer. We do this either by selecting the background layer and pressing
In order to preserve the original, non-processed image, we often begin our processing by duplicating the background layer. We do this either by selecting the background layer and pressing ![]() (or
(or ![]() ), or by dragging the background layer to the
), or by dragging the background layer to the ![]() icon at the bottom of the Layers panel.
icon at the bottom of the Layers panel.
Large numbers of layers can slow Photoshop down, so it often helps to merge multiple layers to a single layer. Merged layers can no longer be manipulated individually, but you can merge layers selectively. Select the layer(s) you want to merge and press ![]() (Mac:
(Mac: ![]() ) or navigate to the Layer ▸ Merge Down command. Hidden layers are ignored by this function. If you want to merge all layers to the background (e.g., in order to make a copy of your image for printing or scaling), use the Layer ▸ Flatten Image command. The resulting file uses much less disk and memory space and is easier to send as an attachment.
) or navigate to the Layer ▸ Merge Down command. Hidden layers are ignored by this function. If you want to merge all layers to the background (e.g., in order to make a copy of your image for printing or scaling), use the Layer ▸ Flatten Image command. The resulting file uses much less disk and memory space and is easier to send as an attachment.
If you need to create an interim layer (for performing sharpening or Shadows/Highlights manipulations, for instance), you can use the ![]() (Mac:
(Mac: ![]() ) keystroke. This creates a layer that combines all lower layers while preserving the individual layer contents.
) keystroke. This creates a layer that combines all lower layers while preserving the individual layer contents.