All photographers know that nothing beats the right light. In our book California Earthframes[121], we had to choose from images shot in three types of light:
Midday sunlight with harsh shadows and burned-out highlights
Evening sun with better light but longer shadows
Overcast skies with flat light
We like the third alternative best. Overcast situations provide light similar to that from a good light box. Cloudy skies deliver images with flat lighting directly from our RAW converter.

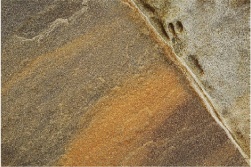
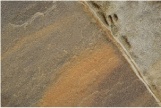
We could process these images using our RAW converter (and we sometimes do), but we prefer to do this type of work using Photoshop Layers. This enables us to reactivate and fine-tune our corrections later, if necessary. Our source image for the next example is shown in Figure 8-7.
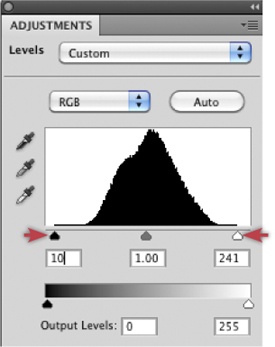
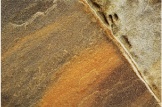
The first step often involves using a Levels adjustment layer. As you can see in Figure 8-8, we moved the white point only slightly in order to avoid making the photo too bright and to keep the whites white. The result of this adjustment is shown in Figure 8-9.
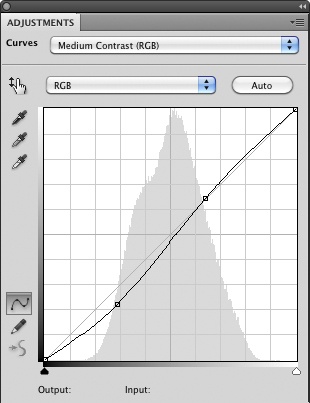
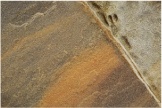
Now, we improve contrast by applying a Curves adjustment layer with a moderate S-curve. This gives us the result shown in Figure 8-11. S-curves tend to induce slight color shifts. We avoid this by changing the layer’s blend mode from Normal to Luminosity (Figure 8-13).

The difference between Figure 8-11 and Figure 8-13 is subtle but effective. The Layers stack that results from this operation is shown in Figure 8-12.
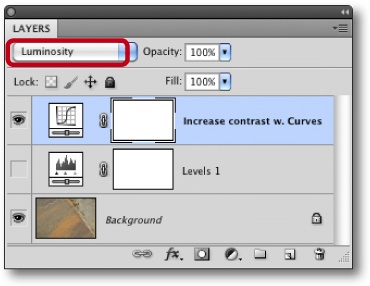
Figure 8-12. Layers panel after applying our Curves adjustment layer. We set blend mode to Luminosity.
If you still want to increase saturation and tweak contrast, there are various approaches you can take. We like a technique explained to us by Katrin Eismann, author of the book Photoshop Masking and Composition [12]. It consists of just two steps:
We create a new Curves adjustment layer (without changing any of the default Curves settings) and set blend mode to Hard Light. Our first result, shown in Figure 8-14, still displays unnatural color saturation.
We reduce the Opacity of the top layer to produce more natural-looking colors. In our example, 33% Opacity produced the result shown in Figure 8-15.
This technique can produce overly dense shadows – an issue we could address using our curve, but there is also a more elegant solution:
Open the Layer Style dialog (via ![]() ▸ Blending Options), and move the Underlying Layer slider A to the right. The settings shown in Figure 8-16 mean that pixels with luminosity values below 46 are no longer taken from the lower layer, but instead from the upper layer.
▸ Blending Options), and move the Underlying Layer slider A to the right. The settings shown in Figure 8-16 mean that pixels with luminosity values below 46 are no longer taken from the lower layer, but instead from the upper layer.
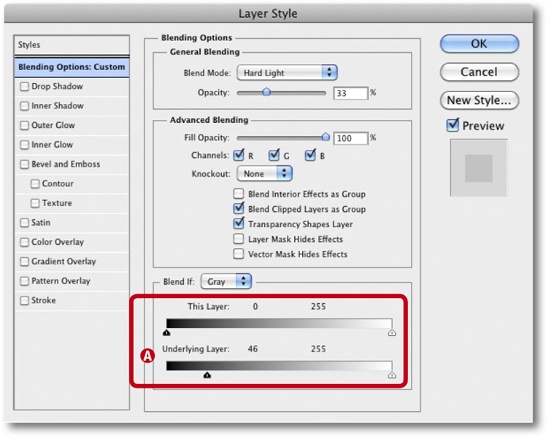
Figure 8-16. In the Layer Style dialog you can define which tonal values in the underlying layer are influenced by those in the selected layer using the sliders at A.
The result is still not quite what we want, as the transition this setting produces would be visible. If you look carefully, you will see that the slider markers are split. You can separate them by pressing the ![]() key while moving the two halves left or right (Figure 8-17).
key while moving the two halves left or right (Figure 8-17).

Figure 8-17. Separating the slider helps to produce smooth transitions. Press the ![]() key to split the slider into two.
key to split the slider into two.
Now, all shadows with luminosity values below 40 are protected from our Hard Light adjustment layer, and there is a smooth transition zone up to a value of 85. The layer effect is fully visible at luminosity values above 85. These values belong to the general luminosity scale from 0 to 255.
You can achieve a similar effect using the Soft Light blend mode. This makes the final effect a little less dramatic, as you can see in Figure 8-18.
Be careful not to make your photos too dramatic-looking. Contrast that is increased using higher saturation settings can make your images look flat. Nowadays, we are bombarded with large numbers of oversaturated photos. Some critics call this type of saturation the “Heavy Metal” of digital photography.

Figure 8-19 once again shows the original image, and the result of the adjustments described above using the Soft Light blending mode is shown in Figure 8-20. The opacity in Figure 8-20 was reduced to 60%.