
All of the RAW converters listed here edit non-destructively. This means that they do not alter the original image file, but instead store changes made to the image in a separate file or in a database for all managed images (or both).[73] This not only preserves the original data, but also makes it simple to produce a new version of an image for processing. This is an important aspect of working with RAW image files, and the principle has now been adopted by some image processing programs for other file formats. Most of the RAW converters mentioned here can also process JPEG and TIFF files non-destructively.
The additional settings files are very small – typically between 5 and 15 kB per image or image version – and can thus be used to save multiple versions of a single image using very little disk space. This capability has been turned into an explicit feature in some programs – Lightroom calls image versions stored this way virtual copies and Capture NX simply calls them versions.
However, non-destructive editing does have its limits. It is not easy to permanently incorporate copyright information or other metadata into a RAW image file, and some RAW converters simply aren’t capable of writing additional data to RAW files. In this case, additional data ends up in the file’s separate “sidecar” parameter file. Apart from sharpening tools, RAW converters seldom include correction tools (such as Photoshop’s Shadows/Highlights command) that alter multiple, neighboring pixels. Recent changes in Aperture, Lightroom, Bibble, and other converters lead us to think that this situation will change fairly soon.
RAW conversion processes are largely divided into two different approaches, both of which have their followers:
Simple conversion with only a few additional processing steps
Here, the RAW converter converts an image to its processing format, interpolates the RGB pixel values, adjusts exposure and white balance, and possibly reduces image noise, vignetting and chromatic aberrations. All other processing steps are then performed either manually or using the tools, actions, plug-ins, and filters built into your preferred image processing program (e.g., Photoshop).
Complete conversion and processing in the RAW converter
Here, the user attempts to perform RAW conversion and as many of the corrections listed above using one and the same program. Photoshop (or other programs) are only used for a few fine-tuning steps. This approach is continually gaining new fans as RAW converters add new image editing functions and tools.
Of course, compromises are possible. The actual steps you perform using your RAW converter depend on the nature of the image you are processing and on whether you are processing a single image in detail or a batch of images with similar settings. If you are processing 8-bit images using Photoshop, we recommend that you make your more important, global corrections using your RAW converter, as 16-bit processing leads to less image quality loss than subsequent 8-bit processing[74].
The term linear conversion has become the norm for describing pure RAW conversion. We don’t see the need for this type of conversion in everyday photographic situations, but every RAW converter nevertheless has to be able to perform it internally.

A linear conversion converts the manufacturer/camera-specific RAW image data into RGB pixel data and alters the white balance and EV (Exposure Value) settings if necessary.
The result of a linear conversion is usually a very dark-looking image (Figure 5-4), but this is the way all(!) interpolated RAW images look when the Bayer pattern has just been demosaiced.
In order to make such an image usable (Figure 5-6), a tone curve like the one shown in Figure 5-5 is applied. This is not the type of curve you would apply under normal circumstances, but it is the right one to use here. Such a curve can be adjusted to suit individual cameras and situations, but the basic form remains the same.


Let’s first take a look at the fundamental aspects of RAW conversion.
This is the single most important step in the RAW conversion process for cameras that work on the Bayer pattern principle.[75] With only few exceptions, this means all digital cameras. The Foveon sensors used in Sigma SD series DSLRs capture three colors of image data per pixel. There are large numbers of demosaicing algorithms available for interpolating Bayer pattern image data, and they produce results of widely differing quality. Generally, algorithm quality – and consequently image quality – is constantly improving.
The balancing act between preserving image detail and reducing noise is a difficult one, and no single RAW converter has the ideal solution. We are prepared to let fine details go for the sake of producing clean, sharp images shot at moderate ISO speeds. Most RAW converters on today’s market are capable of producing acceptable results.
RAW converters generally include usable generic camera profiles for all supported camera models. Camera profiles (Creating Device Profiles) describe the individual color characteristics of a camera. The most precisely formulated camera profiles do not necessarily produce the best images, and the newest versions of ACR have several profiles for each supported camera model – including one that simulates each manufacturer’s own JPEG output.
A good tone curve will brighten shadow detail without sacrificing too much contrast or making shadow noise too obvious.
Some RAW converters allow you to add your own profiles or edit the ones they supply. Generating camera profiles requires additional software and a lot of know-how.
Note
![]() Capture One and RAW Developer support the use of custom camera profiles. Our book [25] describes how to generate camera profiles.
Capture One and RAW Developer support the use of custom camera profiles. Our book [25] describes how to generate camera profiles.
There are two basic schools of thought regarding the use of camera profiles:
Generalists believe that generic profiles produce adequate results.
Perfectionists claim that you can only produce really great results using individually generated, camera-specific profiles.
We usually use the generic profiles supplied with our software, and we expect future versions of the programs we use to include profiles that are tailored to specific shooting situations. Generating custom profiles is complex, time-consuming, and usually not worth the effort, even for professional photographers. Adobe’s DNG Profile Editor [31] is designed to make generating and editing camera profiles for ACR and Lightroom simpler, and it is available for free download at the Adobe website.
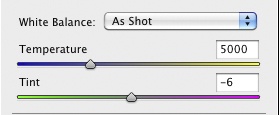
Suitable white balance settings are critical to the RAW conversion process. There are four basic ways to set white balance:
Using software sliders, usually based on a predefined base values and color temperatures (Figure 5-8)
By gray balancing a neutral gray-colored area. This can usually be selected using an eyedropper tool. Examples of this method follow later in the chapter.
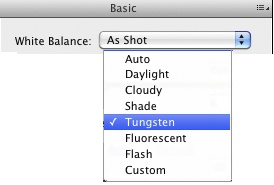
Using presets that relate to typical lighting situations (Figure 5-10).
Using the Auto WB function of the RAW editor (we usually avoid this)


Setting white balance is not a trivial task, and a good RAW converter will update all changes to the preview image in real time.
Correct exposure is vital in a digital image, so an essential part of a RAW converter’s toolset is a histogram display that can show under- and overexposure warnings in all three color channels. Overexposure is much harder to correct than underexposure, so burned-out highlight detail is usually irretrievably lost. Expose carefully, and avoid overexposure at all costs. All of the RAW converters we use have functional exposure correction tools.
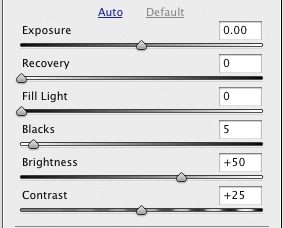
You can see in Figure 5-11 that ACR’s exposure sliders are arranged in a logical sequence that we usually follow when adjusting our images. We hardly ever adjust contrast here. We use the Exposure and Recovery sliders to set the white point and Blacks (also available Lightroom) to set the black point for our image. Recovery and Fill Light sliders are generally a standard RAW converter feature, even if they have slightly different names from program to program. Recovery tools are designed to recover burned-out highlight detail as far as is possible. Fill Light brightens shadows selectively without lightening highlights and midtones. We generally reduce the Blacks value before making Fill Light adjustments.
One of the RAW format’s major advantages is that you can often rescue slightly under- or overexposed images using the Exposure, Brightness, and Recovery sliders. While Brightness slider settings affect the whole image, Recovery only darkens the highlights. Play with both sliders to see what results you get.
The degree to which you can recover overexposed image areas depends on your camera, how powerful your converter’s tools are and the nature of the overexposure itself. High-end cameras often have a whole f-stop exposure reserve, or even 1.5 stops if only a single color channel is overexposed.
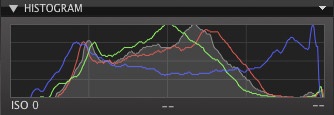
The left-hand histogram in Figure 5-12 shows a strongly overexposed image shot using the default camera settings. The right-hand histogram shows a better exposure curve that we produced by reducing the Exposure value by 0.41 and adding a Recovery value of 37 (in Lightroom). The image is rescued – if this had been a JPEG image, we wouldn’t have been able to alter the burned-out highlights.
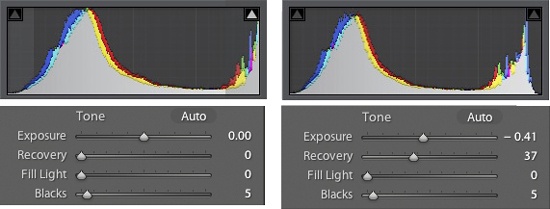
Figure 5-12. The burned-out highlights in the left-hand histogram were eliminated using the Lightroom Recovery and Exposure sliders-
Most RAW converters include under- and overexposure warning functionality, allowing you to directly optimize exposure without risking additional color clipping. Activate the exposure warning and keep a careful eye on the image preview while you adjust your sliders. If you want to process an image later using Photoshop, be careful not to set restrictive black and white points – always leave some adjustment leeway at both ends of the histogram curve.
In order to judge exposure and white balance correctly, a RAW converter’s histogram needs to include individual red, green, and blue color channel displays that can be shown separately or simultaneously. The ACR histogram display includes two triangle icons at top left and top right that indicate when shadow and highlight clipping is present. The display also includes basic exposure data and the RGB value at the current cursor position. ACR and Lightroom allow you to set the image black and white points directly in the histogram window, should you feel this is necessary.
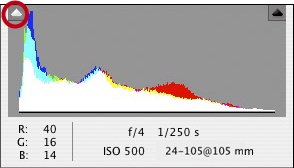
Figure 5-14. An ACR histogram. The non-black triangle at top left indicates that the image has clipped shadows.
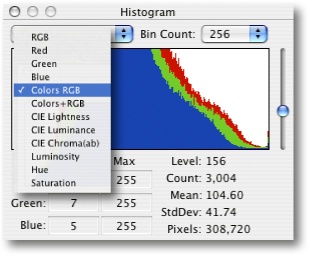
RAW Developer [45] has particularly extensive built-in histogram functionality that includes a tool for adjusting the vertical scale of the histogram display (Figure 5-15).
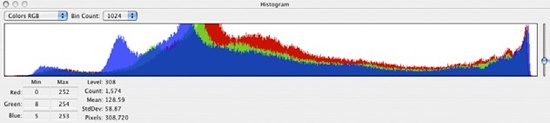
This makes it easier to identify smaller burned-out highlight details. The RD histogram can also be “stretched” in order to make judging the shadow and highlight ends of the curve easier (Figure 5-16).
The Capture One and RAW Developer histograms can be displayed as simple line curves, rather than as filled in curves, which can help you to judge finer exposure details.
RAW image noise should be reduced as soon as possible in the workflow (i.e., using your RAW converter) before it can be intensified by other correction steps. Although the quality of noise reduction offered by Photoshop plug-ins such as Noise Ninja [80] or Dfine [75] is better than that provided by most RAW converters, performing slight noise reduction early on in the workflow still helps to produce better overall results.
Some noise reduction algorithms are based on ISO and camera model EXIF data. Bibble has Noise Ninja’s excellent noise reduction functionality built in. The quality of the noise reduction tools built into RAW converters is improving rapidly.
Reducing image noise usually reduces overall image sharpness (to some extent), resulting in close interaction between sharpening and noise reduction processes.
Noise reduction and artifact removal are often lumped together as similar phenomena. The truth of the matter is:
Image noise is caused during image capture by the image sensor, and is more pronounced in shadow areas.
Image artifacts are caused by color limitations in the image sensor’s Bayer pattern and the subsequent in-camera color interpolation. Other artifacts can also be produced by oversharpening.
It is often difficult (or even impossible) to remove moiré effects using a RAW converter, so we often resort to using Photoshop instead (Removing Moiré Effects). It is best to remove other lens-based artifacts, such as chromatic aberrations and vignetting, at the RAW conversion stage. ACR, Adobe Lightroom, Capture One, and Nikon Capture NX are all strong in this area. Lightroom and ACR even have separate Luminance Noise, Color Noise, Chromatic Aberration, and Defringe tools (Figure 5-18). The latter is used to remove blooming effects caused by sensor elements overloading at high-contrast edges.
You can also reduce moiré effects in ACR and Lightroom by using the Adjustment Brush with a negative Clarity value. Capture One has its own dedicated moiré reduction tool.

We consider the following features essential in a good RAW converter:
The better the interaction between the software and the user, the better the results a RAW converter will produce. All of the tools listed here have fast-reacting, interactive user interfaces. Non-modal processes (Non-modal Editing), as offered by Lightroom, ACR, and LightZone, are an advantage. Nikon Capture, for example, requires you to close one dialog before opening another. This is time-consuming and sometimes annoying, and makes this otherwise powerful tool less popular in some circles.
All of the RAW converters we describe have full color management support. This includes:
Support for monitor ICC profiles for preview images. A RAW converter should be capable of automatically loading the monitor profile installed in the system preferences.
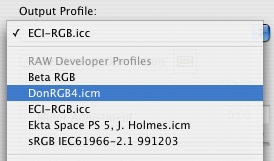
Support for embedding ICC profiles in output files. The minimum requirement should be a choice of sRGB, Adobe RGB (1998), and ProPhoto RGB target profiles. For output, the application either embeds the user-defined profile in the image file or converts the image to one of the other available profiles. The number of available output profiles varies widely from program to program, but ideally, your converter will support all color spaces installed on your host system.
Nearly all RAW converters include browser functionality for viewing RAW image files before they are converted. Photoshop, Bridge, and ACR form a complete RAW processing toolset (The Influence of Individual Tools on the Workflow) in which ACR generates the preview images that are displayed in Bridge. If necessary, Bridge can be set up to display only RAW images. RAW browsers are also useful for transferring selected conversion settings from RAW-edited image files to other, similarly exposed images.

RAW Developer, Apple Aperture, Lightroom, and Capture NX allow you to view and compare images side by side, and others are sure to add similar functionality soon. A loupe function is nowadays a standard feature, helping you to view image details without changing magnification of the entire preview. Bridge introduced a loupe function in version CS5 (Figure 5-20), and Apple Aperture has the best implementation of this feature that we have seen so far.
Typical Preview thumbnails are not large enough to allow you to judge the quality of an image. You need a larger preview window in order to correctly judge image sharpness, contrast, saturation, and color. ACR/Bridge, Capture One, RD, and several other programs provide preview images that are large enough so you can make an initial judgement regarding the quality of your images. Preview images should have at least the same resolution as your monitor.
A real-time preview of image corrections saves time during the workflow, but large preview images do use more disk space. You can set your program preferences to delete preview images after a certain period of time, but saving preview images permanently saves time and improves overall performance. Preview images are usually saved in a compressed JPEG format. Deleted preview images have to be regenerated from RAW image files, which takes time and requires a lot of computing power for large collections of images.
Quality RAW converters allow you to save your conversion or adjustment settings in order to apply them to other images.
The programs listed in this book all allow you to cut and paste selected settings from one image to another (with varying degrees of simplicity). All-in-one tools also allow you to apply RAW image settings to images saved in other formats. Some programs include functionality for cutting and pasting metadata and keywords, which saves time when you are cataloging your stock of images.
Selective corrections – such as creative sharpening or brightening of shadow areas – can be applied using very little disk space in a RAW converter. Removing blemishes caused by dust particles on the image sensor by copying neighboring pixels is a selective correction that we apply regularly. Because these types of corrections are applied non-destructively using parameters that are saved separately from the image data, they are easy to save and apply to other images, too. (If there are dust particles on your image sensor, they will probably be visible in all the images from a particular shoot.) You can then fine-tune each image separately if the transferred settings don’t suit your other images.
Aperture, Lightroom, ACR, LightZone, Nikon Capture NX, and most other up-to-date RAW editors allow you to simply retouch small blemishes using brush tools or soft-edged, lasso-style selections.
These types of correction require a lot of computing power in order to refresh image previews in real time. If you can’t immediately see the effects of your corrections, you will tend to over-correct, which is frustrating and time-consuming. So, be patient when performing image corrections. Photoshop Layers techniques (Chapter 7) are one way of working around such limitations. As computing power increases, future RAW converters are sure to include increasingly complex correction tools.
Many jobs produce sequences of images that require the same white balance and exposure settings (and similar corrections). In such cases, batch conversion can save time and effort. The very simplest approach is to convert all images in a shoot to TIFFs or JPEGs using your RAW converter’s default settings. A more advanced approach is to correct a prototype image of a sequence, apply its settings to all the other images, and finally batch-convert them.
Batch processes usually run in the background, but nevertheless can use up a lot of computing power. If you are using a laptop or other less powerful computer, it is better to run batch processes once you have finished making other, processor-hungry corrections. RAW Developer has specific settings for controlling batch processes, but these are not yet available in ACR. We often need to produce multiple versions of an image in different formats or resolutions during conversion – functionality that is supported by Capture One, Bibble, and Capture NX as part of the batch conversion settings.
All-in-one tools generally leave RAW images in RAW format, and applying settings from other images only involves a set of previously saved parameters – a process that doesn’t cost too much processing power. Image export is a CPU-hungry process and should therefore be set up either as a background process or as a set of parallel processes. For this reason, most all-in-one programs farm out batch processes to their export modules.
A powerful print module is an essential part of any all-in-one workflow tool. Whether you use your RAW converter for making anything more complex than a test print depends on the way you work. Most high-end prints that you want to optimize and add a frame or a signature will require you to use Photoshop or some other high-end image processor. With the exception of Lightroom and Aperture, we only make prints in Photoshop or a specialized print application or RIP (RIP, see Specialty Printing Software and RIPs).
We consider the degree to which we can integrate a RAW converter into our workflow critical to its value. This view is, of course, subjective, but we consider Capture One Pro (with its fast, real time preview and background processing support) to be the best currently available converter. ACR’s integration with Photoshop and Bridge makes it a powerful tool too. RAW Developer is our current favorite among Mac-based converters.
Most of today’s RAW converters and browser tools with RAW support (such as Photo Mechanic, Breeze, Extensis Portfolio, iMatch, and Phase One’s Expression Media DAM systems) allow you to preview RAW images before you convert them. All-in-one tools offer the best integration of image browsers and databases.
We would like to see better image management integration for RAW converters and functionality that logically groups image versions that only differ from each other in respect to their current adjustment state. (Deleting an image version does not and must not delete the associated original!)
Since early 2006, nearly all new notebook and desktop computers are equipped with multi-core processors (and sometimes even with multiple processors). Multi-core processors counteract the endless spiral of ever-increasing processor speeds and the associated increased heat generation. Multi-core processors are an advantage for performing CPU-hungry image processing tasks. Provided that your RAW converter and your image processing software are capable of taking full advantage of the new technology, multi-core processors refresh preview images faster and allow you to process images while others are still being imported in the background.
Note
![]() Photoshop has supported some multi-core processors since the release of CS. Lightroom uses separate processes for importing and exporting images, and for generating image previews – an indicator in the main program window then tells you which background processes are currently in progress. We would like to see more multiprocessors support in future.
Photoshop has supported some multi-core processors since the release of CS. Lightroom uses separate processes for importing and exporting images, and for generating image previews – an indicator in the main program window then tells you which background processes are currently in progress. We would like to see more multiprocessors support in future.
Multi-core support also makes other background processes (such as RAW conversion itself) faster without limiting overall processing power. Multi-core processors make image correction processes perceptibly faster. Capture NX and Canon Digital Photo Professional do not yet support multi-core processors and are relatively slow as a result. But Lightroom and Aperture still have room to improve in this respect – here, too, we hope that future releases will address these issues.
The auto functions built into many of today’s RAW converters have advantages and disadvantages, but we generally avoid using them.
The main advantage is that auto settings quickly produce generally usable images that you can either apply directly or as a basis for further corrections.
The disadvantage is that the algorithms that drive auto functions cannot be adjusted and sometimes produce results that don’t suit the image purpose at all. For this reason, we usually deactivate ACR’s auto correct functionality (Figure 5-28).

Many of the correction tools that used to be the exclusive preserve of Photoshop or image processing plug-ins are now an integral part of today’s RAW converters. You will have to decide for yourself whether these are useful to your own personal workflow, but you can always simply ignore them if they are not what you need. If you intend to convert your RAW images to 8-bit JPEG rather than to 16-bit TIFF, editing the RAW version will usually lead to less image quality loss than if you correct your JPEGs later.
Image versions and snapshots •. You will often want to try out different conversion settings or work on multiple versions of the same image. Only a few RAW converters offer versioning functionality, among them Nikon Capture NX, Aperture, Lightroom, and Bibble 5. Lightroom addresses this issue with its elegant virtual copy system. Here, the original image remains untouched, and each copy consists of an additional set of separately stored correction and settings parameters.
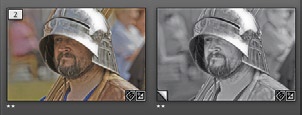
Figure 5-23. Two versions of an image. The image file itself is only present once, but it has two stored sets of correction parameters. These are Lightroom preview thumbnails.
The Photoshop snapshot system makes a temporary copy of a particular image state that you can then recall at any time during a session. Lightroom, LightZone, ACR, and Capture NX have similar functions.
Some converters allow you to step back through the corrections you have made (usually using ![]() ).
).
Image upsizing •. If you want to print your images in large formats, enlarging (or upsizing) them at the conversion stage often produces better results than subsequent enlarging. Some RAW converters have upsizing functionality built into their conversion processes – Adobe Camera Raw and RAW Developer both produce very good upsizing results.
Cropping and rotating •. Cropping an image at the conversion stage produces a smaller image file that is then easier to handle during subsequent correction processes. All RAW converters have crop and rotate tools.
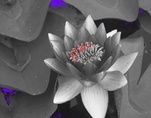
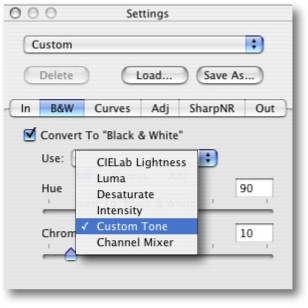
Black-and-white conversion •. We love monochrome images, but we always shoot them in color, even if our camera has a dedicated black-and-white shooting mode. Most RAW converters have built-in monochrome conversion functionality, and ACR and Lightroom have the best of the bunch. RAW Developer includes a total of six different black-and-white conversion variants. Black-and-white RAW conversion is discussed in more detail in Black-and-White Conversion Using a RAW Editor.
Tone curves •. RAW converters often include tone curve functionality like that found in Photoshop. This often includes a range of preset curves with a more or less pronounced S-curve for adjusting midtone contrast.
Using Color Samplers •. It is very useful to see the effect of a particular color adjustment on other colors in an image. ACR allows you to place up to nine color samplers in a preview image, whose RGB values are then displayed and adjusted in real time.

Adaptive tonal value adjustments •. Tone curves are not always the most intuitive method for making selective tonal adjustments. Adaptive tools (similar to the Photoshop Shadows/highlights tool) that take neighboring pixels into account are often easier to use. The Fill Light and Recovery sliders found in ACR, Lightroom, and most other converters are good examples of easy-to-apply adjustments.
Lens corrections •. Even the best photographic lenses produce visible optical errors. You can correct them using your RAW converter or later in Photoshop. These errors include:
Vignetting (darkened image edges)
Distortion (usually in “barrel” or “pincushion” form)[76]
Chromatic aberrations
Perspective distortion due to acute shooting angles or ultra-wide-angle (or fisheye) lenses
The decision regarding what to correct and where depends on the availability and quality of the tools at your disposal. Built-in, profile-based lens correction tools are still rare in RAW converters.
Note
![]() DxO Optics Pro [68] is a highly specialized lens correction program that includes a good quality RAW converter.
DxO Optics Pro [68] is a highly specialized lens correction program that includes a good quality RAW converter.
The program is based on specially generated camera/lens profiles and corrects perspective distortion cleanly and effectively. Silkypix also includes perspective distortion correction tools.
Vignetting is seldom a critical factor with our own lenses, but where it is present, we perform the basic correction for this and chromatic aberrations using our RAW converter. We then perform other, finer corrections using Photoshop or specialized plug-ins.
The range of correction tools available in RAW converters is continually expanding to meet demand. The most flexibility is required if you want to produce finished images for Web, slideshow, or print output directly in an all-in-one environment. The advantages of all-in-one tools are non-destructive image editing, effective use of disk space, and the fact that you don’t have to switch programs to complete image processing. Most all-in-one implementations are not as intuitive as Photoshop layers and masks -at least, not for those of us who are used to the “old way” of doing things.
Note
![]() Selective corrections and sharpening require a lot of computing power in order to function smoothly and produce real time preview updates.
Selective corrections and sharpening require a lot of computing power in order to function smoothly and produce real time preview updates.
We would still like to see better integration of panorama and HDR tools into the workflow. Lightroom and Photoshop are made by the same manufacturer, and as a consequence, the newest versions are increasingly well integrated concerning the HDRI and panorama functions of Photoshop.
Multiple monitor support •. Multiple monitor setups are the norm on most professional and semi-professional digital photographic desktops. Most image browsers allow you to place the preview window on your main monitor while placing your tool panels and other settings windows on a secondary screen. RAW converters are still not as capable, mostly offering single-screen solutions like the one found in ACR. Aperture, Bibble 5, Lightroom, and Capture One allow you to place the preview window on a second monitor, while Aperture and SilkyPix allow you to place the tool panels elsewhere on the desktop. RAW Developer, Bibble, and Capture NX are full-fledged multi-monitor applications. Again, we hope that future versions will introduce improvements in this arena.
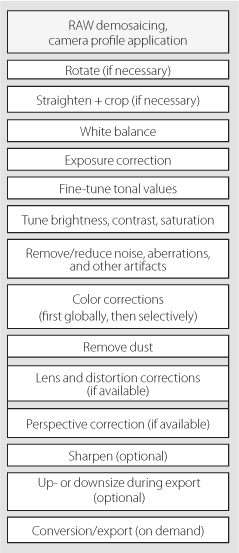
Figure 5-26 illustrates the basic corrections, steps, and settings involved in the RAW conversion process. The sequence is not set in stone and can be varied to suit the image(s) being processed. The demosaicing step is only included for completeness’ sake, as it happens automatically and doesn’t involve any user intervention.
The “correct” sequence for straightening and correcting white balance or exposure is widely debated. We prefer to straighten and crop our images first, as this often eliminates image areas that no longer need to be corrected. If a strong exposure correction is required, we often perform a preliminary correction in order to gain a better overall impression of our image before we adjust white balance.
Most RAW converters perform automatic compensatory sharpening in order to give the user an idea of the “real” look of an image. If your converter doesn’t sharpen automatically, you may have to bring the sharpening step forward in the conversion sequence.
The sequence illustrated in Figure 5-26 doesn’t completely account for the selective corrections that are becoming increasingly available in RAW converters. For example, if we are processing an image that includes an overexposed sky, we use ACR or Lightroom to add a graduated filter relatively early in the workflow. We then perform all our other adjustments on the corrected version of the image.
We only perform the final sharpening, scaling, and conversion/export steps when we are sure that we don’t want to make any further adjustments (e.g., in Photoshop or LightZone). If you use an all-in-one program, these steps usually don’t apply, as you simply leave your image files and their accompanying corrections and settings in their native RAW format and only convert (render) images on demand, e.g., to work on them in Photoshop, to pass them on to another application, to print them outside the all-in-one application or to pass them on to another user or customer.
Non-modal application architecture (as explained in Non-modal Editing) helps to keep the workflow smooth if we need to switch between multiple image versions or states during complex editing processes.
[73] Some converters now store metadata and correction parameters directly in the RAW image file. The image data supposedly remains untouched, but the risk of damage to the original data is nevertheless increased using this method.
[74] In reality, cameras deliver images with only 12 or 14 bit color depth. Only a few medium format cameras provide true 16 bit color depth.
[75] For details, see What are RAW Files?.
[76] Bibble, Canon DPP, Nikon Capture NX, DxO, Lightroom 3, and ACR (as of 6.1) all include this type of function.