
Working with analog and digital cameras is similar in many ways, but you need to understand the differences in order to provide yourself with the best possible material for feeding your digital workflow. Good framing and correct exposure are critical to the success of any photo, and the old maxim “garbage in, garbage out” is still relevant in the digital age. This doesn’t mean you should trash your snapshots, but it does mean that turning a sloppily-shot photo into a great image will involve a lot of work in the digital darkroom.
JPEG is currently the most commonly used digital image format and produces highly compressed image files. Unfortunately, the JPEG format produces an appreciable loss of image quality, even at lower compression rates.[5] With JPEGs the camera adjusts white balance, sharpness, noise, and contrast in the camera. This is useful for hobby photographers who want to produce an image as simply as possible, but it robs others of the opportunity to correct their images in a controlled fashion later. These automatic adjustments reduce image quality before we even begin our own processing.
JPEG stands for the “Joint Photographic Experts Group” that invented the format.
JPEG is fine for images that are not due for much further processing. This is often the case in the consumer market, but seldom the case for ambitious hobby or professional photographers – although there are situations when even a professional needs to resort to a quick JPEG solution.
Some digital cameras use the alternative TIFF format or a proprietary RAW format in order to produce the best possible image quality. In the course of the book, we will demonstrate how RAW provides the best material for flexible image processing.
If you end up using JPEG or TIFF for your images (e.g., if your camera offers bad or no RAW support), you can still use most of the steps described here to process your images. Only the RAW conversion step is no longer relevant, as this is performed automatically in-camera. All of the remaining steps apply to both JPEG and TIFF image files. Even if you don’t shoot RAW images yourself, you should understand the concept of RAW.
In order to understand the advantages of RAW, you need to understand how most modern digital cameras work. All new digital cameras capture color photos, right? Well, not exactly. While you ultimately get color images from a digital camera, most modern digital cameras use sensors that record only grayscale (brightness or luminance) values. (The Foveon X3 sensor, some digital scanning backs, and multishot digital backs are exceptions.)

Let’s take a box of Crayola crayons as an example (Figure 1-4). A grayscale sensor would see the subject as it looks in Figure 1-5; that is, it would see only shades of gray. But how do you use a grayscale sensor to capture color photos? Engineers at Kodak came up with the color filter array configuration illustrated in Figure 1-6. This configuration is called the Bayer pattern after the scientist who invented it back in the 1980s. (Other pattern variations are used as well, but this is the basic technology used in most CCD and CMOS image sensors.) The yellow squares in the grid shown in Figure 1-6 are the photoreceptors that make up the sensor; each receptor represents one pixel in the final image. Each receptor sees only the red, green, or blue part of the light that passes through the color filter just above the sensor element.
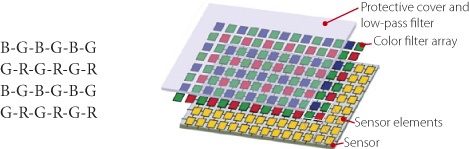
You will notice that 50 percent of the filter elements (and thus the receptor elements) are green, while half of the remainder (25 percent each) are red and blue. This pattern works because the human eye can differentiate between many more shades of green than it can red or blue, which is not surprising when you consider the number of shades of green in nature. Green also covers the widest part of the visible spectrum. Each receptor in the sensor captures the brightness values of the light passing through its color filter (see Figure 1-5), and each pixel therefore contains the information for just one color (like a mosaic). However, we want our photo to have full color information (red, green, and blue) for every pixel. How does that magic happen? A software trick called Bayer pattern demosaicing, or color interpolation, adds the missing RGB information using estimates garnered from the color information in neighboring pixels.

Demosaicing is the method used to turn RAW data into a full-color image. A good demosaicing algorithm is quite complicated, and there are many proprietary solutions on the market.
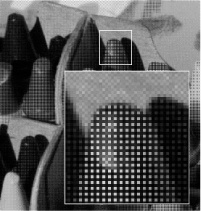
The challenge is also to resolve detail while at the same time maintaining correct color rendition. For example, imagine capturing an image of a small black-and-white checkered pattern that is small enough to overlay the sensor cells, as in Figure 1-8.
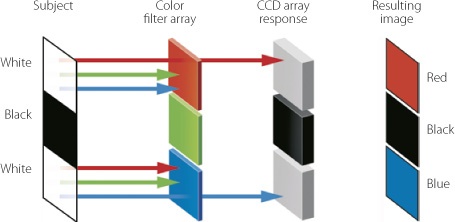
Figure 1-8. A Bayer pattern image sensor with its erroneous color interpretation. An AA filter is positioned in front of the color filter array in order to correct this problem.

White light consists of red, green, and blue rays, and the white squares in our example correspond exactly to the red- and blue-filtered photoreceptors in the sensor array. The black squares, which have no color information, correspond to the green-filtered photoreceptors. So for the white squares that are aligned with red photoreceptors, only red light passes through the filter to be recorded as a pixel.[6] The same is true for the blue photoreceptors.[7]
Color interpolation cannot correct these pixels because their neighboring green-filtered photoreceptors do not add any new information. The interpolation algorithm would not know whether what appears to be a red pixel is really some kind of “red” (if white light hits the red filter) or “blue” (if white light hits the blue filter).
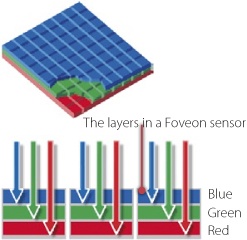
Contrast this with the Foveon sensor technology illustrated in Figure 1-10. Instead of a Bayer pattern, where individual photoreceptors are filtered to record a single color each, the Foveon technology uses three layers of receptors so that all three color channels are captured at the same photosite. This allows the Foveon sensor to capture white and black correctly without the need for interpolation.
The resolution captured by a Bayer sensor would decrease if the subject consisted of only red and blue tones because the pixels for the green channel could not add any information. In the case of monochromatic red or blue tones (those with very short wavelengths), the green photosites receive absolutely no information. However, such colors are rare in real life, and even when the sensor samples very bright, saturated reds, some information is still recorded in both the green and (to a much lesser extent) the blue channels.
A Bayer pattern sensor needs a certain amount of spatial information in order to correctly estimate a color. If only a single photosite samples red information, there will be no way to reconstruct the correct color for that particular photosite.
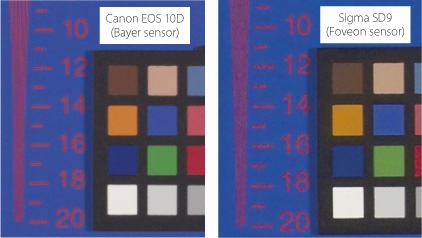
Figure 1-11 illustrates a test we made in a studio to demonstrate the loss of resolution that a Bayer sensor causes when capturing monochrome colors. Notice how blurred the text in the Canon image is compared to that in the Sigma image. These test photos show an extreme situation because a Bayer sensor cannot really capture the transition from blue to red at a pixel level. Although this type of error is less dramatic in real-world situations, it is still visible and cannot be ignored. Increasing sensor resolution helps to diminish the effect.
Some of the challenges that interpolation algorithms face include image artifacts, such as moirés and color aliasing (displayed as unrelated green, red, and blue pixels or discolored image areas). Most camera manufacturers combat aliasing problems by positioning an anti-aliasing (AA) filter in front of the sensor. This filter, also called low-pass filter, blurs the image and distributes color information to neighboring photosites. Needless to say, deliberate blurring and high-quality photography are strange bedfellows, and finding the right balance between blurring and aliasing is a true challenge for camera design engineers.
AA filtering reduces the effective resolution of a sensor, so some fairly strong sharpening is often needed during the RAW workflow. Re-sharpening performed after anti-aliasing is known as compensatory sharpening.
The task of creating a high-quality image from the data recorded by a sensor is a complicated one, but it works surprisingly well.[8] Every technology has to struggle with its inherent limitations, and digital photography is nowadays superior to analog photography in some respects due to the fact that analog techniques also have their own limitations.
Now we know that RAW data is the representation of the grayscale values captured by the individual elements in an image sensor[9]. The data then has to be interpolated and transformed to produce a color image. For JPEG and TIFF images, the conversion of RAW data is performed by the camera’s firmware before the image is saved to the memory card.
Firmware is hard-coded (i.e., non-changeable) software. Most cameras allow you to update their firmware.
What are the limitations of shooting in JPEG instead of RAW format?
JPEG artifacts caused by data compression
Although many high-quality image sensors deliver 12-bit or 14-bit per pixel image data, JPEG image files only record 8-bit data
Although RAW data conversion requires a lot of computing power, the power of the camera’s CPU is limited. Using a computer is therefore a more powerful and flexible approach to RAW conversion, especially considering that computers are getting faster all the time, while a camera’s CPU cannot be enhanced or updated. Conversion algorithms are improving too, and a software update on a computer is easier to perform than a camera firmware update.
A great many automatic and manual settings (such as white balance, contrast, tonal value corrections, sharpness, and color interpolation) are automatically built into the image data by the camera. This limits later correction potential because each automatic correction reduces image quality. This is especially true if you are working with 8 bits per color channel.
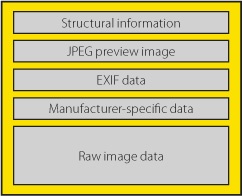
Various RAW image formats can now be defined. A RAW file saves the raw data from the image sensor as well as the file’s EXIF metadata. EXIF data includes information about the camera and lens used to shoot the image, as well as information about the aperture, the shutter speed, the ISO value, and various other aspects of the camera settings that were used. This information helps us to make adjustments to our image manually that would otherwise be made automatically in the camera.
The advantages of shooting in RAW format are:
No loss of image quality due to JPEG compression
Full use of the 12-bit or 14-bit image data captured by the camera’s sensor
Potentially much more sophisticated RAW conversion (for example, using Adobe Camera Raw, Lightroom, or other specialized software)
Corrections to white balance, color rendition, sharpness, noise, and dynamic range can be made later in a controlled, computer-based environment
A RAW file is largely equivalent to an undeveloped analog negative and can be similarly pushed at the “development” stage in order to compensate for exposure errors. RAW conversion software is continually improving, helping us to improve our results.
A JPEG image produced in a camera is like a Polaroid photo – you can see the results immediately but you can’t change anything. High-quality RAW editors, such as Capture One Pro, Lightroom, Adobe Camera Raw, or RAW Developer can be configured to work something like your own secret chemical recipe for developing analog film.
What are the advantages of 14-bit color depth? When you perform major corrections to white balance, color, contrast, or perspective, every operation causes a loss of data bits due to rounding errors. These errors are additive, so the more image data you have in the first place, the better you can compensate for data loss during processing.
Most output devices can only reproduce 8 bits per color channel anyway.
What happens if you shoot your images in TIFF format? TIFF image files behave basically just like JPEG files, but are not subject to the image quality loss caused by JPEG compression. Image data is reduced to 8-bit, but the image files are nevertheless larger than equivalent RAW files because RAW saves 12-14 bit grayscale pixel data, whereas TIFF saves 24 (3 × 8) bits of color data per pixel. The other advantages of RAW don’t apply to TIFF images. We are of the opinion that an 8-bit TIFF file produced in-camera offers no advantages over a mildly compressed JPEG file.
Today’s image sensors usually interpolate color information using a Bayer pattern sensor and do not capture full RGB image data for every pixel. This results in a slight loss of image sharpness. The Foveon X3 sensor described above shows that other solutions are possible.
What happens when a fine red line passes through a green image area and doesn’t touch any of the neighboring sensor photosites? The line wouldn’t appear at all in a RAW image file. Most digital cameras combat this type of phenomenon by using an AA filter placed in front of the image sensor. An AA filter diverts the light reaching the sensor slightly so that it is also registered by neighboring photosites. In our case, neighboring photosites would then see parts of the red line.
An AA filter therefore cures one problem and creates another in the form of reduced image sharpness. Such images have to be more strongly sharpened in the course of the RAW workflow.[10] Detail that is lost due to an AA filter cannot be reconstructed later, regardless of how clever your sharpening tool is. AA techniques nevertheless deliver results that are generally better than our description of the problem might lead you to believe.
[5] There is also a “lossless” version of JPEG available, but this is seldom used. “Image quality loss” means that the image data is simplified in order to save memory space. Every time a JPEG image is saved, it loses additional image data that cannot be accurately rescued later.
[6] Where white light hits the red filter
[7] Where white light hits the blue filter.
[8] Experience shows that some high-end Canon and Nikon DSLRs do this job very well.
[9] for a normal sensor with colored filters
[10] This effect is also just as evident if you shoot in JPEG or TIFF formats.