
Select either RAW mode (check your camera manual to see how) or JPEG with the highest possible resolution and the lowest possible compression rate. RAW files use much more memory than JPEG files, regardless of whether your camera uses CF, SD, xD, or Memory Stick cards.
CF = CompactFlash, SD = Secure Digital, SDHC = Secure Digital High Capacity. These are the most common memory card technologies in current use.
Correct exposure is the key to great photos. Overexposure should be avoided at all costs, as washed-out highlight detail cannot be recovered at any stage during the workflow.
Note
![]() Digital image sensors are more sensitive to overexposure than film and clip highlights much more drastically.
Digital image sensors are more sensitive to overexposure than film and clip highlights much more drastically.
In order to help you judge exposure, digital cameras allow you to check your exposure visually on the monitor immediately after shooting. Nearly all digital cameras – at least all DSLR cameras – have a histogram display that shows the distribution of tonal values within the image from 0 (black, on the left) to 255 (white, on the right).
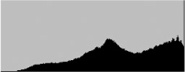
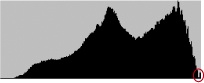
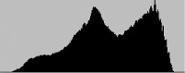
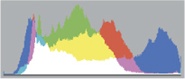
On the next page are four sample histograms produced using Photoshop that show three typical curves.
The histogram in Figure 1-13 shows an overexposed image with obviously clipped highlights at the right end of the graph. This image will lack highlight detail. Images that display a histogram like this are generally only good for deletion. Some photographers recommend using the Photoshop Burn tool to darken images like this, but the tool only simulates detail that wasn’t actually present in the original image.
The histogram in Figure 1-14 shows only a small overexposed peak on the far right. The actual subject will dictate whether this amount of highlight clipping is acceptable or not. If the clipped highlight is pure white or represents a less important image detail, the photo might be OK. Otherwise, it may be safer to ditch it and re-shoot.
The histogram in Figure 1-15 is of a balanced exposure. The missing tonal values at the white end of the scale can be reconstructed using Photoshop. You should always aim to produce images with histograms that look similar to this one – i.e., with an even, unclipped grayscale “mountain” as far towards the right-hand end of the graph as possible. This approach is often described as “exposure to the right”.
The next section will clarify why it is better to underexpose than to risk losing highlight detail, especially as it is often difficult to view and judge a histogram correctly in bright light or on the road.
Note
![]() Remember that the monitor image and the image represented by the camera histogram are in JPEG quality and have already been subjected to a RAW-to-JPEG conversion by the camera’s firmware. If you are shooting in RAW mode, your computer-generated histograms and the resulting images (e.g., in a RAW editor) will often look different from the ones the camera displays while shooting.
Remember that the monitor image and the image represented by the camera histogram are in JPEG quality and have already been subjected to a RAW-to-JPEG conversion by the camera’s firmware. If you are shooting in RAW mode, your computer-generated histograms and the resulting images (e.g., in a RAW editor) will often look different from the ones the camera displays while shooting.
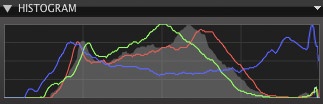
A good luminance histogram displays only the distribution of brightness values and can belie detail clipping for individual colors. Histograms for the separate color channels help in such situations – a feature offered only by a few high-end cameras.
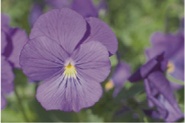
The histogram in Figure 1-17 is of an image shot using a Canon EOS 10D and shows the typical color saturation problems associated with yellow, orange, or blue flowers. Such subjects will generally not use the entire range of tonal values in a luminance histogram. The color histogram in Figure 1-17 (produced using Adobe Camera Raw) clearly shows the clipping that occurs at the right end of the blue curve.
The Capture One multi-channel histogram in Figure 1-19 also indicates clipped colors. The blue clipping was not visible in the camera histogram because it only shows the average (luminance) values for all three color channels.
A color histogram only helps if you are in a position to re-shoot your image using different exposure values. This is often possible for nature photos (with the exception of birds or other animals). Unfortunately, even the most sophisticated automatic exposure systems cannot guarantee optimum exposures. Histograms offer a more reliable way to judge exposure, even for experienced “old-school” photographers who are used to using light meters. You can compensate for overexposure by adjusting your exposure value (EV) setting and repeating your shot. You should always keep an eye on the histogram, and we strongly recommend that you set your camera to display a histogram automatically after each exposure.
EV = Exposure Value
If you use a tripod, it is easier to use your own manual exposure settings than the camera’s exposure compensation dial. The correct settings for a particular scene don’t usually change that often, and automatic exposure metering systems often adjust exposure randomly for differently lit objects within a single frame.
White balance (WB) settings are the key to correct color reproduction. They have to allow for direct and indirect (reflected) light sources.
Analog photographers adjust white balance either by changing the film they use or by attaching colored filters to the camera lens. This compensates for differing lighting conditions (indoors, outdoors, cloudy sky, flash, etc.).
If you shoot in RAW format, you can adjust white balance later during processing. Fine art photographers are not necessarily interested in absolute color reproduction anyway (why else would you want to use Velvia slide film, with its over-the-top candy colors?), but most of us are interested in the subjective mood of a photo, which is often carried by the colors.
DSLRs allow you to select your preferred white balance setting while shooting.[12] This is a great feature, but it is not always practical to use in real-life situations. We recommend that you set white balance to automatic and correct it later (if necessary) during the workflow.
An alternative method of ensuring consistent white balance is to photograph a gray card[13] in the same light as your subject and use the resulting image as a reference for your white balance setting.
Getting white balance right is a tricky and largely subjective process, but you will get better at judging color and color settings with increasing experience.
Color value judgements depend on the overall mood of an image. Images that show too many cold (blue) tones can benefit from additional warm (yellow or red) tones, although you may find yourself wishing that a warm image includes more neutral (blue or green) tones. Color experiments and corrections involve time and effort during the image optimization process.
There is a big difference between correct colors and pleasing colors. There are only few situations in which we want to reproduce colors completely faithfully – for example, if we are photographing textiles or products for publication in catalogs. In most other cases, we aim to produce a pleasing color composition. The most frequently discussed (and culturally influenced) aspect of color is skin tone. In Europe and the USA, people generally prefer skin tones that have been shifted slightly towards brown, whereas Asian photographers tend to prefer paler skin tones.
Select a white balance setting that you like and correct contrast and color selectively and only where genuinely necessary. This might involve correcting skin tones, but can also mean changing the dull blue of a sky or the blue tones in shadows that are often produced when you shoot in bright sun.
Color perception is subjective and depends to a great extent on personal taste. The default settings in different RAW editors produce different results from the same source image, which is why some people prefer one particular software package over another. These types of differences are also evident in JPEG images produced by the camera, as they too are subject to the manufacturer’s proprietary, firmware-based RAW conversion.
This is why many newer RAW editing programs offer multiple camera color profiles,[14] so that every user can select his/her favorite (with stronger or weaker or more neutral colors) as the default. These profiles nevertheless only form the basis for subsequent optimization.
Modern digital cameras allow you to select the ISO value for each situation using a dial or a button. This is a great advantage over analog photography, which requires either a film change or special development in order to alter the sensitivity base.
Generally, the lower your ISO value, the less noise your photos will display, resulting in better image quality. Higher ISO values always produce more noise, which takes on various forms and is usually more evident in darker image areas. Image noise is caused by charge differences between the individual elements of the image sensor that result from static, manufacturing tolerances, signal amplification, and other, similar factors.
High sensor temperatures also increase noise. If you are shooting in high ambient temperatures, keep your camera cool and don’t leave it switched on for longer than absolutely necessary. The levels of noise a camera produces also depend on the type of sensor it uses. Small image sensors produce more noise than larger sensors, and CCD sensors produce more noise than their CMOS counterparts because they use more power and therefore have higher operating temperatures. Greater sensor resolution for a similar sized sensor reduces the per pixel sensor area, which also leads to increased noise – technical advances in recent years have helped to keep noise levels down in spite of increasing sensor resolution.
Grainy, “salt and pepper” noise effects are generally more acceptable to us because they look similar to the grain effects we know from analog film material.
If you find yourself needing to use higher ISO values (for instance, in low light or for fast-moving subjects) we advise you to use the best possible noise reduction tools during processing. (See also Reducing Noise Without Losing Detail onwards.) We usually deactivate in-camera noise reduction, as it not only slows down in-camera image processing but also tends to blot out fine image detail. If noise reduction is really necessary, you can perform it in a much more selective and controlled fashion by using a RAW editor or Photoshop plug-ins.
We also nearly always deactivate Auto ISO. This feature allows the camera to automatically increase the ISO value if it thinks the situation demands it. This can be useful for sports photography or other fast-moving subjects, but it often produces unexpected, unwanted noise effects.